|
|
Post by Oldtimer on Aug 24, 2019 15:33:26 GMT -8
One other area that needed attention was the trunk and the fuel cell filler and vent. This is the top of the fuel cell from the Hamilton donor in the trunk of the Belvedere.  Clearly I need to get from the end of the black hose through the trunk and left rear fender. Initially I considered just a scabbed piece to close the internal gap.    That would be a cop-out, as I have this nicely defined port on the left rear fender.  So I drilled all the way through the bodywork, and the trunk.  Created a longer transition piece out of thin wall aluminum tubing that picks up the black plastic hose to the fuel cell.  And then finished it all out with a vent tube from the top of the fuel cell, routed to an outlet in the left rear taillight.    |
|
|
|
Post by Oldtimer on Aug 25, 2019 9:59:12 GMT -8
Got the spring shackles fabricated, 1/8" x 3/16" solid styrene rod, cut 1/4 inch long, with a 3/64" hole drilled lengthwise, secured by a 0-80 x 1 inch screw (I ran out of 0-80 nuts, so had to order them) which I will cut down to length. I'll paint the "shackles" black before final fabrication.  Wanted to set the body down and check how it looked, but with the fuel cell mocked up in the trunk, the screws are too long and interfere. Hopefully the nuts will show up this week, and I'll able to get this chapter closed. Although, now that I know how to change rear ride height (and rake), I may go back and attack the front. |
|
|
|
Post by Oldtimer on Sept 14, 2019 20:53:12 GMT -8
Now, for the weekend update. I'm Chevy Chase, and You're Not! Anyway, been working, off and on, trying to get some details done. Built a package tray out of really thin aluminum sheet. Don't have pictures of the structure underneath required to bring it up to the correct height, but trust me, it was clearly a "Hold My Beer" process.  For a reason that defies logic, the steering column of the Superbird was diecast, and damned brittle at that! It shattered into more pieces than I prefer to count, but I was able to salvage the hockey stick that actuates the steering and the plastic steering wheel.  I have fabricated a steering column out of brass tubing, along with a collar to match up the steering wheel to the column. Again, didn't take a lot of pictures, but trust me, considerable brass tubing was sacrificed to get to this point.  I also needed to relieve the cockpit footwell (which includes the cage from the Superbird), and the firewall (from the Belvedere) in order to get the alignment. And then, re-attaching the firewall, to the Superbird chassis, with the Belvedere firewall to match the body, required some ingenuity. I have become an advocate of using pins to connect pieces (my "pins" are actually pieces of paper clips). Here's how the firewall is attaching. 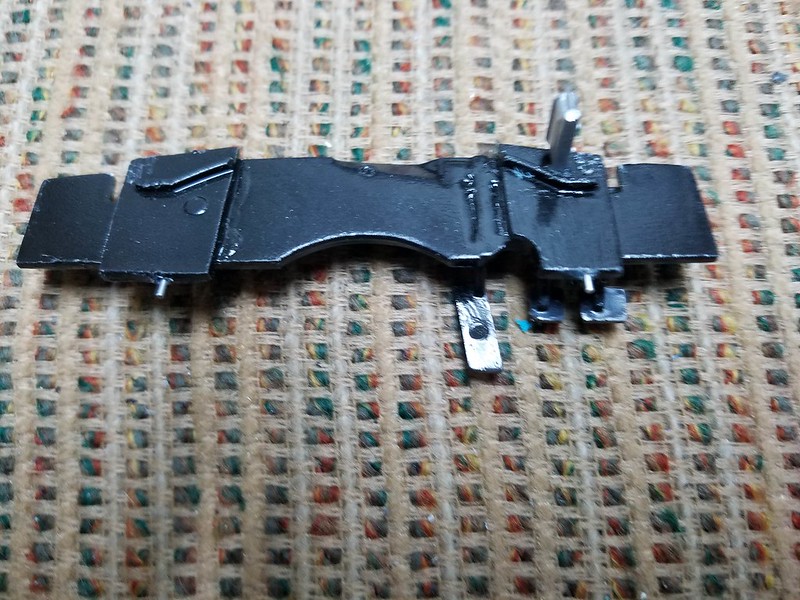
You can see the holes I drilled into the chassis to accept the pins. 
And here it is, assembled.  |
|
|
|
Post by Joel_W on Sept 15, 2019 6:16:14 GMT -8
Jim,
nicely done fabrication on the fuel and overflow lines. As for the steering wheel and shaft, I'd say yours looks better then the original diecast one.
Joel
|
|
|
|
Post by Oldtimer on Sept 16, 2019 8:22:52 GMT -8
Wrapping up the Weekend Update with a lot of progress. Here is a picture of the front of the engine compartment, with the cage tube coming around in front of the radiator, and a piece of brass channel to fill in a gap.  Here we are with that fabrication completed.  Essentially, I had to take about a 1/4 inch slice out of each horizontal tube, and used my post technique to rejoin them.  And then for the chassis attachment, I drilled two holes where the cage mounts meet the frame rails, and then drilled two more smaller holes in the brass channel (now painted gloss black to match the rest of the engine compartment).   Ending up with what I feel is a reasonable solution.   The bar coming around the front of the radiator is actually critical as it locates the height of the body at the front. |
|
|
|
Post by pnance26 on Sept 16, 2019 19:07:52 GMT -8
Nice problem solving on all counts!
|
|
|
|
Post by Joel_W on Sept 17, 2019 4:54:10 GMT -8
Outstanding progress. Your solution for the front cage bar came out perfect.
Joel
|
|
|
|
Post by Oldtimer on Sept 17, 2019 5:57:23 GMT -8
One other work in progress is the fuel cell/fuel filler set up. As you can see, there is a gaping hole where the stock gas cap used to be.  Here's the pieces that need to fit.  The outlined piece is actually multiple diameters of different tubing sizes, all cut to the same length, with ends clearanced so that they fit inside each other. This is what I hope to build a realistic looking fuel filler with cap. This is the trunk with the fuel cell and fuel hose mocked up.  This is what I did last night while my wife watched this season's premier of Dancing with the Stars. This is the largest diameter aluminum tube, JB Welded in place.  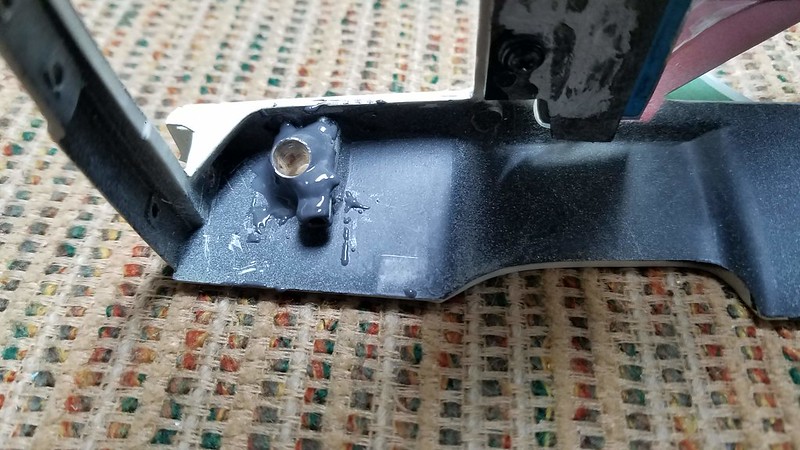 I'll clean this all up with a Dremel sanding drum, and get the outside back to the proper body contour, and clean up the inside so that the tube just touches the edge of the trunk. After that, I will start staging the other tubing sizes to create the effect I am looking for. |
|
|
|
Post by Joel_W on Sept 17, 2019 12:51:44 GMT -8
Jim,
The Fuel filler pipe and cell really is looking quite good. I'm impressed to say the least.
Joel
|
|
|
|
Post by Oldtimer on Sept 19, 2019 6:04:21 GMT -8
Forgot to take a picture of the cleaned up outside, but was so excited about how well it looked I took off on the next step. Here is a picture of the next size smaller tubing (brass in lieu of aluminum) that will be the transition piece to the plastic "fuel hose" attached to the top of the fuel cell.  And then, after a lot of trimming, a new longer and radiused brass piece, and some fore and aft shifting of the fuel cell top, here's where we are this morning. The extra brass tubing on the outside of the fender will be ground down flush with the bodywork.    One thing to notice is that the rear package tray is not installed (for ease of multiple iterations of body/chassis separation), but that it forms an integral component in body height location, which also influences trunk location. I am hoping that when I do a semi-final dry fit of everything tonight that I'm still close. |
|
|
|
Post by pnance26 on Sept 20, 2019 5:17:13 GMT -8
Did the fuel filler stick out that far in 1964? I'm not old enough to recall... or maybe I am jumping the gun and it will be flush in the finished project...
|
|
|
|
Post by Oldtimer on Sept 20, 2019 5:50:23 GMT -8
Did the fuel filler stick out that far in 1964? I'm not old enough to recall... or maybe I am jumping the gun and it will be flush in the finished project... "The extra brass tubing on the outside of the fender will be ground down flush with the bodywork." Here's where I ended up last night.  
Unfortunately, something has gone terribly wrong with the rake of the body as it sits on the chassis. I fit and refit everything several times last night, and this is the best I could get.  As compared to prior.  Going to require more research and development. |
|
|
|
Post by Joel_W on Sept 20, 2019 8:00:48 GMT -8
Jim,
The fabrication on the fuel filler line is really excellent. Could the issue with the rake be somehow due to the filler line pushing the body out of proper position?
Joel
|
|
|
|
Post by Oldtimer on Sept 20, 2019 12:10:12 GMT -8
Jim, The fabrication on the fuel filler line is really excellent. Could the issue with the rack be somehow due to the filler line pushing the body out of proper position? Joel I think the trunk is shifting, somehow. I tried putting a piece of styrene shape under it to lift it up, but didn't seem to do much. I'll take it apart about a dozen more times to see. This was a lot easier when I was building real ones. |
|
|
|
Post by Joel_W on Sept 20, 2019 13:36:44 GMT -8
Jim,
Betcha it wasn't easier with the real thing. Our brains tend to only remember the good times, and not so much the bad times, even when they do, they just don't seem so bad now.
I'm completely confident in your abilities to solve this problem sooner then later.
Joel
|
|


