|
|
Post by Ben_B on Feb 11, 2020 12:24:39 GMT -8
I guess All Japan Championship cars belong here? Anyway, this is the Tamiya Honda NSX kit. It was released in several different liveries, with different engine intakes, wheels, and wings. This particular one is the Raybrig kit, molded in purple. I wanted to build the Castrol car, with its green, black, white, and florescent red livery, but that kit is long out of production and very expensive when you find it. Shunko has released new decals for the car, and the Raybrig version is the only other version of the kit with the correct wheels and intake. The only aftermarket is the seat belt buckles from Pro Tech, with painted medical tape belts. I'll add the belt logos when I do the other decals. Paint is Tamiya white white primer and gloss black, both from the rattle can, and MCW Castrol Green left over from an Indy Reynard build many years ago. The wings and dive planes have a lot of ejector pin marks, but that's really the only complaint I have about the kit. I'm hoping to start applying the decals in the next week or so.    Ben |
|
|
|
Post by afx on Feb 11, 2020 17:12:15 GMT -8
I think you have your project classified correctly Ben. Look forward to seeing it come together.
|
|
|
|
Post by robhart on Feb 11, 2020 17:45:14 GMT -8
Nice work. Is it a full detail kit?
|
|
|
|
Post by arcticwolf on Feb 11, 2020 18:24:02 GMT -8
Cool car. Interested to see the finished colour scheme.
|
|
|
|
Post by Joel_W on Feb 12, 2020 6:40:03 GMT -8
Ben,
Interesting build for sure. I've never really seen a build of this kit before. Tamiya's added detail looks convincing enough from the top looking down. I'm guessing that it's a sort of curbside kit with little to no suspension.
Can't wait to see the decaling finished.
Joel
|
|
|
|
Post by Ben_B on Feb 12, 2020 10:52:35 GMT -8
Thanks! I had a heck of a time finding any online builds for this one. It's not a well-known subject, I guess, although this car is on the Gran Turismo game. The kit includes a full engine/transmission, radiator, and good representation of the suspension. Not really a curbside kit, but builds as quickly as one. Here's mostly what it's supposed to look like when it's finished. The wing is different and livery is slightly different from the kit. I actually prefer this set-up to the bi-plane wing I'm building. 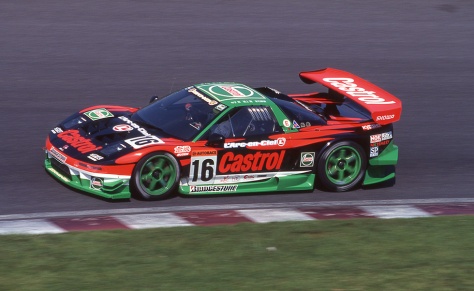 Ben |
|
|
|
Post by Joel_W on Feb 14, 2020 6:44:15 GMT -8
Ben,
Looking forward to seeing your build in that paint scheme. It surely will be stellar.
Joel
|
|
|
|
Post by Ben_B on Feb 14, 2020 10:08:34 GMT -8
Thanks, Joel!
I just painted the wing parts with Mr Color fluorescent red. It covers much better than the Tamiya version decanted from the rattle can. The wing parts are bright!
Ben
|
|
|
|
Post by Joel_W on Feb 14, 2020 12:53:42 GMT -8
Ben,
Sure sounds like I'm going to be needing my sun glasses when you post those pictures.
Joel
|
|
|
|
Post by Ben_B on Feb 24, 2020 12:59:52 GMT -8
Making progress on the NSX! I just have to go back and repaint part of the wing and add some decals to it. Then it will just be a matter of putting it all together. The photo doesn’t do the Day Glo justice. I used the kit’s backward tire logos without screwing any of them up, but they were so old they rolled up as they dried. I glued them down with Future, but I may just order some replacements from Spot Model. Ben |
|
|
|
Post by afx on Feb 24, 2020 16:02:00 GMT -8
That is a striking livery Ben - looks great!
|
|
|
|
Post by Chris K. Hale on Feb 24, 2020 19:36:55 GMT -8
|
|
|
|
Post by Joel_W on Feb 25, 2020 6:48:57 GMT -8
Ben,
Wow!!
Buddy, you really nailed that paint scheme. Looks tremendous, as does the glass, interior, and tires. And speaking of the tires with those reversed decals, I've never really understood the correct way to apply them. Yours looks absolutely perfect. Could you please explain how you go about applying them, I'd really appreciate it.
Joel
|
|
|
|
Post by Ben_B on Feb 25, 2020 8:53:25 GMT -8
Thanks everyone! It's a very good kit, so it doesn't take much skill to make it look good. Joel, I am by no means an expert on those weird tire decals and have mostly been able to avoid them. These look okay by sheer luck. Best I can tell, they're like Clear-Fix airplane decals from the '90s. You lay it down where you want the decal, wet the paper from the back, press it down for a couple of minutes, and hope for the best. Fujimi's have each letter separate, while these Tamiya decals have a film connecting all of the letters. I managed to completely botch the ones in my Fujimi 917, so I went with Indycals, and I've used aftermarket decals for the logos on all of my other builds. I may order some Potenza decals from Spot Model if these start to peel off again. Here's a Youtube video that shows how to do it, but I'm still confused: Video 1 I think I was supposed to peel off the film, but the letters were firmly attached to it and they dried like regular decals. Ben |
|
|
|
Post by Ben_B on Feb 25, 2020 14:28:18 GMT -8
Update: I found another explanation on how to do the decals: link
I think I may have Futured the clear carrier to the tires!  Live and learn! Ben |
|


 Live and learn!