|
|
Post by pnance26 on Jan 17, 2021 6:42:43 GMT -8
I hate to tell you this but the actual car had red needles on the instruments and yours has white! How could you?
Actually, it all looks very good and very well done! I was having a little fun with you!
Can't wait to see the rest of it!
|
|
|
|
Post by tartan54 on Jan 18, 2021 7:00:32 GMT -8
Mea culpa Patrick, I don't think BMW used Smiths gauges either! Although the restored car does have some white needles on the large gauges.......
Dave
|
|
|
|
Post by tartan54 on Jan 24, 2021 3:31:35 GMT -8
Morning all, as I indicated last update I've moved on to the cockpit area which in all honesty doesn't need huge changes, just some extra detailing and a bit of bling. The floorpan was sprayed semi gloss black then weathered with grey and brown washes to highlight the raised pressings, the cars looked well used in period photo's and not the pristine items you see today. 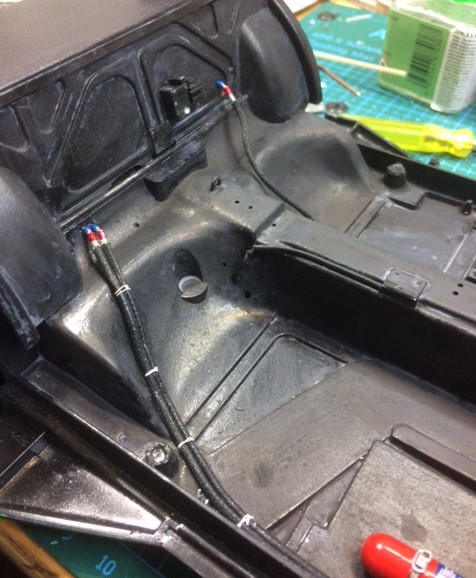 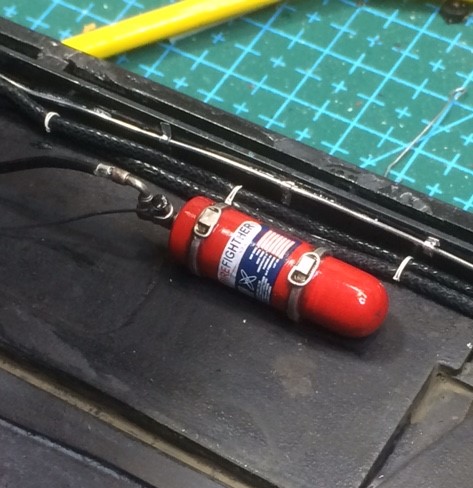 Centre console with added relay panel and wiring. 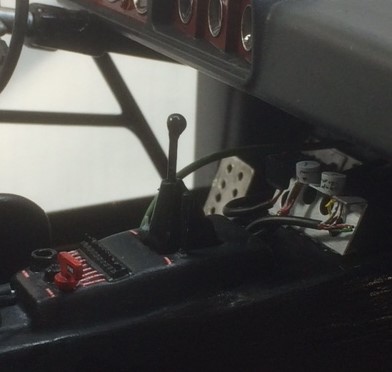 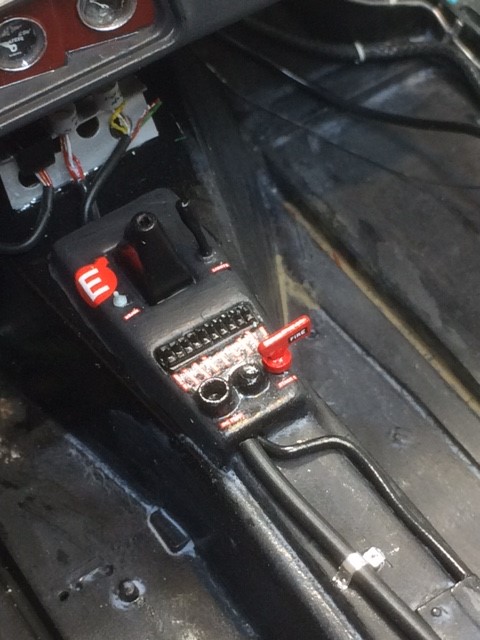  The drivers seat had some extra framing for the base and the lap belt slots cut and detailed, the belts came from MFH. 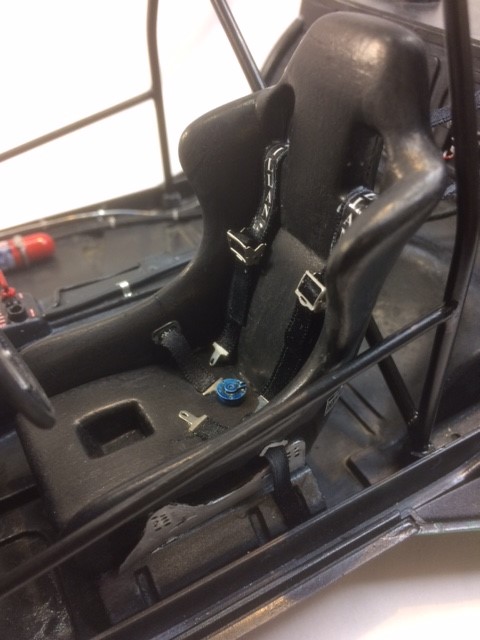 The roll cage in the kit was the wrong pattern for the Gp5 car and was also oversize so replaced by brass tube and rod, epoxied together. The kit pick up points were also in the wrong place so were filled in and on the rear parcel shelf the shock towers were improved and the cage picked up there instead of the shelf.  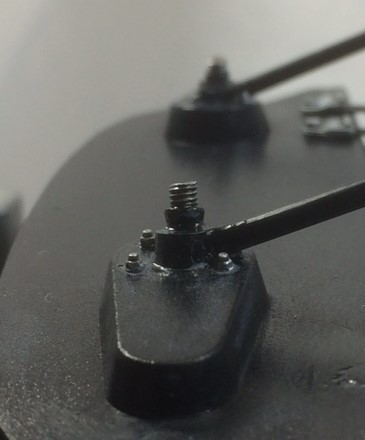  Not perfect but overall I'm happy with the look, once the body is on most of this will disappear from such close scrutiny. Dave |
|
|
|
Post by tartan54 on Feb 7, 2021 12:52:38 GMT -8
I've been avoiding the bodyshell since I did the initial modifications, I'm still learning with making cars (long time aircraft builder here) so getting a good finish on bodies is an on going learning curve. I don't help myself as I HATE airbrushing. I'm an open minded, easy going guy happy to learn new techniques but I just cannot get on with using an airbrush. My modelling time is limited and the chore of masking, mixing, cleaning, de masking when getting a brush out can do the same job in the fraction of the time just kills it for me. So going into car modelling meant I had to learn to use rattle cans if I wanted a reasonable finish! Only making cars from the 70's and early 80's is a bonus as they were never totally immaculate and didn't have the knee deep shine that seems to be the go to standard for models of more modern vehicles. Enough waffle onto what I have done with the body, at the start of this thread were some pictures of the main modification, the front air dam, here it is under a few coats of Kermit sorry Gosser green - 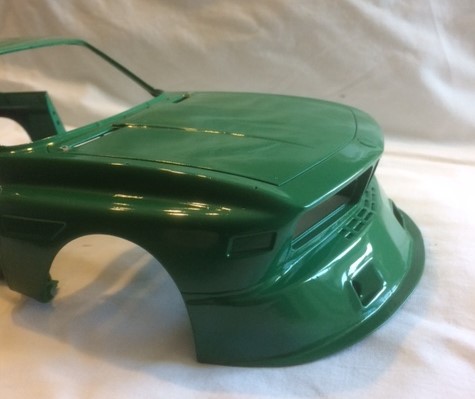 I've used a can of spray paint intended for John Deere agricultural vehicles, this has been applied over Tamiya Fine Surface Primer after a rub down with 4000 MicroMesh, it's got a good shine straight from the can and takes a couple of days to really harden but it is pretty cool here at the moment so the boiler cupboard is getting some extra use. The other major mod to the body is the new rear wing, this is a big son of a gun and the wing mounts required some scratch work with laminations of plastic card, this view shows the boot lid in place and also the new louvres over the rear wheel flare. 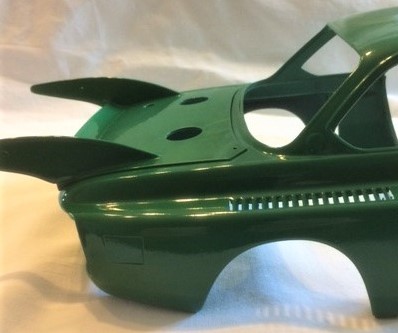 The kit body has a waist trim strip moulded in, that isn't on the Gp5 car except across the doors, so I've carved that off the wings and smoothed things out. The boot lid and bonnet (trunk and hood for my colonial colleagues) are separate items on this car, no hinges and held in place by pins and R clips, the Gp5 car also had an extra hole cut in the boot lid to access the oil tank quick fill fitting. 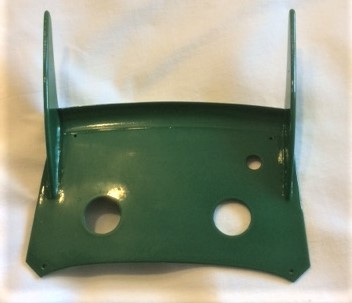 And I just had to see what things looked like with the body on - 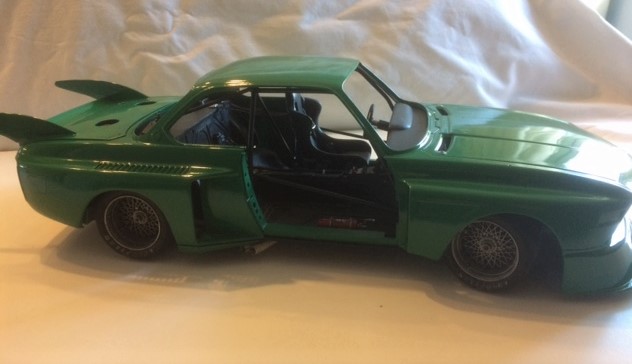 The modified ride height looks acceptable to my eye. The wheels got a bit of a makeover with MFH valves, some tyre bolts and balance weights, the Goodyear decals came from a generic decal sheet off eBay.  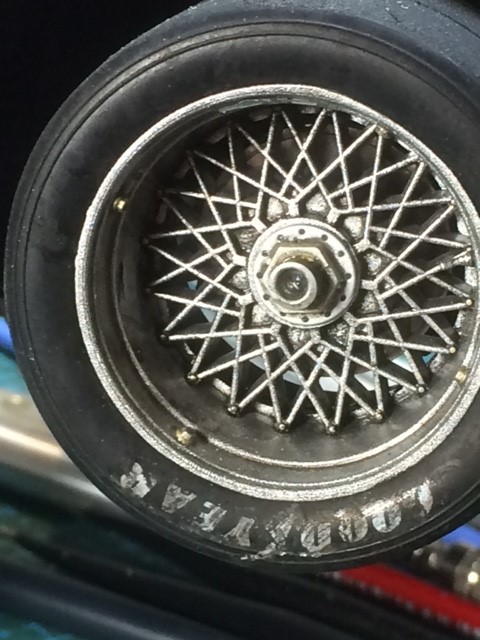 I'm waiting on a decal sheet that I've been helping out with sizes and details, I'm excited to see how this works out so next time there should be some colour to relieve the greenness. Dave |
|
|
|
Post by Joel_W on Feb 8, 2021 6:54:58 GMT -8
Dave,
I'm just blown away at your progress and your detailing. Had a hard time with several pictures trying to decide if it was the model or the real deal. Your work is that good.
As for air brushing, believe me it's nothing more then an acquired skill, which you should have no issues with. the best instructional videos on air brushing cars I've ever seen, and whose procedures I use is by Paul from International Scale Modeler. Step by step from prep to polishing out the gloss is in his Subaru Impreza & BMW M30 E3 build blogs. If I can learn how to paint cars after more then 30 years of aircraft modeling, anyone can.
Joel
|
|
|
|
Post by tartan54 on Feb 8, 2021 8:17:46 GMT -8
Thanks Joel, airbrushing isn't just the use of, it's all the time it takes, that's what kills my enthusiasm for doing it. And I know, the more I do it the quicker it will get....
Maybe I'm not that easy going open minded guy but the grumpy old stick in the mud....
Thanks again for nice comments.
Dave
|
|
|
|
Post by chrissmith on Feb 8, 2021 10:38:51 GMT -8
Your project is coming around very nicely, I am digging your weathering of the wheels and tires! Looks like they have seen a few laps.
|
|
|
|
Post by Joel_W on Feb 8, 2021 11:36:26 GMT -8
Dave,
While I love to air brush, I to hate the full setup including the paint booth exhaust line into the window, then reverse, but after a while you just get use to all of this stuff. I do plan out my painting sessions for smaller parts needing similar primers and paints, so that I only switch paints a min number of times.
Joel
|
|
|
|
Post by tatocorvette on Feb 8, 2021 13:24:59 GMT -8
I am quite ignorant on this subject, but from what I can see you are doing a great job with it!
|
|
|
|
Post by arcticwolf on Feb 8, 2021 18:02:49 GMT -8
Thanks Joel, airbrushing isn't just the use of, it's all the time it takes, that's what kills my enthusiasm for doing it. And I know, the more I do it the quicker it will get.... Maybe I'm not that easy going open minded guy but the grumpy old stick in the mud.... Thanks again for nice comments. Dave I'm with you. I don't own an airbrush and never will. 
Seriously, rattle cans are only limited by colour selection, although I admit I'd never thought of tractor paint as a source of inspiration. That being said, I love the colour. It'll look fab when it's done!
Paul
|
|
|
|
Post by pnance26 on Feb 11, 2021 6:02:32 GMT -8
Dave,
I am here to also endorse the use of rattle cans! If I could get away with it on the Ford, I would but that is such a specialized color, I have to airbrush it.
That being said, though, I did rattle can the chassis and I am not sure I like it! It may go for a bath in purple power... the rattle can was a Pearl Blue by Tamiya and even using primer, it went on very unevenly as if the plastic was resistant. I'll post photos over in the Ford thread this weekend.
So rattle cans it is on most occasions. Airbrushing is very tedious, I agree!
|
|
|
|
Post by tartan54 on Feb 26, 2021 16:03:44 GMT -8
It's been a decalfest at Coors Towers for the last couple of weeks, interrupted by home working (how very dare they?) and domestic life but my wish for some colour on the green machine has been answered. As I mentioned earlier I have been working with Frank from Taylormade Decals in Germany tailormadedecals.webshopapp.com/de/decals/auto/ to correct his sheet for this car which looked as though it was a scaled up version for a much smaller model and didn't fit very well and was also deficient in detail in many areas for a large scale model. Taylormade do their sheets in several scales. Long story short the new sheet is superb, very complete, even down to the clips holding the screens in place and BMW roundels. The sheet was originally intended for the car as it appeared at Le Mans in 76, but Frank has now included the race numbers and sponsor emblems for the Silverstone 6 Hours and Nurburgring races so it has variety and it's good value for money, I hasten to add that I have NO financial interest here only being a very satisfied customer. The decal set has two sheets, one in colour 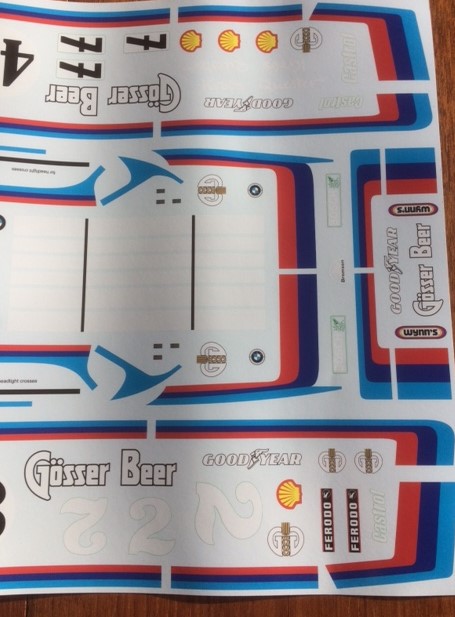 and the same again but in silver to provide a solid backing for the colour, so you do have to do the job twice! 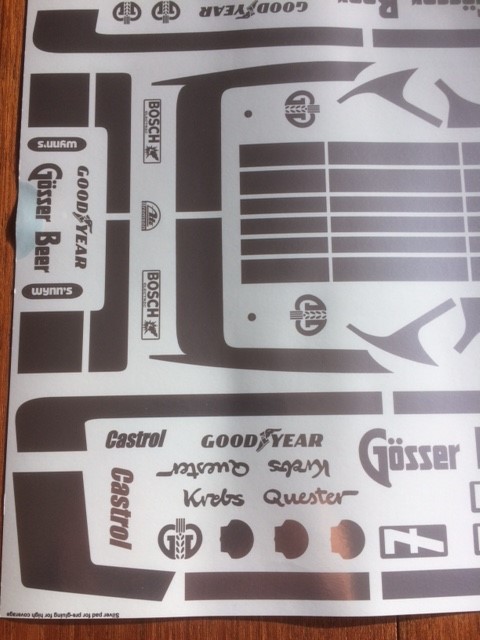 The sheet is also in one piece so each item has to be cut out and trimmed close, hence why it's been a fest! Anyway more pics, 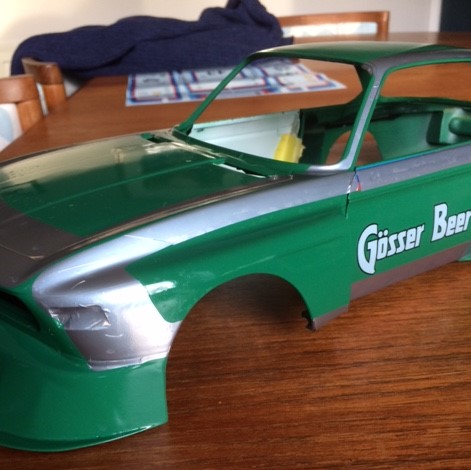 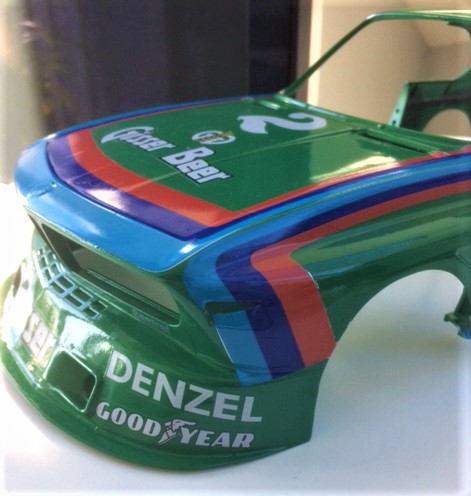 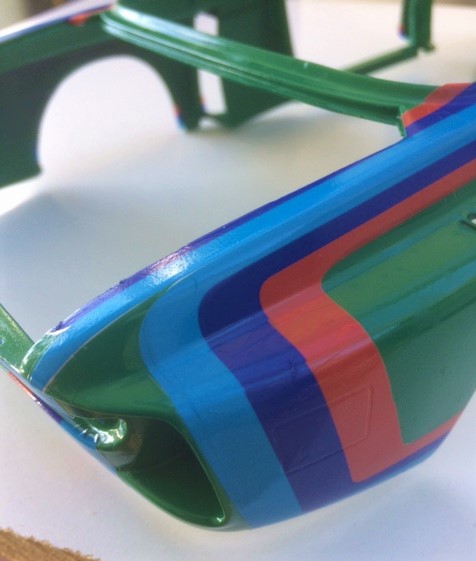 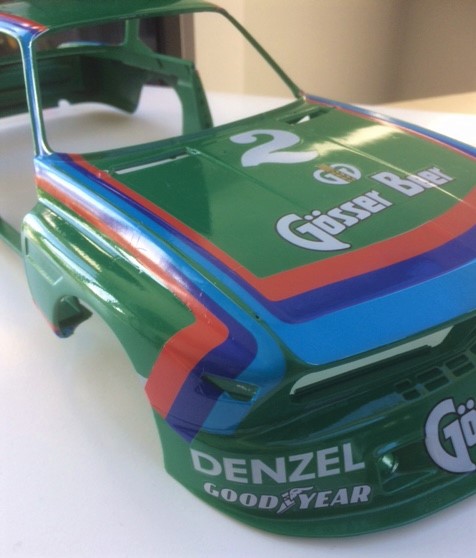 Decalling has thrown up a problem that I was vaguely aware of in that the rear arch extensions are wrong for this car, I knew they were a tad narrow but the angle of the front inlet is too acute which leaves the panel in front of the rear wheel too narrow. This means the race number on the sheet is the right height but too wide. 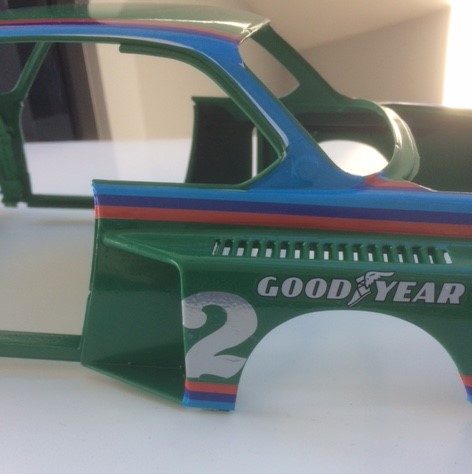 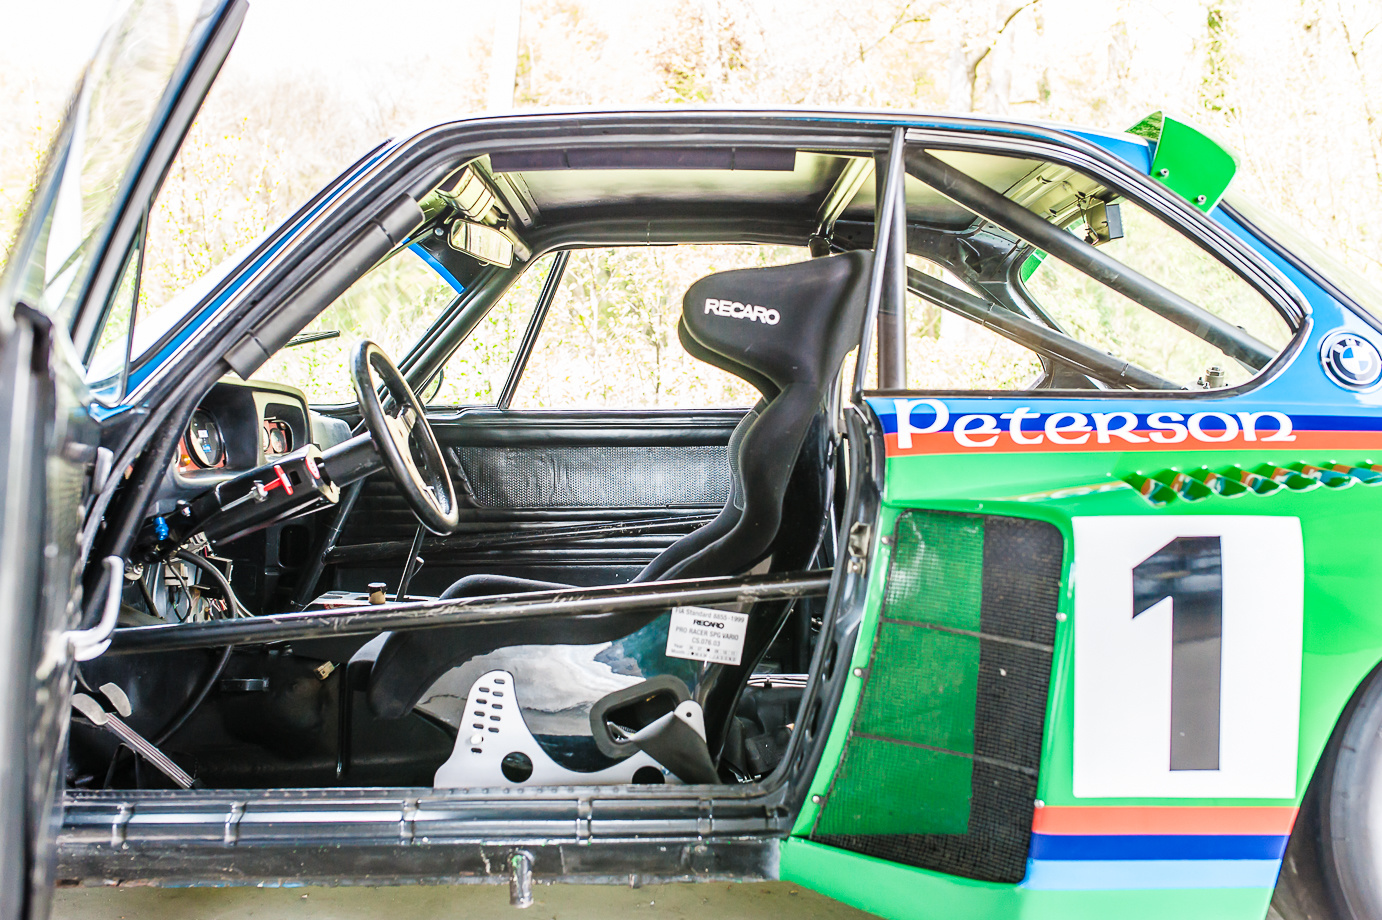 This wouldn't have been a huge job to correct at the start of the project but I'm too far in now so I'm going to have to compromise and make a smaller 2, Shame it's not a regular font...... Anyway next stop clear coat, detailing and windows, nearing the home straight now. Dave |
|
|
|
Post by Joel_W on Feb 28, 2021 6:57:11 GMT -8
Dave,
Even though I'm a air brush kind of guy, I do use Tamiya Rattle Cans for small primer and paint jobs of basic colors to save time.
Talk about impressive progress!! those decals look amazing. And I love the 2nd sheet of solid Silver to keep every color correct no matter what the body color(s) maybe. I along with Ben had the same exact bleed through issues on our Ferrari 330 P4s as the Red just bleeds right through the white roundels.
joel
|
|
|
|
Post by tartan54 on Mar 3, 2021 5:03:40 GMT -8
Bit of a problem with my clear coat - 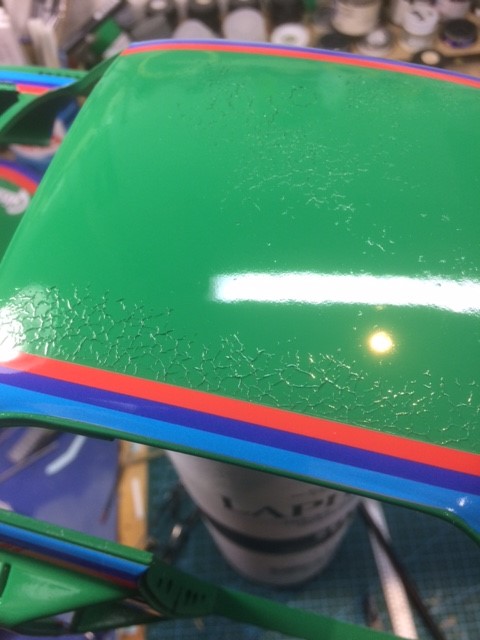 My enthusiasm got the better of me when applying the clear and I've wrinkled quite a bit of the main colour....... Going to go away and give myself a stiff talking too and try and figure out a way to save things. Dave |
|
|
|
Post by Joel_W on Mar 3, 2021 7:13:25 GMT -8
Dave,
Not the type of news I like to see here.
As for removing all those wrinkles, are they over the entire body or just the roof? And if it's just the roof, the stripe doesn't seem to be effected. Maybe you could gently sand them out, polish, and then clearcoat again.
joel
|
|


