|
|
Post by arcticwolf on Feb 11, 2021 16:04:26 GMT -8
I got my self into a major and totally unplanned renovation for my Daughter, so not a lot of time spent building models lately. But a little playing at night just to unwind, I tell myself it's therapeutic. 
I'm sure most of you have built this kit, overall it's a good one (much better than the 962 curbside). The basic OOB engine/transaxle with just some ignition wires added:
And then I realized there's a few major bits missing here. I have a gazillion reference photos of this car, and it has large and very noticable cooling pipes from the rads to the heads - so I made some from some styrene tubing - test fit on left, painted and installed with some clamps on right, together with also missing two lower tranny braces (styrene rod):
So, once you start detailing, you might as well keep going. More extra braces, fuel rails (copper wire), metering valve (photo etch), ignition coil and fuel filters (styrene rod), fuel and hydraulic lines (braided cable), some resin fittings, tranny cooler lines (copper wire), oil vent tube (leftover McLaren part)........you know how it goes:
and lots of detail painting:
I'm getting more used to this small scale, but I still find it a challenge:
Maybe now I can get on with building the model (and the drywall, the cabinets.........aaargh!)
Later guys
Paul
|
|
|
|
Post by afx on Feb 12, 2021 3:32:26 GMT -8
Nice work on the build. Good luck with the renovation - been there, done that.  |
|
|
|
Post by Ben_B on Feb 12, 2021 9:13:43 GMT -8
Looking great!
Ben
|
|
|
|
Post by arcticwolf on Feb 13, 2021 8:26:05 GMT -8
Thanks guys.
Here I am trying to figure out how to build the missing brake ducts, and I thought why bother, so I just bought them from Shapeways. Actually I bought a 3 pack, they look useful, lol.
I'll probably get them long before I figure out how to paint and decal this thing.
Paul
|
|
|
|
Post by Joel_W on Feb 14, 2021 9:09:06 GMT -8
Paul, I built this kit a few years ago, did some detailing in the engine compartment as well, but nothing like you did, mostly just cables and wires. Your engine/trans really looks outstanding. Can't wait to see the rest of the build come together. Here's my build, not great by any means as it was of my 1st car builds after coming over from Aircraft. Joel 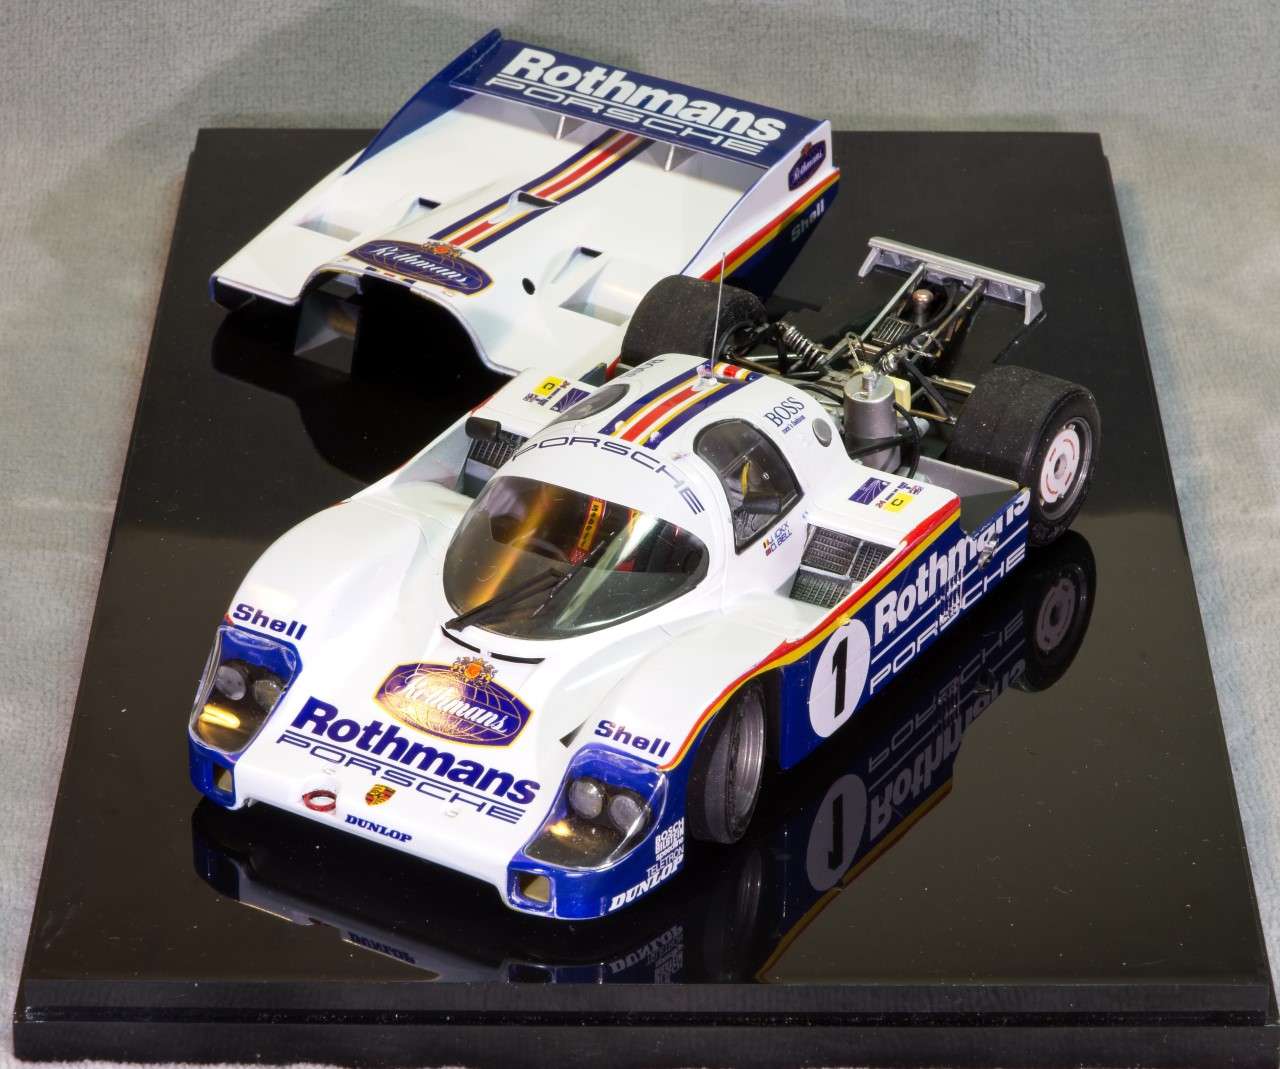 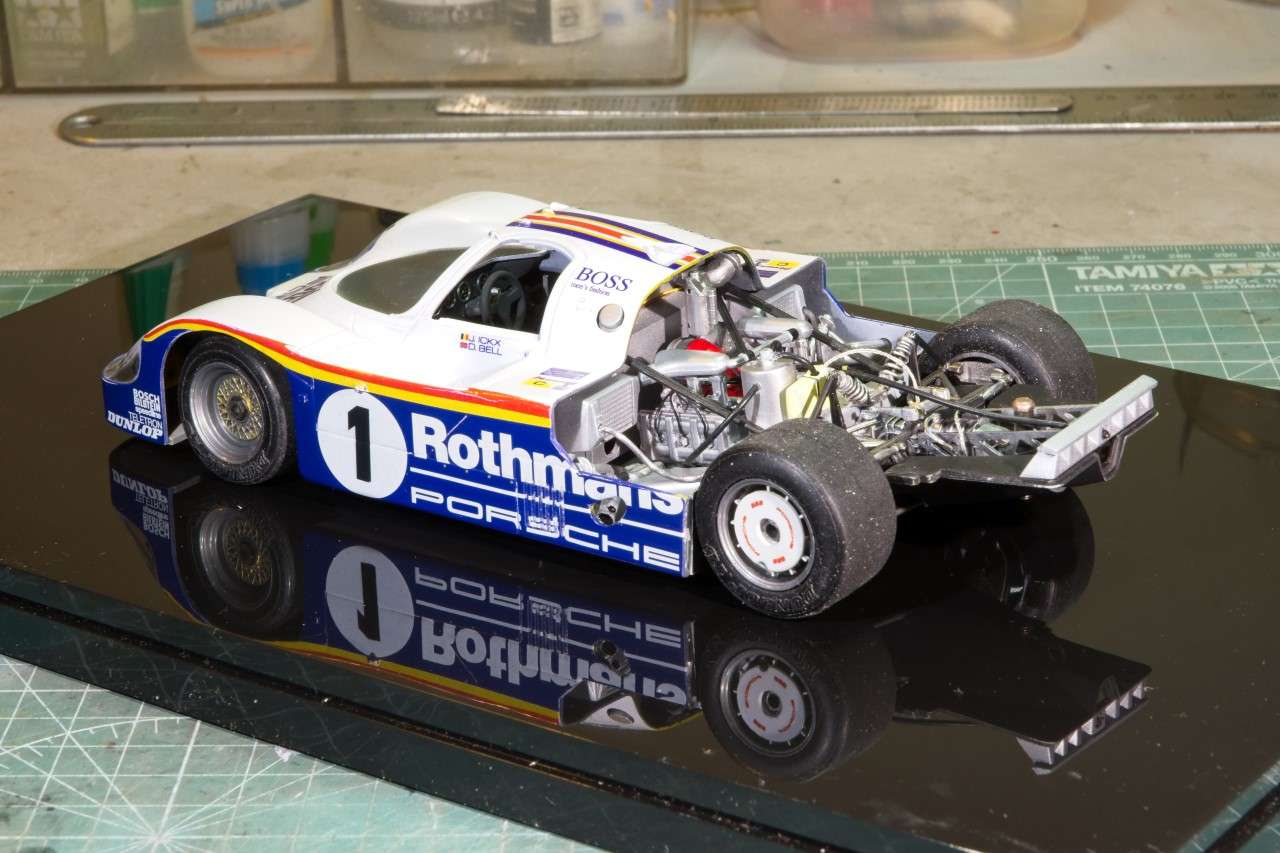 |
|
|
|
Post by tatocorvette on Feb 15, 2021 17:45:15 GMT -8
Looking good Paul!
Joel, yours came out really nice. For some reason I've yet to build a 956/962. Those were really epic cars!
Thanks,
Ismael
|
|
|
|
Post by arcticwolf on Feb 15, 2021 18:14:11 GMT -8
Looking good Paul! Joel, yours came out really nice. For some reason I've yet to build a 956/962. Those were really epic cars! Thanks, Ismael Thanks Ismael.
The 956 Tamiya is a nice kit, just needs a few add ons to complete the car. The 962 is just a curbside, very disappointing in comparison - I don't know what Tamiya were thinking. I'm doing a lot of comparisons on the 1:1 cars, seriously thinking of chopping my 962 apart and seeing if I could use the 956 innards to build a proper full detail 962. But that would be way down the road........ Now the dreaded paint and decal - I should sub it out to one of you guys to do it right!
And Joel, you picked the same paint scheme as mine, just a different # - nice job mate.
|
|
|
|
Post by pnance26 on Feb 16, 2021 7:49:47 GMT -8
Here is my 956 offering... which I was told wasn't that good with some "wavyness above the headlamps" and "not that good on gloss." Oh well, opinions are like assholes... everybody's got one and most of them stink.  |
|
|
|
Post by Joel_W on Feb 16, 2021 9:30:01 GMT -8
Paul,
Now that's a very interesting conversion for sure. I guess that the main issue would be to move the 956 turbos from next to the doors to much further rearward. As long as you use the 962 chassis and body, you should be ok as it's longer then the 956 and the footbox for the driver is completely different as per IMSA safety specs.
And yes, the paint job was a killer for me as it was my 1st multi tone effort. The decaling saved me in more then a few places. And speaking of decals, they're once again Indy Cal's and worked perfectly. I opted for the non- blue colored options.
Joel
|
|
|
|
Post by Joel_W on Feb 16, 2021 9:38:57 GMT -8
Patrick,
Sorry to read that the nick pickers looked for issues rather then the over all presentation of your build. The amount of gloss is certainly a subjective one for sure. With the light reflecting on the front clip there sure does seem to be a rather high degree of a gloss finish. Your build looks darn good to me.
joel
|
|
|
|
Post by Ben_B on Feb 16, 2021 10:11:10 GMT -8
I agree with Joel. Patrick's finish looks great to me. The livery really works well with the car.
Ben
|
|
|
|
Post by arcticwolf on Mar 4, 2021 18:01:59 GMT -8
I followed Patrick's build as it went, it looked perfectly fine to me.
Not a lot of model building time lately as I'm up to my ass in alligators with this reno (what else is new), but my bench is finally clear, well except for the resin stuff anyway. This one's done, except for some AM parts I'm still waiting for. They will be added later whenever USPS decides I can have them. 
Indycals decals, top quality as usual. One of these days I'll learn how to apply them. I didn't paint the blue, just used the decals, seemed to work fine if I took my time. Sister car to Joel's excellent product. I'll take some more when she's got the rest of the goodies installed.
I think I might try something simple, but nothing ever is.
Paul
|
|
|
|
Post by afx on Mar 4, 2021 18:33:43 GMT -8
Paint and decals look great.
|
|
|
|
Post by pnance26 on Mar 5, 2021 5:58:33 GMT -8
Paul, it looks great! Another great build!
|
|
|
|
Post by Joel_W on Mar 5, 2021 11:57:45 GMT -8
Paul,
The 956 turned out to be just like the winner she is in real life. Just another outstanding build my friend.
Love the decaling job you did. I've always been fearful of trying out Indy Cal's decals with the secondary colors. I'm amazed at just how well you got them to work especially around the headlights. I can't tell you just how long it took me to mask, and then paint the dark Rothmans Blue, then lay down the Gold and Red stripping. You got it all done perfectly in way less time.
joel
|
|


