|
|
Post by neckcheese on Jun 25, 2013 1:36:49 GMT -8
Here is my entry for the contest - a Tamiya 1:12 Porsche 934 in Brumos 1976 livery.  I told the reason for choosing this kit in the contest opener, so here we go: I received the kit in early april and started building some days after. My intention was to build it mostly straight from the box and keep extra detailing to a minimum in order to be able to finish the project.  My worktable non-permanent paint booth - used for painting small parts with waterbased paints. I have another paint booth in my (very small) workspace, but it is in another building, so therefore I made this solution.  I began building the engine. Here the basic parts are assembled. I gave the parts a slight black wash, to enhance the details.  Tamiya cast the grp parts in a slightly transparent greenish plastic and I painted the parts with a transparent yellow/brown mix to make it look more like the original parts. 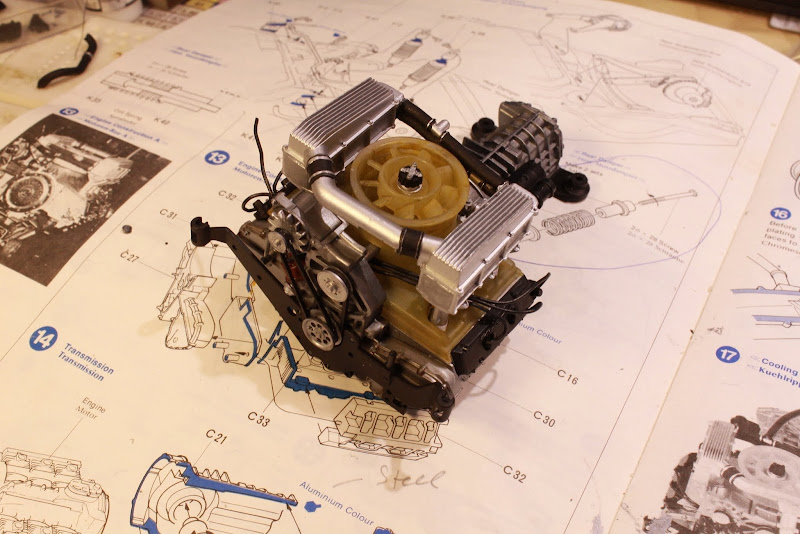  More parts added and most have received a slight black wash to give "dept" and also to remove the shine from the metallic paints. Tamiya has plated many of the parts in aluminium and crome, but I repainted most of these parts as removal of casting lines and tabs ruined much of the plating anyhow. I have used a mix of Vallejo Model Air metallic colours as well as Testors crome and Alclad crome.  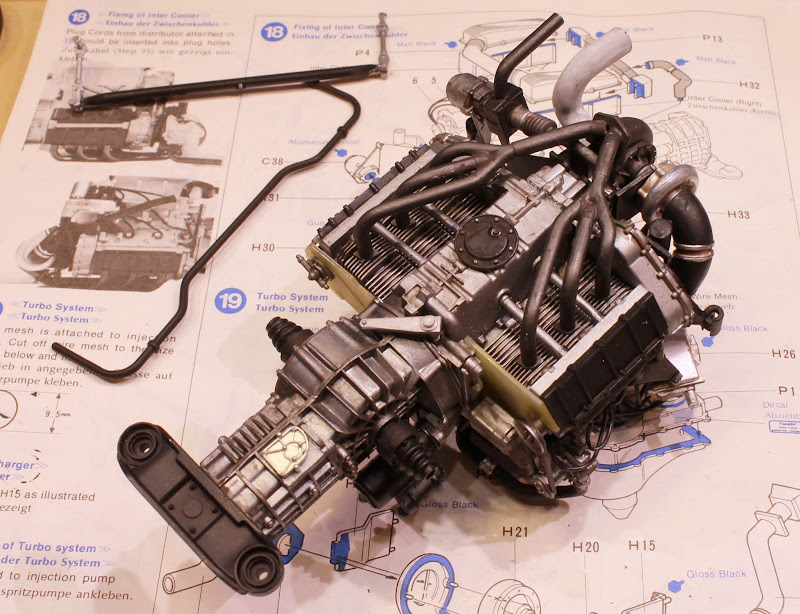 Engine basically finished with all plumbing and wiring done.  Chassis painted and ready for detailing. 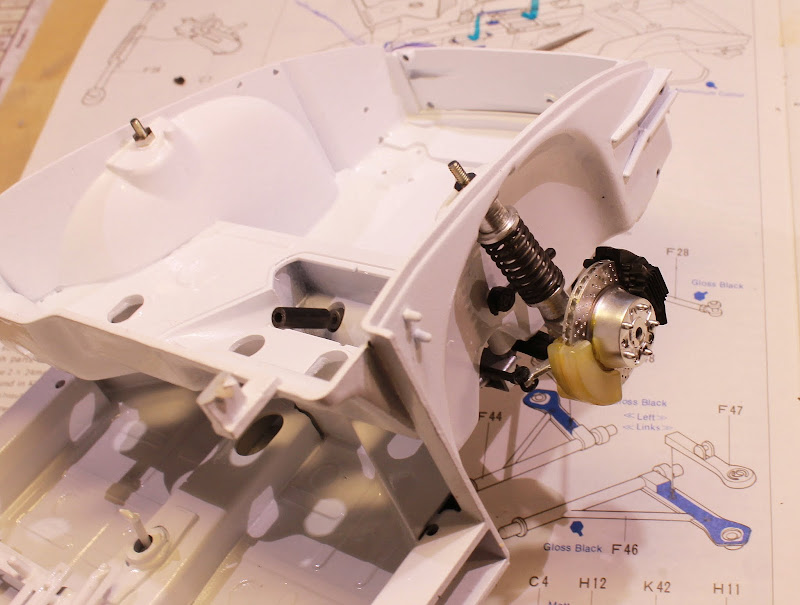  Front suspension done  Rear suspension also installed 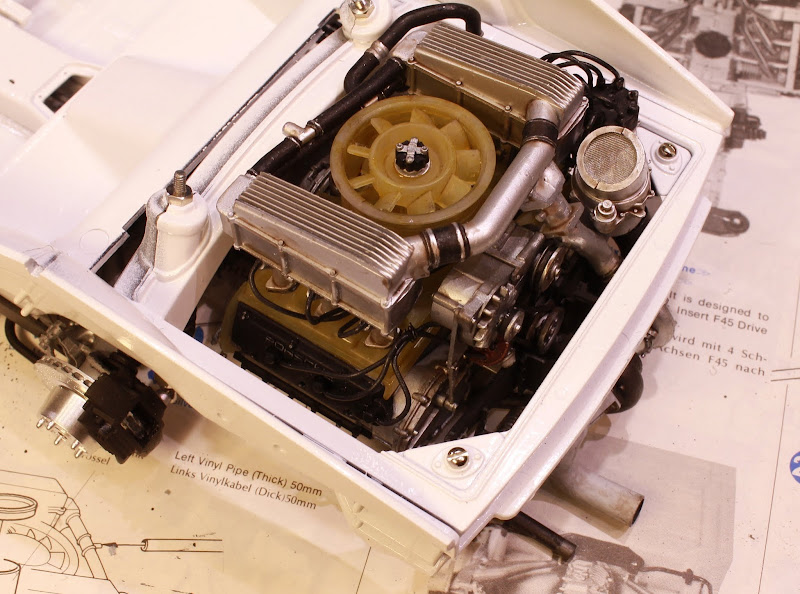 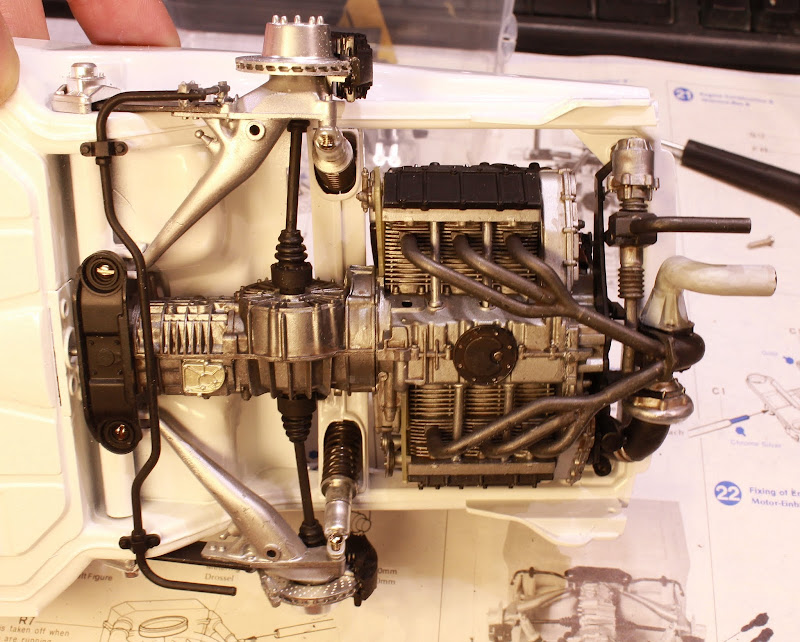 and engine/gearbox etc are also installed - a tight fit 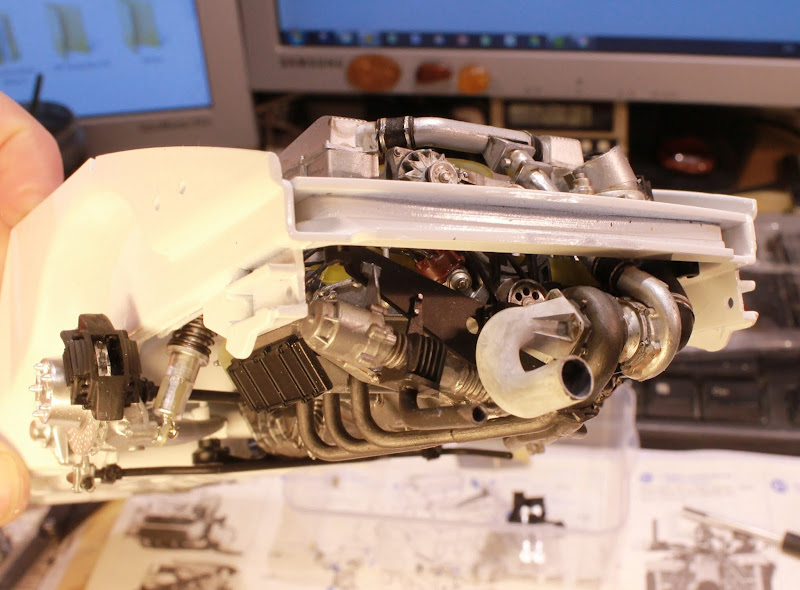 more to follow |
|
|
|
Post by neckcheese on Jun 25, 2013 2:03:11 GMT -8
Work done from mid- May till now: 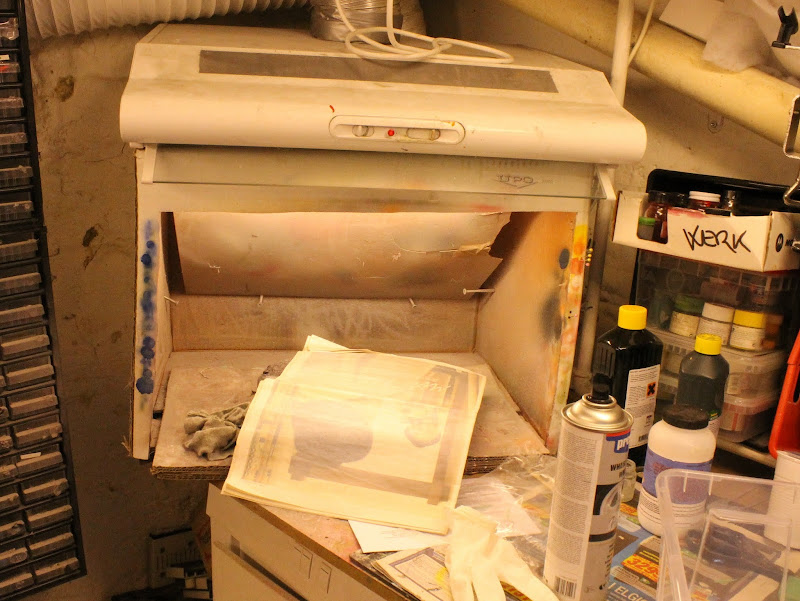 My butt-ugly, but cheap and functional stationary paint booth. I share the very small room with the heating installation as well as washing machine, dryer and (too much) other stuff. Not very clean for perfect paint jobs, but always warm and dry. But better than no workspace at all. I do building in my apartment and all the dirty stuff here. 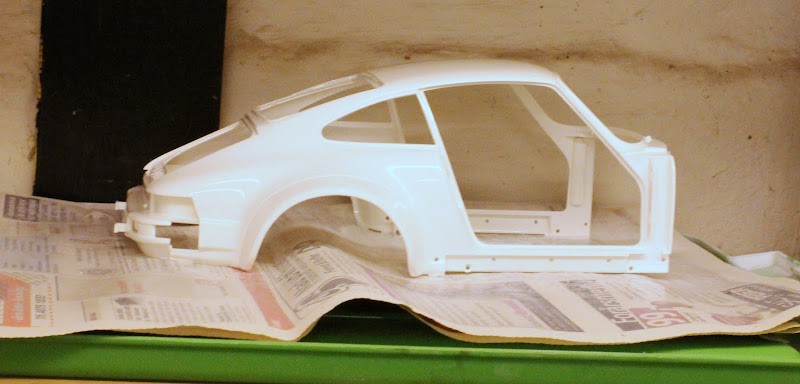 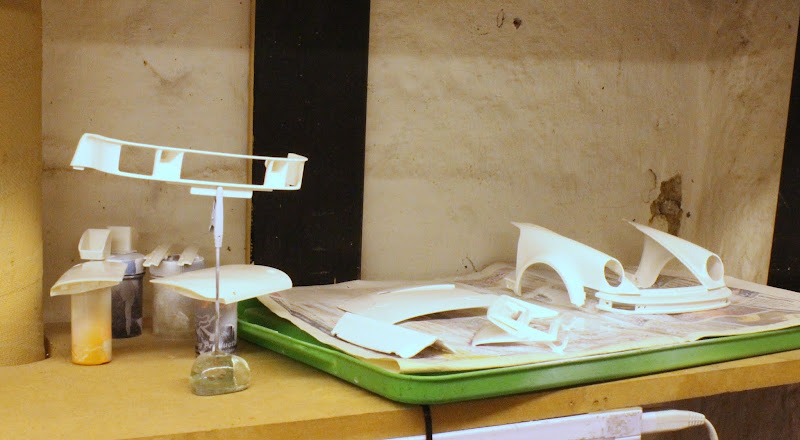 Body parts painted first time 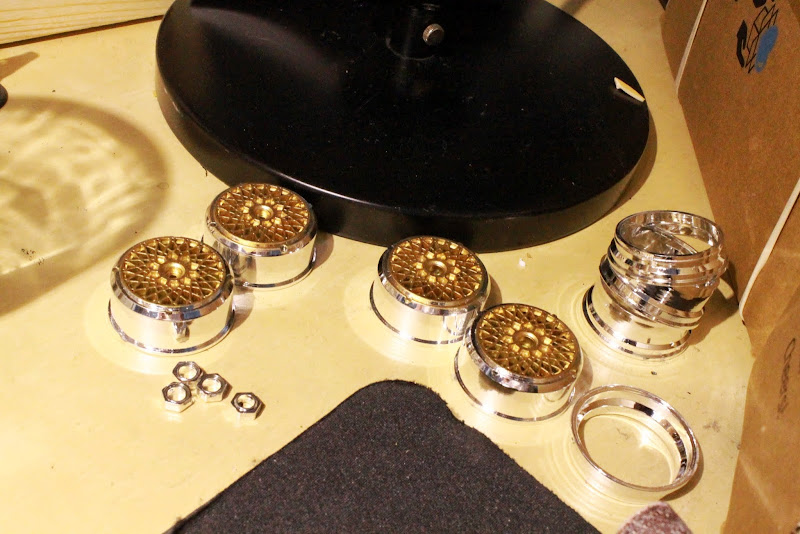 BBS Wheels painted gold  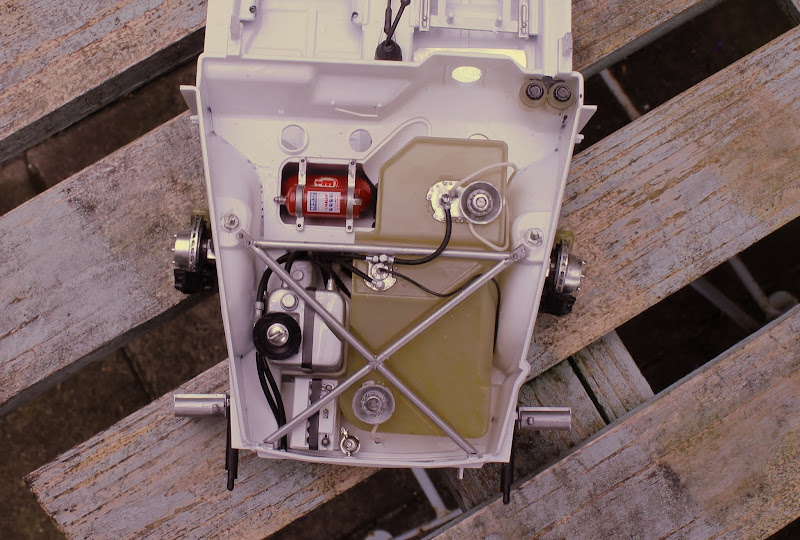 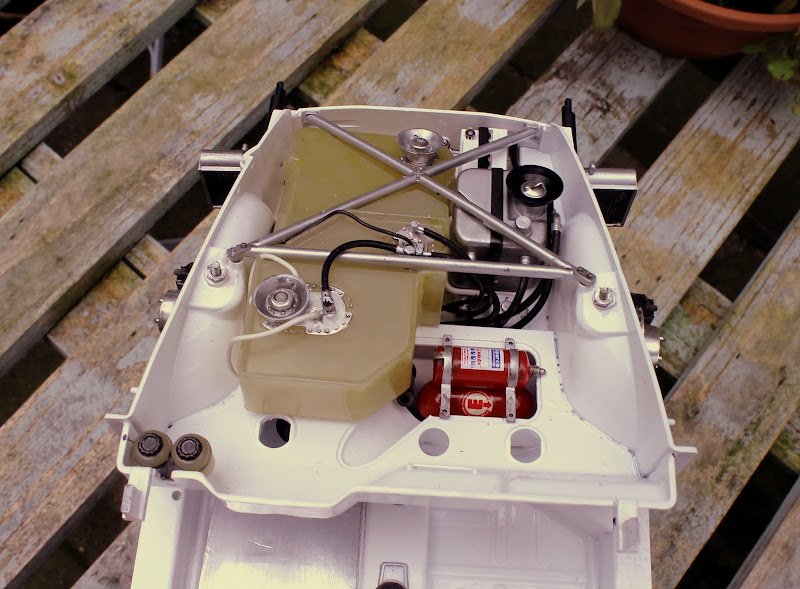 Front of car with fuel and oil tank, battery, fire extinguisher etc. I addede a few extra wires and tubes, rest is standard kit parts. all plated parts are repainted except fuel tank fittings which are toned down with black wash.  I added an aluminium plate (thick alu foil) to the footwell and painted the other details  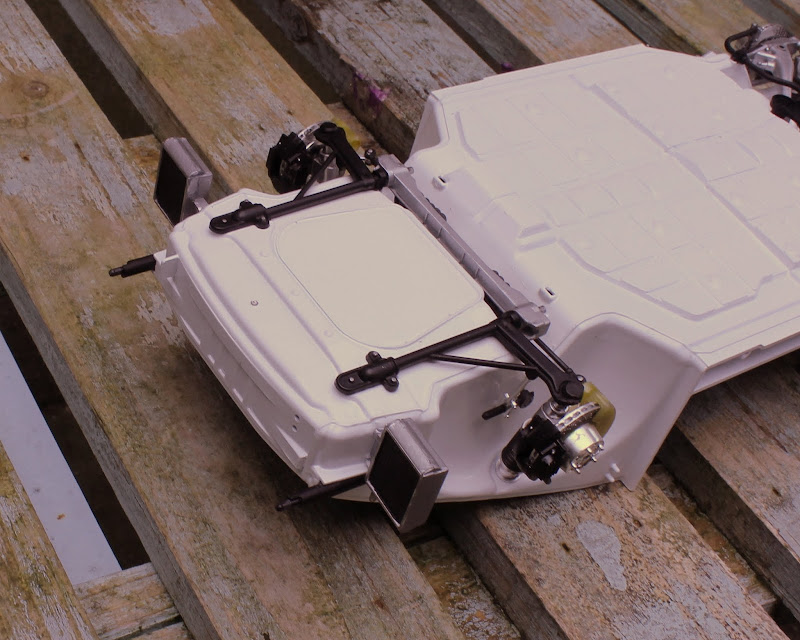 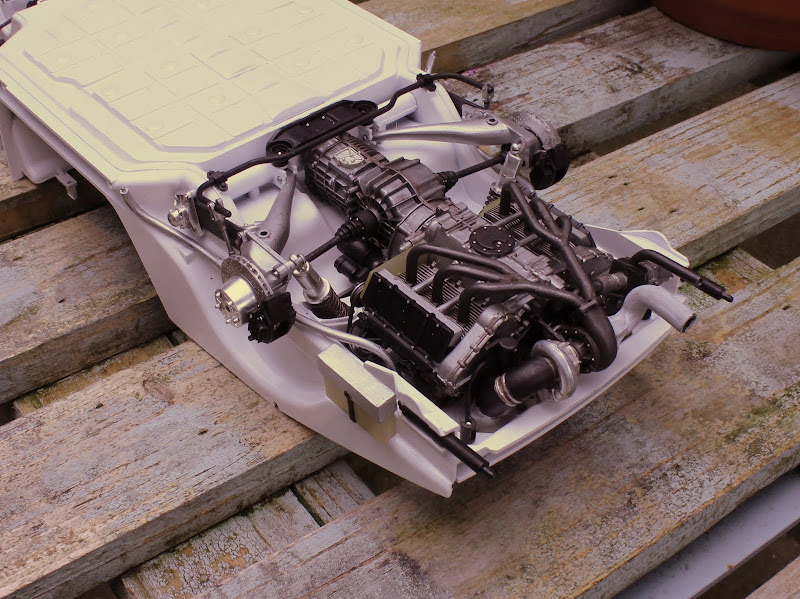 Next steps are dashboard, roll cage, seat with harness and lights Niels, DK |
|
Calvin
Full Time Ride

Posts: 168
|
Post by Calvin on Jun 25, 2013 4:04:33 GMT -8
Great stuff!
|
|
|
|
Post by 2lapsdown on Jun 25, 2013 4:07:32 GMT -8
That engine is a clinic on detail painting and black wash application, it looks fantastic. The whole chassis is great too. I can't wait to see the progress on this build.
John
|
|
|
|
Post by neckcheese on Jun 25, 2013 10:43:46 GMT -8
More works done: 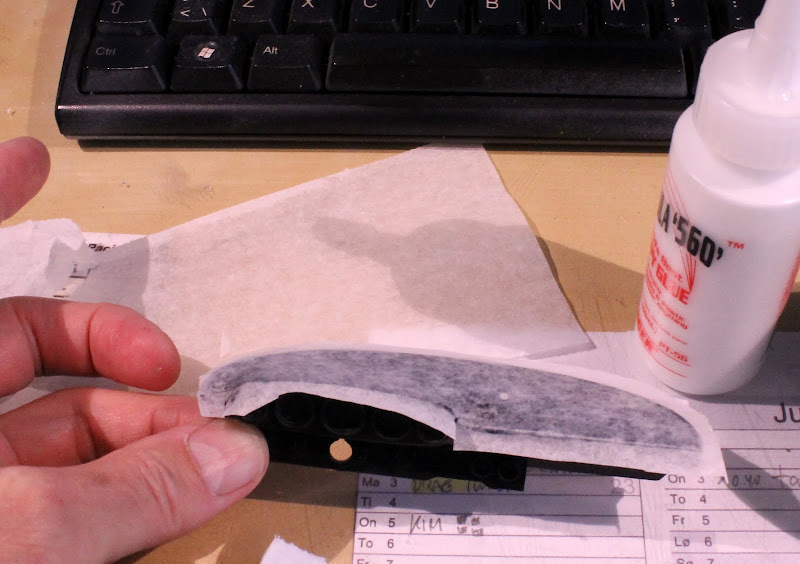 paper from a tea filter glued to the dashboard with thinned white glue. The dash on most period Porsche was covered with black felt (incl. the 917's) to avoid reflections.  When dry the edges were cut with a scalpel blade and the dash was painted matt black (thinned Vallejo Model Color). It looks better in real life and have a "feltish" look :-) 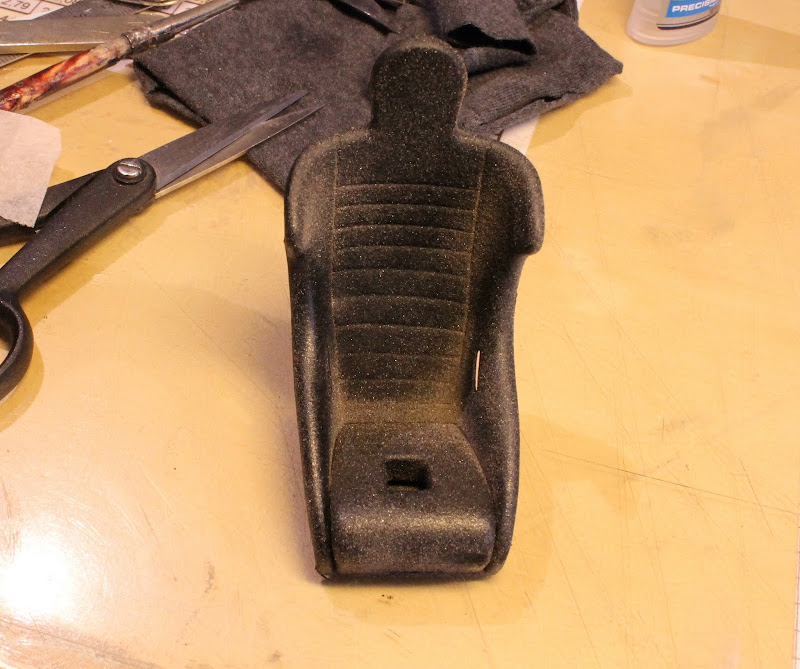 The driver seat was spray painted with matt black and when still wet, very fine sand was sprinkled on. The was repeated 3 times and only on the upper side of the seat.  The seat was then painted with thinned matt black and finally drybrushed with matt black with a little darkgrey added. The seat shell was painted satin black 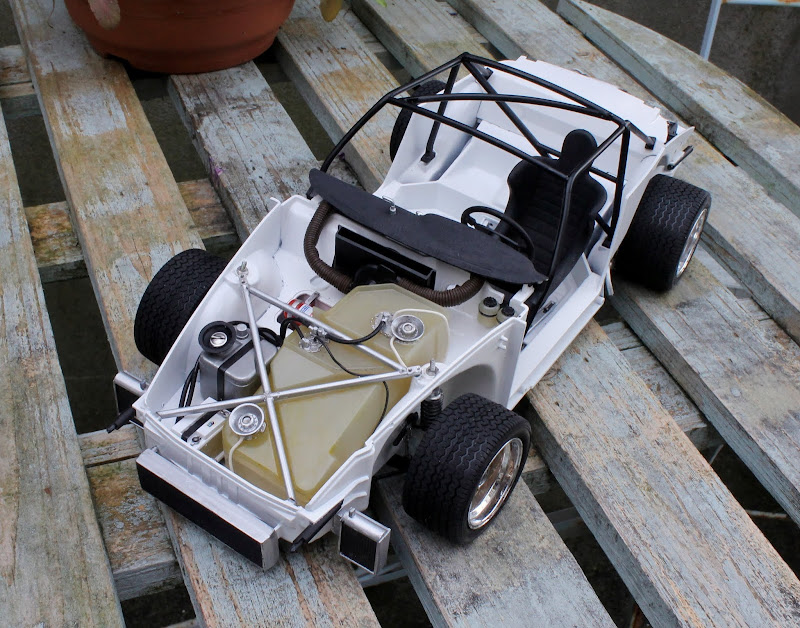   next step is seat belts + harness + a few small details on the chassis. The body parts are in the paint shop for now, Niels, DK |
|
|
|
Post by Art on Jun 25, 2013 12:48:33 GMT -8
Beautiful work, Niels. Thanks for doing a WIP!
|
|
|
|
Post by Patrick on Jun 25, 2013 13:00:23 GMT -8
Great tip on the tea filter! That's why I love this group!!!!
Patrick
|
|
|
|
Post by neckcheese on Jun 25, 2013 15:57:29 GMT -8
 Resin seat belt hardware. Cleaned and painted. The two brackets lower left are made in 0,5mm plasticard and will be used for fixing the seat belts to the chassis  seat belt made from templates from the hardware. I used a combination of masking tape and tea filter material.  belts painted black with a marking pen  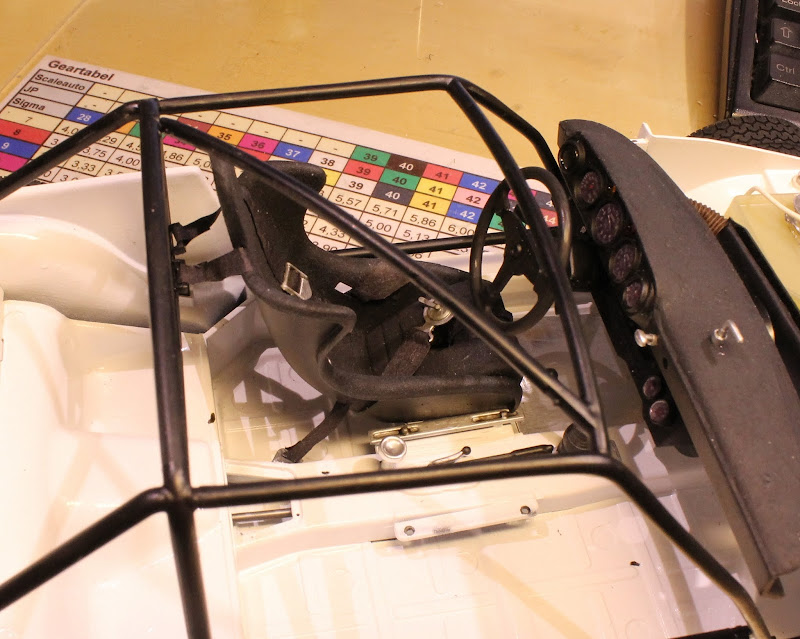 Roll bar finished and mounted on the chassis. seat belts are fixed to the cross member and in the bottom of the chassis. The tea filter material has a nice texture that is also usefull for seat belts. For 1:24 cars I always use masking tape. I never likes the silk bands supplied by some manufacturers. next step is the last detail + finishing the body yours, Niels, DK |
|
|
|
Post by neckcheese on Jul 2, 2013 1:01:41 GMT -8
The car is nearing completion: 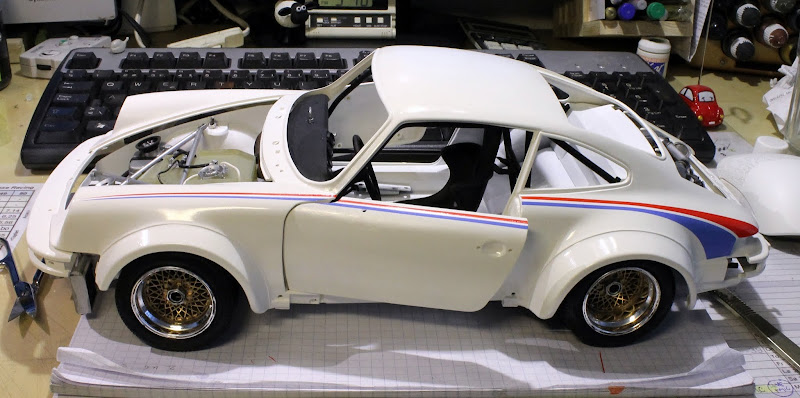 Decalling  Handpainting the window frames sucks :-( 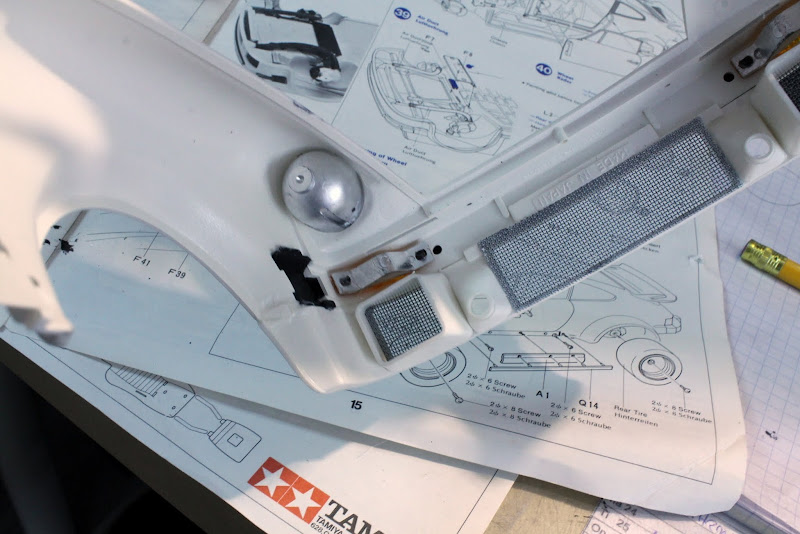  Intake net is painted white and mounted as is bumper parts and headlights etc.  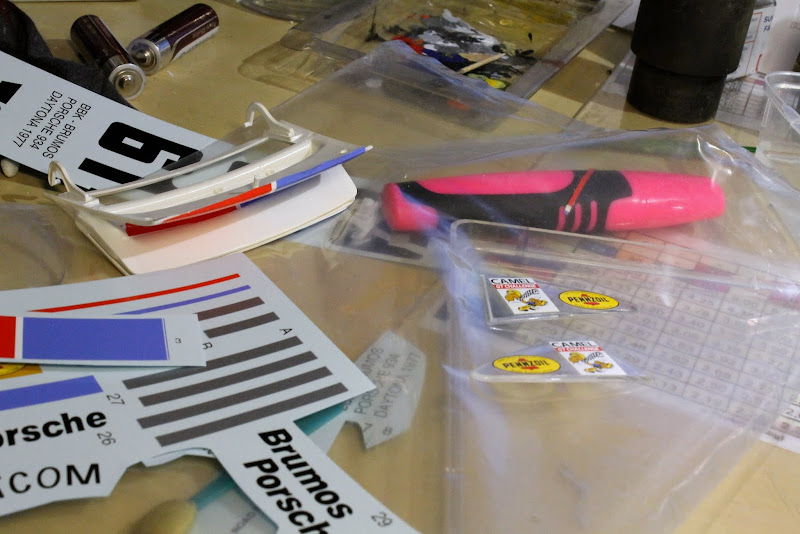 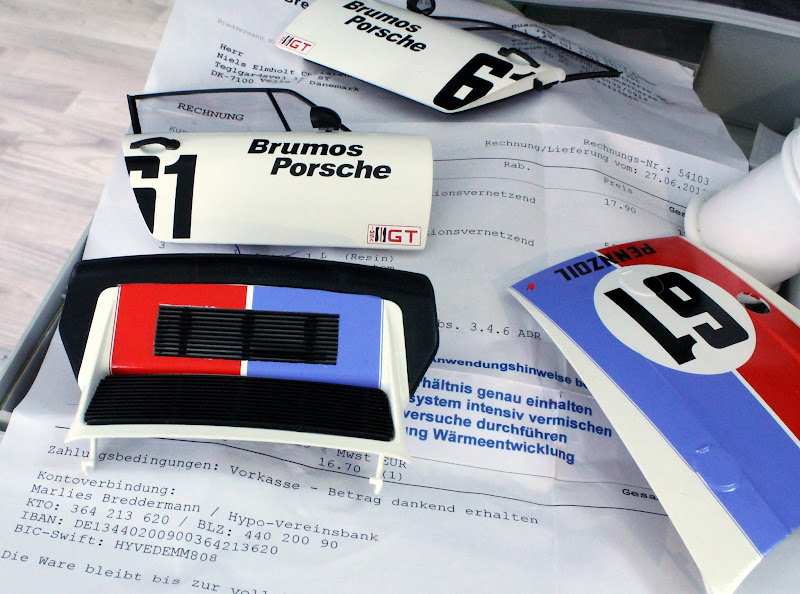 decals, windows etc added. The decal quality is good, but they are very thin and brittle. I had to do some repair job, especially around the edges. Next: more window frame painting to do and then only a few interior details has to be added before the body is mounted on the chassis. |
|
|
|
Post by 4wheels on Jul 2, 2013 4:04:42 GMT -8
Very nice model and some REAL nice detailing tips! I have a tip for you: Use Bare-Metal foil to mask around the outside of the window trim, paint and remove Bare-Metal immediately. Perfect edges!
Brian
|
|
|
|
Post by 2lapsdown on Jul 2, 2013 4:11:16 GMT -8
Fantastic work, I'm learning a lot and really enjoying this process.
John
|
|
|
|
Post by neckcheese on Jul 2, 2013 10:44:40 GMT -8
disaster struck twice :-( 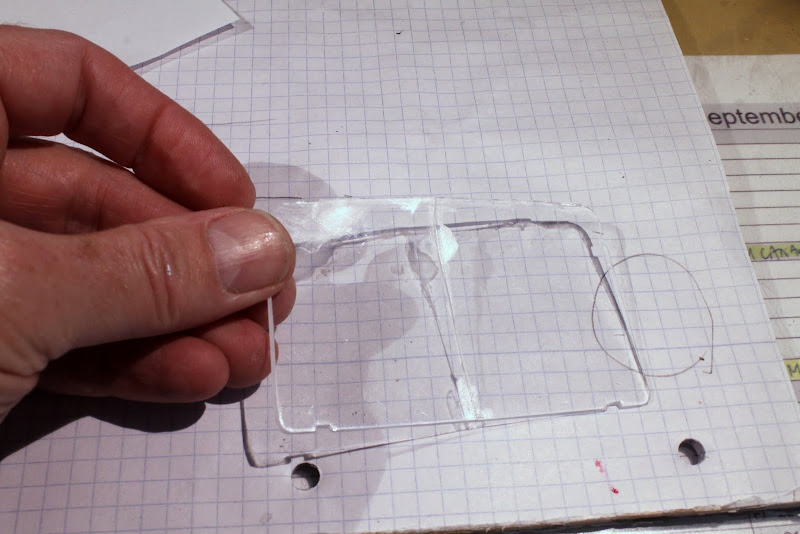 Cyano activator spray ran out on the rear windows and both etched the surface and made a crack through the window :-(  The decals ran away from me and did not align on the rear deck :-( hmmmm.... sh.. hmmmm.... back to the building table again |
|
|
|
Post by neckcheese on Jul 2, 2013 17:45:05 GMT -8
OK - got in repair mode and replaced the rear window with a piece of 0,5mm clear plastic (from the package with my new PC Mouse) and the decals was repaired used a spare piece of decal. So i calmed down and finished the last bits of the car.  The car had a driver protection net in the left door like the Nascars and I could not find anything usefull for this purpose :-( - than I asked my girlfriend and se came up with some silver stuff that is used for gifts. The edges was made from tea filter material and it was later sprayed matt black. Last jobs was mounting the windows and interior details like sunshades, rear view mirror etc + a few outside details like window wipers etc. I gave up on the working hinges on the front and rear bonnet, so they are removable, but the hinges are not working. here are some pictures of the finished chassis before the lid came on: 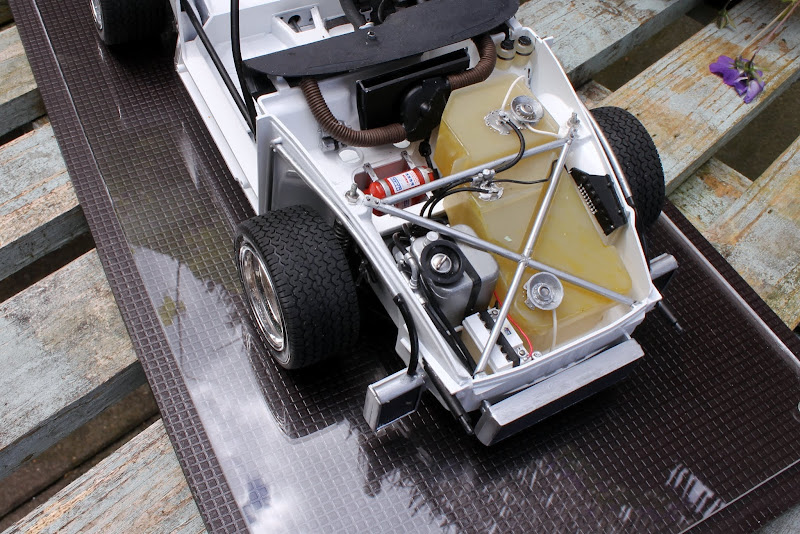 ![]() lh4.googleusercontent.com/-5rdj1apTIPM/UdMhIncGu7 lh4.googleusercontent.com/-5rdj1apTIPM/UdMhIncGu7I/AAAAAAAAZI8/3ZDRb889Zss/s800/IMG_5190.JPG[/img] 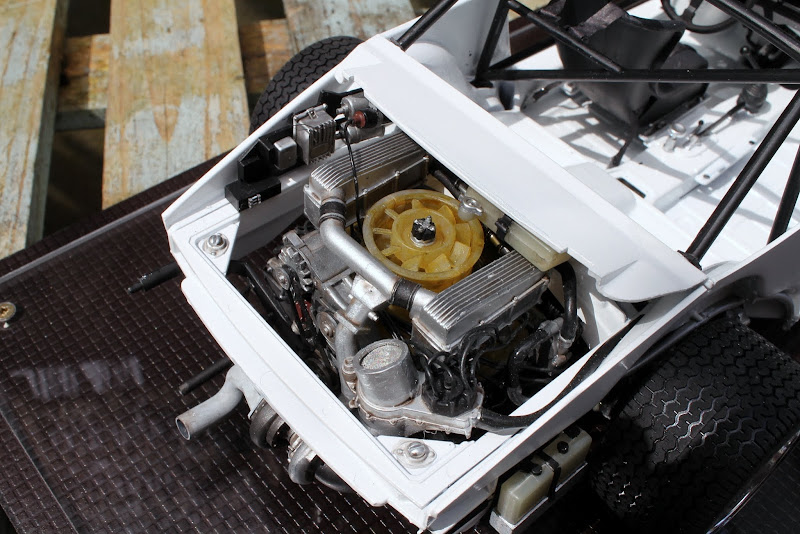 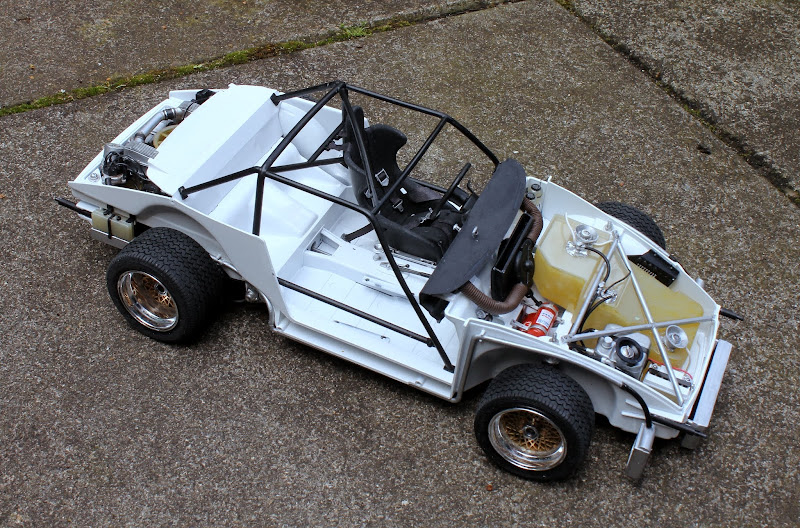  and some pics of the assembled car:  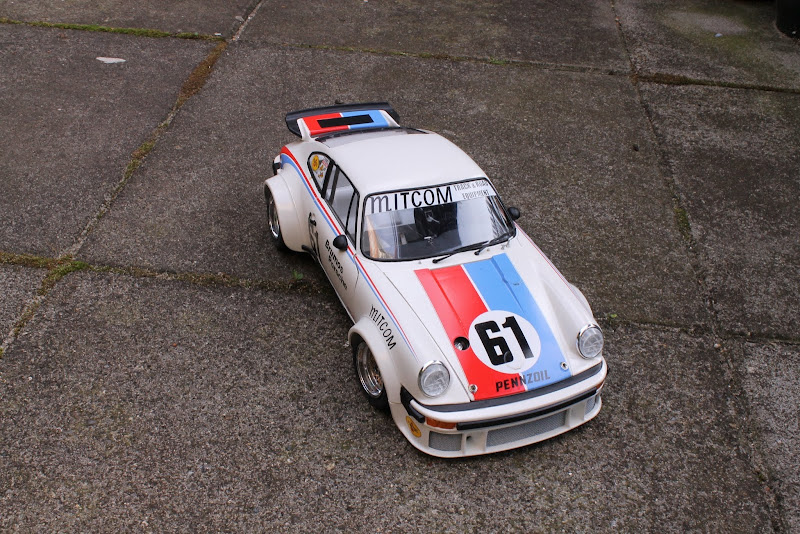   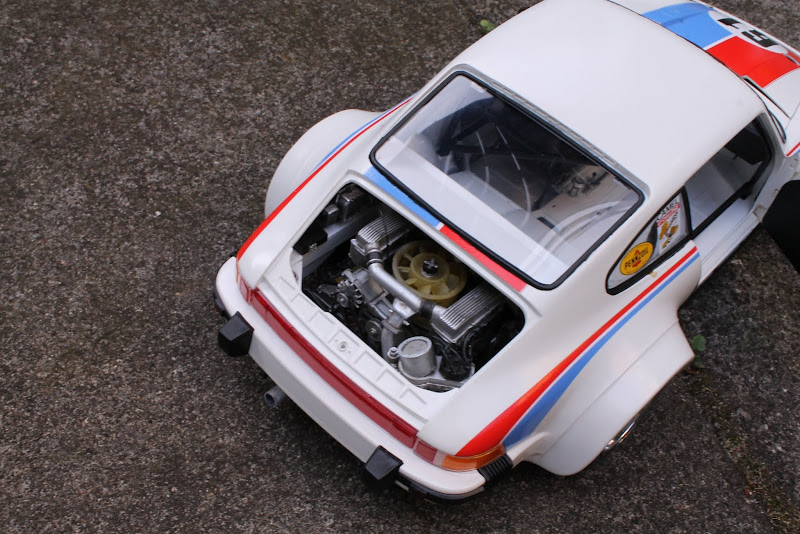  I do not regret that I chosed the Brumos livery. The car looks splendid and I look forward to present it to my friend :-) Thanks for your nice words and good advice Niels, DK |
|
Calvin
Full Time Ride
Posts: 168
|
Post by Calvin on Jul 3, 2013 11:12:00 GMT -8
Looks real to me!
|
|
Deleted
Deleted Member
Posts: 0
|
Post by Deleted on Jul 5, 2013 4:15:34 GMT -8
very, very well done!
i'm sure you're friend will be thrilled to have it.
duane
|
|


 Pro Tech | MAD | Scale Motorsport
