|
|
Post by Ben_B on Dec 6, 2018 11:49:44 GMT -8
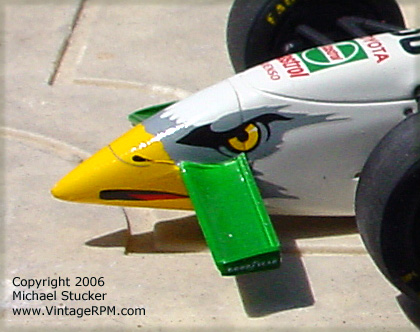
Hi All, I've gotten far enough along with this one to post a photo. I'm enjoying the kit, but it's requiring a lot of cleanup. Lots of ejector pin marks and seams where the molds parted. The plastic in the silver sprues remind me of plastic in Trumpeter kits, where primer would bead up like water on a waxed car. I had a tough time getting lacquer-based paint to stick to it. I'm taking a break from cleaning up the roll cage and applying the decals to the body. I still have a long way to go. The decals mostly fit, but a lot of them have to be coaxed to lay down with hot water and Solvaset. The ones for the vertical sides of the radiator outlets on top of the hood don't fit, so I'll have to go back and touch these areas up with paint. I'm also trying to find a match for the yellow parts, so I can touch up around the radiator inlet. Cheers! Ben  |
|
|
|
Post by garydavis on Dec 6, 2018 11:54:50 GMT -8
That's really looking good Ben.
|
|
|
|
Post by robhart on Dec 6, 2018 12:46:46 GMT -8
I Agree. Sorry to hear the kit is a struggle.
|
|
|
|
Post by Ben_B on Dec 6, 2018 15:18:21 GMT -8
Thanks! It hasn’t been too difficult. Just some extra, time consuming cleanup that you don’t see in a Tamiya kit. It’s not at all like an AMT kit!  The only real fit issues I’ve had with the kit are the radiator and its ducting. It just needed a little filing. If someone ever releases some decals for a blue & yellow Turner Motorsports car, I’ll happily build another one. Cheers! Ben |
|
|
|
Post by vintagerpm on Dec 6, 2018 15:27:49 GMT -8
Looking good. Happy to see this build. Keep us informed. I've got the Falken Tire version on the to-do list for next year.
Mike
|
|
|
|
Post by afx on Dec 7, 2018 3:05:46 GMT -8
Off to a great start Ben.
|
|
|
|
Post by shunter on Dec 8, 2018 1:07:30 GMT -8
Nice work...appreciate the honest feedback on it as I’ve got one sitting in the cupboard
|
|
|
|
Post by Ben_B on Dec 8, 2018 5:31:58 GMT -8
Thanks! I finally got all of the decals on the body last night. The only ones that really gave me trouble were the yellow ones around the radiator intake, so they'll require a little touching up.
Cheers!
Ben
|
|
|
|
Post by Joel_W on Dec 9, 2018 8:47:08 GMT -8
Ben,
Impressive to say the least. Your decaling came out spot on perfect.
Joel
|
|
|
|
Post by Ben_B on Dec 20, 2018 13:54:01 GMT -8
Thanks for the kind words, everyone! I made some final touch ups around the radiator opening, using black decal film and Testors yellow paint in the little square bottle, and just sprayed the first layer of the clear gloss coat. I found a couple of places where the decals didn't lay down in some grooves, so I'll have to fix those before I spray the next coat. Sorry for the poor cell phone pics.   Ben |
|
|
|
Post by garydavis on Dec 20, 2018 16:05:50 GMT -8
Oh yea...I like it. Sure looks good Ben!
|
|
|
|
Post by Joel_W on Dec 24, 2018 12:31:26 GMT -8
Ben,
The shine is really starting to pop now.
Joel
|
|
|
|
Post by Ben_B on Dec 26, 2018 8:32:16 GMT -8
"That clear coat is turning out pretty good, but I think I'll hit it with one last coat, before I polish it." I guess it's time to have the HVAC ducts cleaned out. Sigh. I managed to remove the offending particles without too much damage, so I'll just have to sand it with some 5000 grit and spray it with another clear coat. It's also taught me I need to be a lot more careful about dust than I do with military models, where you can usually hide mistakes with weathering.  Cheers! Ben
|
|
|
|
Post by Joel_W on Dec 26, 2018 15:57:21 GMT -8
Ben,
Looking real good.
I generally find that two wet coats is more then enough, but your mileage may vary.
Joel
|
|
|
|
Post by vintagerpm on Dec 27, 2018 13:20:29 GMT -8
What clearcoat did you use? I've noticed that when I airbrush 2-part urathane clear, it seems to attract dust & dirt. Almost like it sets up a static charge. I've actually watched the stuff fly past my face and onto a model. Hasn't happened while using Tamiya or Testors clear straight from the can. Weird.
|
|


 The only real fit issues I’ve had with the kit are the radiator and its ducting. It just needed a little filing. If someone ever releases some decals for a blue & yellow Turner Motorsports car, I’ll happily build another one.