|
|
Post by Ben_B on Mar 28, 2021 10:08:28 GMT -8
No more yard work today, thanks to more storms, so I thought I'd see if I was up for battling the Revell Ford GTLM. After the Tamiya "putting together Legos" Mercedes build, this one looks like an AMT kit. It's like it's 2-3 generations behind what is being released in Asia. I'm going to start by refining the ugly fit of the body, using Ismael's technique of shimming parts with plastic. Also making note of his troubles getting the body to fit the chassis. I'm not going to bother replacing the 1/25 wheels with correctly-scaled ones. Decalcas makes replacements, if anyone is interested. I'll post in-progress photos soon, but here's what it will hopefully look like (courtesy of Sportscar365.com). Ben Keating and crew won their class at the 2019 Le Mans, and then were disqualified after an unprecedented 33-hour tech inspection. They had a single 44.4 second fuel stop (minimum is 45 sec) and were later found to have their fuel capacity 0.1 L more than allowed. Keating accepted the DQ, saying they hadn't left enough margin for error when they were setting the car up. 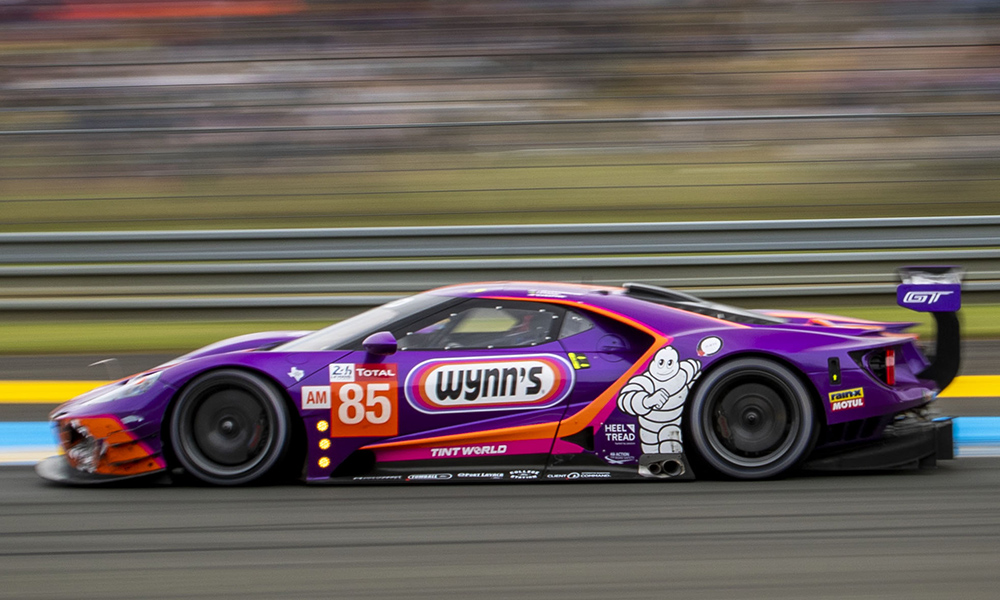 Ben |
|
|
|
Post by tatocorvette on Mar 28, 2021 10:24:42 GMT -8
Will follow up with interest! I felt sorry for Keating on that one. Don't forget to remove the roof camera dome first  Thanks, Ismael |
|
|
|
Post by Ben_B on Mar 28, 2021 13:25:00 GMT -8
Thanks for the reminder! I forgot all about the camera.
I felt bad for Keating, too. There was some talk that there was a lot of politics involved. Ford had pissed off FIA the year before and this was payback. But, Keating’s car did break the rules....
After spending some time adding styrene to the rear of the body to fill those nasty gaps, I’m starting to think I might be able to paint and gloss the area under the transoms, put the two body parts together, and then clean up the seams. It’s all one color with no decals under there. I could feather the paint so I wouldn’t have a mismatch when I paint the rest of the body. That would solve a lot of problems, like being able to brute force everything into place instead of having to worry about damaging paint and decals.
Ben
|
|
|
|
Post by pnance26 on Apr 2, 2021 4:54:07 GMT -8
Which kit is this if it is not the Tamiya "LEGO" kit?
|
|
|
|
Post by Joel_W on Apr 2, 2021 5:03:42 GMT -8
Ben,
As usual I'll be following along on your latest journey with Revell's Ford GT40 Wynn's car. The paint and decaling has been calling me, but I've never gotten around to even buying the kit as yet.
Lets all call what happened to the Keating team getting screwed royally by the FIA's payback to Ford. I'm sure that they could have found the space for .1L in the fill pipe or the .6 seconds at the stop or exit. This has been an ongoing problem with the FIA vs Ford vs almost any USA team and manufacture for years on end.
joel
|
|
|
|
Post by Ben_B on Apr 2, 2021 7:21:58 GMT -8
Paul, the far better Tamiya kit is the street car. Revell’s is the race version.
Joel, yes, you can always find a violation if you look hard enough. While I know every race series has a certain level of politics going on, it seems like F1 and Le Mans are worse than most.
Ben
|
|
|
|
Post by Ben_B on Apr 11, 2021 10:59:53 GMT -8
I just have to add the suspension and a couple of other bits, then the chassis will be done. I didn't want to use up one of my photo etched seatbelt sets on this kit, so I just used the belt decals left over from the Tamiya Mercedes. Very little will be visible once everything is closed up, anyway.  I painted the body with Splash Paint's Ford GT purple pearl. I'm going to paint the insides black and then hit the area under the transoms with clear. I'll go ahead and glue the body together before adding the decals, since there won't be any under the transoms. That way I can force the rear body into place, fill and sand the ugly joints in the back, and then touch up everything before applying the decals.  The decals will be interesting. This will be the first time I've used Decalcas decals. They're so thick, you can feel them by running your finger across the outside of the plastic bag! A guy on YouTube used these decals and they seemed to work well, so we'll see. If this were a Tamiya, Fujimi, or Nunu kit, I would have spent the time tracking down some better quality decals from Shunko.  Ben |
|
|
|
Post by Joel_W on Apr 12, 2021 5:04:06 GMT -8
Ben,
The chassis/interior does indeed look darn good. I'd say that you've made the right decision about not wasting a harness AM set when so little of the interior will be visible, plus everything including the harness is Black so whatever will be seen, will kind of blend into the darkness of the pit.
I've never used Decalcas decals but the thickness issue is a no go for me. I've run into that issue a few times from AM decal companies out of Asia, and even though the decals preformed well and looked perfect, the thickness issue was still there no matter how much Gloss I applied afterwards. I've never used Shunko decals but heard that they are very thin, so special handling is required. Still, I'd go that way over accepting to thick decals.
joel
joel
|
|
|
|
Post by Ben_B on Apr 12, 2021 7:21:56 GMT -8
I’ve used the Shunko decals on a couple of models. I’ll buy them without hesitation. They are thin but not so thin as to be difficult to use.
Thanks to some great input from Patrick, I’m going to redo the body paint. It was already bugging me because it looked too light and he pointed out areas that had a rough finish that need to be addressed. I had missed the fine print on the paint that said to use it on dark primer. I think I’ll be able to get away with sanding and re-priming. If that doesn’t work, I have a new gallon jug of Purple Cleaner out in the garage....
EDIT: While looking over the body while having lunch, I noticed that the scar from removing the rooftop camera is visible again. I guess the paint solvent did something to the Mr Surfacer, because the area was perfectly smooth with just the primer. I think the effect might be similar to the "ghost seams" you get with liquid cement. So, a sand and repaint was in order, anyway.
Ben
|
|
|
|
Post by pnance26 on Apr 12, 2021 10:54:31 GMT -8
So who says the harness has to be black and therefore lost in the darkness of the interior? Never let that be an impediment. Be bold and put in a red or yellow harness. Who will have the balls to tell you that a harness is the "wrong color" especially when it enhances your model.
Thanks for the blame! LOL! Actually, I just want to see you succeed. There was some orange peel on your other purple Wynn's build and I would hate to see it repeated on such a solid color. It is very easy to overlook unless you know what it looks like and can be easily avoided. As I said, just slow down and if you take the time to do it correctly the first time around, then you won't see two or three more hours spent redoing the same thing. (I say that from experience).
Best of luck and just keep pushing the apex of that corner until you can take it at a reasonable speed without dumping it. You will get there!
|
|
|
|
Post by Joel_W on Apr 12, 2021 14:20:48 GMT -8
Patrick,
I'm all for a little artist license when it's to my advantage. I've settled on basically Red for most of my racing harnesses. I just mentioned the black because the decal harness is black as is the interior.
Ben,
Since you're sanding and or stripping back to bare plastic, the roof scar issue could be solved by a few coats of CCA thin glue. I've used it for that very reason several times with excellent results.
joel
|
|
|
|
Post by tatocorvette on Apr 12, 2021 17:07:45 GMT -8
Ben,
I had a few challenges getting that body to cooperate, especially the back. Sandable primer was a good ally on that fight.
Thanks,
Ismael
|
|
|
|
Post by Ben_B on Apr 13, 2021 1:30:17 GMT -8
I usually use red or blue for my harnesses, too. I painted a couple of strips of medical tape those colors, so all I have to do is take some slices out of them each time I need to make harnesses. Artistic license, since my models will probably never be seen outside of my house, except for here and a couple of other forums.
Ismael, in addition to sandable primer, the body on this kit will also need liberal applications of super glue and clamps. I'm going to use Apoxie Sculpt to fill the gaps on the rear. You can smooth it as you apply it and it doesn't shrink, so you end up having to do less sanding at the end.
Ben
|
|
|
|
Post by Joel_W on Apr 13, 2021 2:44:21 GMT -8
Ben,
I'm looking forward with great interest as to how the Apoxie Sculpt handles this complex task as its never let me down as yet, so I keep on expanding its uses.
joel
|
|
|
|
Post by Ben_B on Apr 13, 2021 5:56:18 GMT -8
Apoxie Sculpt is my go-to filler these days. It takes longer than Tamiya putty to harden, but it doesn’t shrink and it stands easily. I use as little super glue as possible, because the fumes can give me a pretty bad allergic reaction.
Ben
|
|


