|
|
Post by Bernard Kron on Aug 4, 2020 18:02:13 GMT -8
 This is the 1/24th scale Tamiya kit. Believe it or not, it's my first Tamiya and I'm enjoying the detail. crispness and precision. My plan is to build the club racer version with the ero screens. I'm in the "proof of concept" phase right now, where I tackle the changes and difficult bits to make sure the idea I have will work. I'm going to try to duplicate the polished aluminum that was a popular treatment among owners of these early lotuses. I'm using Spaz Stix Ultimate Mirror Chrome shot to bare polished styrene. I did the bonnet, cowl and transmission and they came out really nicely so now it's time to tackle the masking job to accomodate the painted fenders and nose.  Dave Bantoft, a very fine modeler in Australia, had let me now a while back that he had resin copies of the classic Lotus "Wobbly" cast aluminum wheels that Colin Chapman first introduced with the front engine Lotus 12 Formula 2 car in late 1956. "Wobblies" are another popular early-lotus appearance item, usually finished in their characteristic yellow color.  Dave was kind enough to send me a set. Dave's resin castings included tires molded to the rims and solid backs. The wheels are just the right size but the tires were a little small. With the fact that they had full wheel backs with no room for the kit brakes it was simplest, if a little risky, to remove the tires and then sand the faces down to fit the kit tires. Here's a post-thrash bench photo of the result. I'm using AMT inner wheel rims. Once they're in the prerequisite yellow they should look mighty fine. You can also see the beginnings of masking job.  This is a brave new world for this confirmed rod and custom modeler, although this particular car has much in common with a hot rod. Wish me luck! Thanx for lookin', B. |
|
|
|
Post by afx on Aug 5, 2020 2:25:20 GMT -8
Bare panels look great.
|
|
darylh
Full Time Ride

Posts: 126
|
Post by darylh on Aug 5, 2020 8:06:35 GMT -8
This will be fun to watch. That single seater looks excellent.
|
|
|
|
Post by Joel_W on Aug 6, 2020 4:52:10 GMT -8
Bernard
Great build for sure. I'll be following right along as I'm sure that I'll be learning a ton of new techniques. Love the bare metal finish on the Bonnet.
Joel
|
|
|
|
Post by Ben_B on Aug 6, 2020 5:37:15 GMT -8
+1 to the comments about the natural metal parts! Following this build!
Ben
|
|
|
|
Post by sam on Aug 6, 2020 21:05:07 GMT -8
I have been wanting to build one of these, so I will be following.
|
|
|
|
Post by Chris K. Hale on Aug 8, 2020 11:40:41 GMT -8
I couldnt agree more about the Hot Rod tie in, I was putting together the parts to do a Super7 but with a 427 Chevy under the hood and a few other Hot Rod type features..never got off the planning stage on it though. Looking Good so Far Bernard.. Chris
|
|
|
|
Post by Bernard Kron on Aug 10, 2020 19:24:59 GMT -8
Thank you, everyone. At last I'm doing something that's relevant to the Motorsports Modeling mission! This is turning out to be a highly technical project. The idea of doing a polished aluminum body dictates a really strategic approach to masking. I didn’t mention it in my first post but this is actually my second try at painting the body. The first time around I wasn’t careful about handling the outer body surfaces. The Spaz Stix Ultimate Mirror Chrome wasn’t fully cured and I landed up wearing it away. So the body went into the purple pond and this time I am planning carefully exactly when I pant each area of the body. The fenders and nose have been painted with Tamiya TS-43 Racing Green Spray. The body is “zoned” into 4 distinct areas with separate masking for each – the fiberglass parts (nose and fenders), the “upholstered” interior surfaces (painted with Testors Acryl Insignia Red), the unpolished bare aluminum surfaces (interior, engine compartment and underpan), and the polished aluminum surfaces. In the composite photo below you can see that I’ve painted the fenders. The second panel shows the fully masked main body. The interior surfaces are left in bare styrene, as is the underside. These will be sprayed in Testors Buffable Aluminum Plate. After several days of cure time I’ll buff the surfaces. The outer body surfaces (under the fenders up to the nose, between the fenders and the rear fuel tank area) will get shot with mirror chrome immediately before final assembly. If possible I’ll attach detail parts that lend themselves to masking before shooting the polished aluminum areas. My hope is to minimize handling and to be disciplined enough to only grip the model by the fenders, which will still be masked. The fenders will only be un-masked after final assembly. In the composite photo you’ll also see the “wobblies” finished in Tamiya TS-34 Camel Yellow. Highlighting them in paint revealed that I need to do more work truing up the rim edges. A nose stripe was also applied in Camel Yellow. After the paint cures I’ll polish out the edge between the two colors. While the paint hardens I’ll work on the motor, drive train and suspension which will be the subject of the next update. Thanx for lookin’. B.  |
|
|
|
Post by Chris K. Hale on Aug 11, 2020 4:47:52 GMT -8
Bernard, Looks like a ambitious plan for masking and painting. I usually dont have a problem using buffing Metalizers if I first thoroughly wash my hands to remove Oils and other contaminates before handling it at any point before finishing, , apply at least 2 coats , let it completely cure ( 3 days to a week ) and dont buff it until I am almost done, and watch for transfers of Metalizer to your fingers while handling, it usually comes out nicely. I also use AS-12 Bare Metal, same lacquer as the TS series, from the Tamiya Aircraft line a lot because of its brilliant shine, unsealed of course, and also the TS-30 Silver Leaf for a similar Bright near polished Metal look. Both being a regular ( not buffing) type finish paint and drys quickly and does not transfer the Aluminum Oxide that is used to make Metalizers. 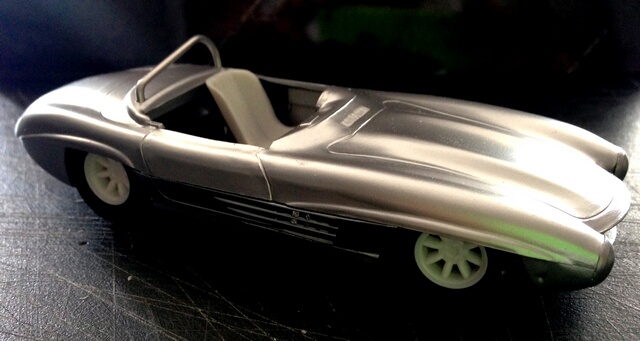 I used the As-12 un-sealed on this 1/32 Mercedes and was really Happy with the results. I am enjoying your approach to the assorted challenges on the Super 7 Keep the W.I.P.'s Coming.. Chris |
|
|
|
Post by Joel_W on Aug 11, 2020 5:36:44 GMT -8
Bernard,
The body/chassis really looks like some very complicated and intricate masking. The final results surely make that effort more then worth while. I've never used rattle cans for painting, so I've never had to deal with any hard ridge line like on the nose cone. I'm completely confident in your ability and technique to remove it completely once it's fully cured. Those wheels & tires are looking real good.
Joel
|
|
|
|
Post by Bernard Kron on Aug 31, 2020 12:08:45 GMT -8
Thanks guys! I figured it was time for an update before this project is completely forgotten. It’s actually quite far along with all the subassemblies painted but this update will only show the bare metal aluminum surfaces painted, the completed wheels and tires, the completed nose piece, and the completed motor. The suspension is done and installed but not very visible in the photo below. The interior bits are all done and will go in next, along with the completion of the under-hood area. Then the windscreens, lights and final assembly. The next update should be the final one showing the completed details. The whole thing looks pretty ragged right now as I’m peeling back the masking only to the limit required for the assembly process. So far I’ve managed to keep the bare aluminum surfaces relatively unmolested, and the Tamiya masking tape has pulled up without lifting any paint. Thanks for lookin, B.  |
|
|
|
Post by mustang1989 on Aug 31, 2020 13:28:34 GMT -8
Man this is looking good Bernard!
|
|
|
|
Post by Joel_W on Aug 31, 2020 15:38:14 GMT -8
Bernard,
That's some masking job you did. Should work perfectly.
The engine with the side draft Webbers (?} along with the finished wheels/tires, and the nose clip all came out perfectly.
Joel
|
|
|
|
Post by Bernard Kron on Sept 7, 2020 17:18:15 GMT -8
Thanks guys glad youre diggin' it! This project is now completed. Since this is a straightforward kit build there’s not much to comment on other than the fact that this is my first Tamiya kit and the fit and precision of the parts was a genuine pleasure, even if some of the subassemblies and detail parts were mighty small and fiddly. Tweezers are definitely in order! I think the accuracy and realism comes through in the final result. Below are a couple of detail photos. The “beauty shots” of the completed model will be posted tomorrow. Thanx for lookin’, B.   |
|
|
|
Post by mustang1989 on Sept 7, 2020 18:01:12 GMT -8
When you say Tamiya you’ve pretty much said it all. I’ve built a couple of aircraft kits from them and their precision in regards to fit and accuracy are just “all that”!
Beautiful finish on your car here Bernard
|
|


