|
|
Post by Ben_B on Aug 21, 2021 2:19:35 GMT -8
Sorry to hear about the decal problems. I had problems with wrinkles on Indycals decals for my recent Audi. Solvaset didn't help. The only way I finally got them to lay down was to dip a Q-tip in very hot water, as in it had just stopped boiling, and pressed them in place. I was at the point of "what do you have to lose" when I tried it. As for the sticking to the paint, I have that happen occasionally, but it varies randomly between manufacturer and paint surface. The dish soap in the water trick usually helps. I've also heard saliva works, but I don't want to go spitting on my models!
Ben
|
|
|
|
Post by Joel_W on Aug 21, 2021 5:30:58 GMT -8
Ben,
Your similar decal issues with Indy Cal decals is even more concerning to me as you're a way better painter and decal'er then I'll ever be. As I said in my latest adventure post with the Lotus, the more I thought about it, the more these little decal issues with Indy Cal decals seem to register. Not always a major issue, but it does vary from sheet to sheet to none at all. Some of my decals are nearly 4 years old, so there's more then just a few different batches of bulk decal paper that Michael used. And he did mention that he's switched brands and or types a few times. These decals are a little more then 1 year old, which matters as he prints decals per order with no in house stock that I really like.
I have noticed that the decals stick sooner, and sure seem to be a little thinner, so working with them should be a min as possible, not constantly rolling and tamping as I'm use to doing.
The surface solution of Set, warm, water, and Dawn seems to be a winner, and with the largest decals still to go on when they get here, I'll know for sure.
And thanks for the QTip in hot water. I'd never have thought of it.
joel
|
|
|
|
Post by Joel_W on Aug 21, 2021 6:05:08 GMT -8
That can be some tuff sailing you got going, glad to hear that you kept at it. With all those years of experience sure paid off for sure. I’m sure we all have a brain fart or bad day at the bench, Waiting for more Chris, At my age one does get more then their fair share of Brain Farts. As I've posted so far I've over come my issues, and the repaint came out fine. Always great to hear from you. joel |
|
|
|
Post by Joel_W on Aug 21, 2021 7:17:01 GMT -8
Chris, I've been thinking more about what you said in relation to the actual color. In the picture I use which is my current avatar, the Green is just to dark, maybe BRG. So i went through my reference pictures and this picture clearly shows that the Martini color is brighter and lighter then BRG. The picture is from the Mortorsport Hall of Fame Live event, and judging by the other F1 cars there, it's most likely a official Lotus restoration. The color and base coat i used up close and personal seems to be a little to dark, but with the flash about right. In any event it's as close as i can get it. joel 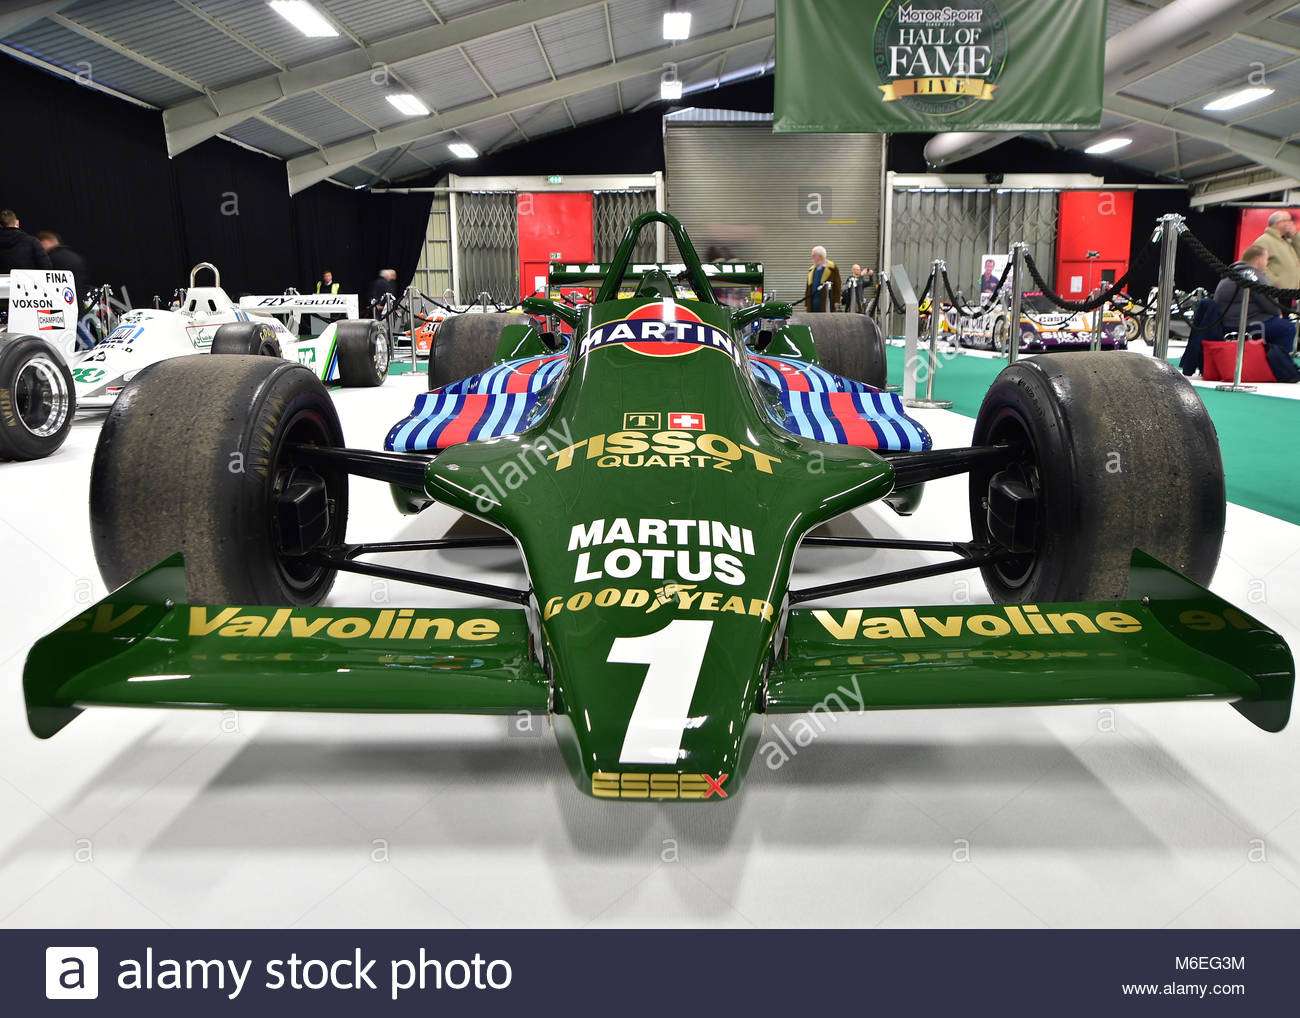 |
|
|
|
Post by Chris K. Hale on Aug 21, 2021 7:38:51 GMT -8
Looking at the last 2 pics, I think you have have it about as close as possible, I didnt think you were going to re-spray it but in the end it was a good move. The camera can be very deceptive when it comes to actual color and at times impossible to get it just right. I always think of the 40+ year controversy about the actual color of the Gurney Eagles, I built a HO 68 Eagle for a Concours event (which I proudly won) and I asked Dan what color they used, and he told me "Cadillac Fire Mist Blue!" But in all the years since, I have yet to see that paint used on a model. Like I said I think you nailed the Lotus 79 paint Right on.. Chris
|
|
|
|
Post by Ben_B on Aug 21, 2021 8:01:30 GMT -8
My hot Q-Tip method was invented through an act of desperation. "Screw it, I'll just melt the little *^&$&% on! If it doesn't work, I was going to have to replace the decal anyway!" I wonder how many modeling techniques were invented that way?  Ben |
|
|
|
Post by arcticwolf on Aug 21, 2021 11:28:03 GMT -8
My hot Q-Tip method was invented through an act of desperation. "Screw it, I'll just melt the little *^&$&% on! If it doesn't work, I was going to have to replace the decal anyway!" I wonder how many modeling techniques were invented that way? Ben All of them, Ben, all of them!!  |
|
|
|
Post by Joel_W on Aug 25, 2021 8:16:31 GMT -8
Update: Decaling Well, the decaling stage of the build minus the tires, wheels, and calibers is done and in the books. As I mentioned in a previous post, I had issues and problems with applying my Indy Cal decals, and managed to ruin one. Michael, the owner of Indy Cals jumped right on my problems and issues, and together along with input from my brother whose level of modeling is a few notches above mine. Anyway, Michael Oops policy is for decals purchased within one year. I bought these decals by his records more then three years ago, yet Michael not only rushed my replacement but sent me the entire decal sheet as a spare. He customer service rates a 100% A+ in my book. My revised decaling procedures worked perfectly. No stress, no issues, and no screw ups this time. I let the decals dry in my paint curing box for 24 hours, and then out for a quick photo shoot. But this time only using two 5000k light sources and no on camera flash. Needless to say the exposures ran 2 1/2 min but came out just fine and the Martini Green is as close as I’m going to get to what the model actually looks like. Nothing has been done post decaling as yet besides a quick wipe for dust and Cat hairs!! Here’s where the Lotus stands as of this morning. The top 6 body sections  Top sections just dry fitted   Next up is the clear glossing, should be rather interesting as I’m once again thinking of Gravity’s 2K system. joel |
|
|
|
Post by Ben_B on Aug 25, 2021 8:33:21 GMT -8
Wow! That’s looking really good, Joel!
Ben
|
|
|
|
Post by Joel_W on Aug 25, 2021 8:34:33 GMT -8
Ben,
Thanks so much for your most kind words. Coming from you, it means quite a lot to me.
joel
|
|
|
|
Post by arcticwolf on Aug 25, 2021 9:15:28 GMT -8
Looks perfect Joel. I like the green, no idea what's accurate or not, but it's going to look great so why worry!
I have found Indycals decals lately don't want to slide as easily as you'd like, on my Lotus I skipped the Microset on the body first step, just used water. It seemed to work a little better. I still put the Microset over the decal once it's in place. But I also clear coat before applying decals, I just have better luck that way. Whatever works man. 
It's a different look for a Lotus, nice addition to your collection.
Cheers Paul
|
|
|
|
Post by afx on Aug 26, 2021 3:10:56 GMT -8
One of the more understated Martini liveries but I like it - nice work Joel.
|
|
|
|
Post by Joel_W on Aug 26, 2021 8:41:43 GMT -8
Paul,
Glad that you like how the paint and decaling came out. Your similar issues with Indy Cal decals and using just water for a setting solution confirms what I did. Although I added two drops of Dawn and about 25% Set as I already had it in the bottle. Like I said, it worked perfectly.
BTW, my twin brother whose a 1/48 & 1/32 scale aircraft modeler has been battling advanced cancer for the last year and has beaten back both with his last check up. So we decided to compromise and once per year Buddy Build of the same exact kit. He opted for large scale, and I picked the Tamiya 1/13 Brabham BT44B, both will be basically OOB plus a little extra here and there. Start date Dec. I'm actually really looking forward to the larger scale with my poor eye site. Could led to two large scale kits per year for me.
joel
|
|
|
|
Post by Joel_W on Aug 26, 2021 8:43:49 GMT -8
JC,
Yep, it's not exactly a very well known Lotus livery especially after years of the Black and Gold for JPS ones. Glad that you like my progress to date. It's always much appreciated.
joel
|
|
|
|
Post by adrian29341 on Aug 26, 2021 9:36:50 GMT -8
Update: Decaling Well, the decaling stage of the build minus the tires, wheels, and calibers is done and in the books. As I mentioned in a previous post, I had issues and problems with applying my Indy Cal decals, and managed to ruin one. Michael, the owner of Indy Cals jumped right on my problems and issues, and together along with input from my brother whose level of modeling is a few notches above mine. Anyway, Michael Oops policy is for decals purchased within one year. I bought these decals by his records more then three years ago, yet Michael not only rushed my replacement but sent me the entire decal sheet as a spare. He customer service rates a 100% A+ in my book. My revised decaling procedures worked perfectly. No stress, no issues, and no screw ups this time. I let the decals dry in my paint curing box for 24 hours, and then out for a quick photo shoot. But this time only using two 5000k light sources and no on camera flash. Needless to say the exposures ran 2 1/2 min but came out just fine and the Martini Green is as close as I’m going to get to what the model actually looks like. Nothing has been done post decaling as yet besides a quick wipe for dust and Cat hairs!! Here’s where the Lotus stands as of this morning. The top 6 body sections Top sections just dry fitted Next up is the clear glossing, should be rather interesting as I’m once again thinking of Gravity’s 2K system. joel This looks fantastic Joel - a very nice clean decal app. for sure. I personally love this Martini Livery - the green is so unique, and really makes me think Britain! Decaling is my favourite stage of any build, and so I find it very exciting - I do just took advantage of Michael's 'OOPS' policy when I buggered a set of the Players 95 decals - Michael sent me a replacement right away and also mailed me out a replacement set of my Helio decals as well due to the fact that he made a booboo on the Nosecone decals and did them black instead of white - great customer service from him for sure. This is looking like a classic Joel Golden Years F1 build and coming along very nicely my friend - very nicely indeed. Tell me Joel what the Gloss 2K method procedure you are going to use - I'm always curious about different ways of clear coating because there are so many. |
|


