|
|
Post by Oldtimer on Dec 4, 2021 14:39:34 GMT -8
Inspired by, I think, someone on here that was doing one in 1/24, I've started on a 1/18 scale Petty 1970 Ford Torino Cobra. We all know the story about the one year that Petty bailed on Plymouth before they created the Superbird. 
But what if Chrysler blinked, and didn't bow down to the Pettys? What if Petty Enterprises stayed with Ford? Here are my two donors, an Auto World 1972 Petty Plymouth Roadrunner will donate the chassis.  An Ertl American Muscle 1971 Torino Cobra will donate the body.  Wasn't sure how successful this one was going to be, so didn't take any progress pictures, but when it clicked, thought I would chronicle the rest of the build.     You might be thinking, wow, that looks too easy, you just put the new body onto the old chassis. Well . . . I wanted to get rid of the torsion bar front suspension of the Plymouth, and use a more Ford-like coil spring setup. But I also wanted to keep the race chassis detail of the Plymouth (and the Torino had a molded in exhaust system, among other things). So, I cut the front clip off the Ford chassis, and put it in place, then bonded (actually Super Glued) the Plymouth chassis to it.     In order to use the front spindles from the Plymouth with the front suspension from the Ford, I had to fabricate a ball joint extension out of aluminum rod (circled in the picture), which also cured a front/rear rid height issue.  Encouraged by this progress, this one is going forward. |
|
|
|
Post by swede70 on Dec 10, 2021 9:27:51 GMT -8
Greetings,
Neat - that looks super-promising and right quick too. I remember seeing a Torino Cobra taking shape at Petty Enterprises looking into the '71 season, hence it seems the effort to draw Richard back to Plymouth via affording him the Superbird aero package and whatever other enticements were placed on the table came late. It's surprising no one else has tried this in 1:18th, or even 1:25th scale plastic for recent and admittedly limited memory. Thanks for sharing...
Mike K./Swede70
|
|
|
|
Post by arcticwolf on Dec 10, 2021 14:24:46 GMT -8
Using a Plymouth to make a Ford. I never would have thought of that. Looks right so far!!
|
|
|
|
Post by Oldtimer on Dec 11, 2021 14:18:25 GMT -8
Using a Plymouth to make a Ford. I never would have thought of that. Looks right so far!! When you consider how, in the early, pre-spec eras, chassis were re-skinned multiple times, I thought it was a plausible premise. Body is with my stripper right now, should get it back early next week. Paint arrived yesterday, decals already in hand. GMP Ford 429 engine arrived yesterday as well, but is designed for a street Boss 429 Mustang. In the process of trying to transfer racing peripherals (air cleaner and headers primarily) from donor Hemi. Biggest hurdle may be getting it painted, as weather has turned cold here. |
|
|
|
Post by Oldtimer on Dec 16, 2021 13:47:43 GMT -8
So, making some progress on this one. Here's the back of the chassis, and you can see that the Plymouth chassis doesn't quite match up with the body.  Going to use the same technique I used at the front, and cut a slice off the rear of the Torino chassis. 
Then bond that piece onto the Plymouth chassis, which will allow me to use the screw mounts at both the front and rear of the custom.  Will reinforce the joint with a piece of sheet styrene.  Now, onto wedging the GMP Boss 429 engine into the Ertl Torino engine compartment. I dry fit the headers and dumps from the Plymouth to their proper location on the Plymouth chassis.  Because of the way that the Plymouth engine mold is made, the headers are really funky.  I removed the street exhaust manifolds from the GMP 429, and they have a nice flat surface, almost like a real engine would have.  When you dry fit, this is what you get.  Going to have to very carefully sand back the headers to where the engine will drop into the chassis and look, hopefully, correct. |
|
|
|
Post by Oldtimer on Dec 18, 2021 9:09:18 GMT -8
One of the many things that I need to work around when blending the body from one 1/18 scale diecast to the chassis of another is the differences in treatment of certain elements. Here I have to deal with the dogleg hinges of the hood from the Torino which are closer together than in the firewall of the Plymouth chassis.   Fortunately, from my racing days, I have acquired a nibbling tool that helps.  This tool takes a roughly 1/4 inch wide by 1/16 inch deep bite out of most any lighter material. Here you can see where I have started a new notch.  
I'll have to make similar cuts on the firewall, to match the interior.  Might have to relocate the master cylinder for accuracy. Dogleg hinges are also popular on earlier model diecast for hanging doors.   Since this is a Nascar stock car, that won't be a problem, as I will remove the hinge and solidly mount the door skin to the body for final assembly prior to painting. I use a pin vise of sorts, with an 1/18 inch drill bit.   |
|
|
|
Post by Oldtimer on Dec 23, 2021 14:14:10 GMT -8
Got a dry fit of the body onto the chassis done. Had to cut a lot more of the interior and exterior firewalls than I had expected, but I have the four corner screws set and I think it looks good. You be the judge.       Next I will turn back to the engine compartment and start to shave the header flanges to see if I can make that work. Merry Christmas and Happy New Year! |
|
|
|
Post by Oldtimer on Dec 25, 2021 13:48:56 GMT -8
On Christmas Day, it is 82 degrees here. My paint booth is my front driveway, so I had to take advantage of the weather and put down a couple of coats of paint. There will be a couple of coats of clear, as well, and temps are above 70 from now until new Sunday. What do you think? Might be a little too dark, or might be the light in my shop, but this is the paint color that my research revealed, Basin Street Blue.  Tried a picture with the flash on. Still might be a little dark, but I'm going to go with it.  |
|
|
|
Post by Oldtimer on Dec 28, 2021 9:43:09 GMT -8
Trying make some progress, but seems like it is one step forward, three steps back. Got the header flanges ground down. The one on the right was the Guinea Pig, but when it is glued to the head, won't be noticeable.  Dry fit from the bottom looks good.  Dry fit from the top shows that a lot of work needs to be done. 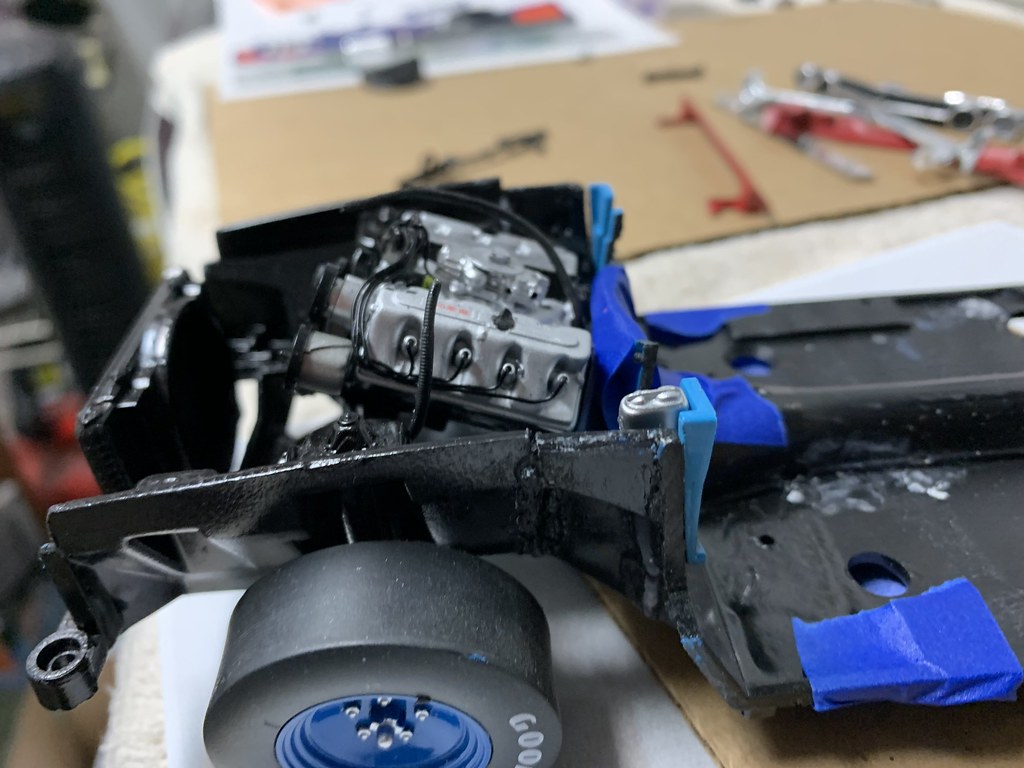 If you remember the engine crossmember from a few posts up, I already removed a considerable amount of plastic, including a stalk that the Ertl engine was attached to.  Looks like a lot more surgery will be required to get the GMP 429 to sit flat. 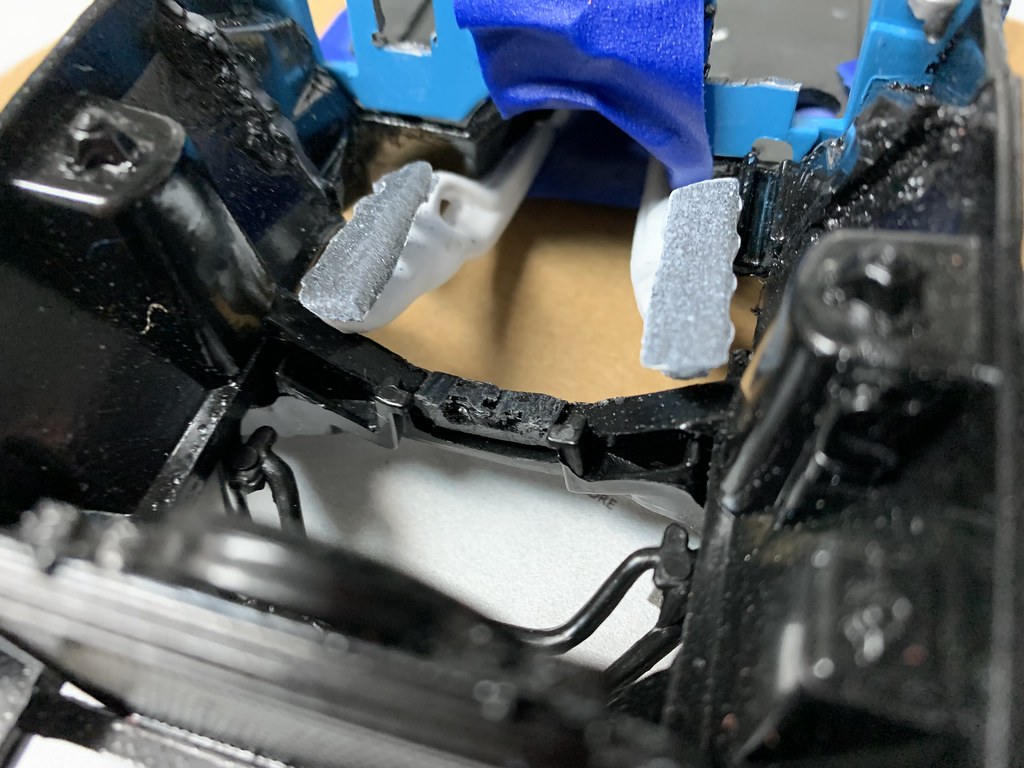 Was hoping not to have to remove the radiator, but that may be my only access point. |
|
|
|
Post by Oldtimer on Dec 29, 2021 17:50:04 GMT -8
This is a new dry fit. Looks pretty good.  That is, if you leave this minor component off.  A little more work required. |
|
|
|
Post by Oldtimer on Dec 30, 2021 12:55:12 GMT -8
So, how did we achieve the new dry fit? By going dry sump! Prior to 1969, my exposure to Nascar racing had been through Wide World of Sports, so I knew very little other than what ABC, Jim McKay, and Chris Economaki wanted me to know. In 1969, Texas International Speedway opened with inaugural Texas 500. As president of the Texas A&M Sports Car Club at the time, I had an ongoing relationship with the track. One day I got a phone call asking if I knew of anyone who would be interested in pumping gas for Union 76 during race events. I volunteered myself, and then started looking for others to join me. My job was to pump gas and give out lubricants to the Nascar teams. The Union 76 reps (which included Bill Broderick) gave us a list of teams, showing what kind of oiling system they were using. If a team was still using wet sump, we were to give them eight quarts of oil whenever they requested it, but the newer, more advanced teams using dry sump would get an entire case. So, now equipped with the knowledge that dry sump was in existence during the era of this fantasy build, I looked around on my shelves and found an 1/18 scale Nascar chassis with a dry sump setup. So I salvaged a pan and drive system and removed the bellhousing and transmission from the GMP wet sump pan.  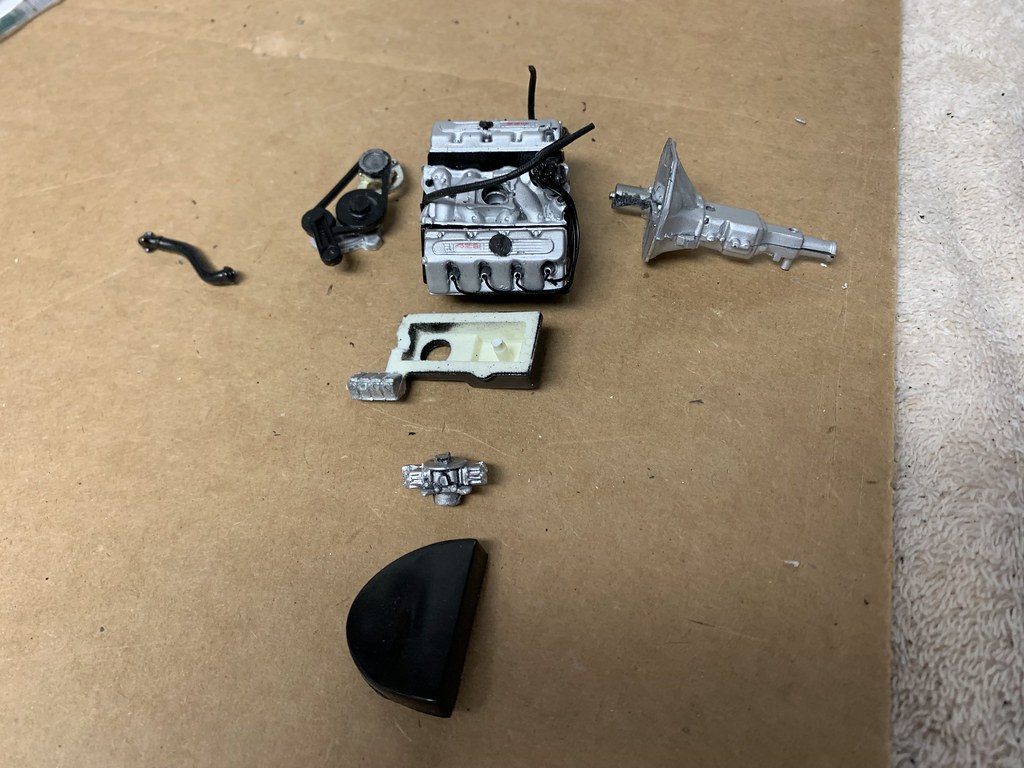 With the dry sump pan taped in place, looks like we might have a winner! 
Found a dry sump tank in the spares bins, as well, so it will be mounted in the appropriate location in the interior.  Got to wait on some paint to dry, then we have to take courage and SuperGlue in hand and assemble the engine. |
|
|
|
Post by arcticwolf on Dec 30, 2021 13:56:56 GMT -8
Have faith Jim, it will fit!
|
|
|
|
Post by Oldtimer on Dec 31, 2021 11:16:25 GMT -8
Thanks for your confidence! In the process of owning and (occasionally) racing four different race cars, I've taken delivery of my share of long blocks. They all, more or less, looked like this.    Usually, I knew they were going to fit into the chassis, as I raced Chevy Smallblocks exclusively. Hoping for the same luck with this GMP 429 with a dry sump pan and drive from an Ertl Nascar Ford going into an Ertl Torino chassis. Happy New Year! |
|
|
|
Post by Oldtimer on Jan 1, 2022 9:45:43 GMT -8
Well, Happy New Year to all who are following this build. I've put the engine install on the backburner while I figure out headers. So, instead I did a hard dry fit of all the other parts and pieces of the model, in order to go ahead and apply decals soon.  Added a pedal assembly that the Plymouth interior didn't have. Doors will eventually be glued closed.  Still need to fabricate a fuel filler.   Got the engine installed, and the carb and air cleaner in place. Still need to install the top water hose from the engine to the radiator.  And the hood stays open by itself (unusual for me on one of these body/chassis swaps). 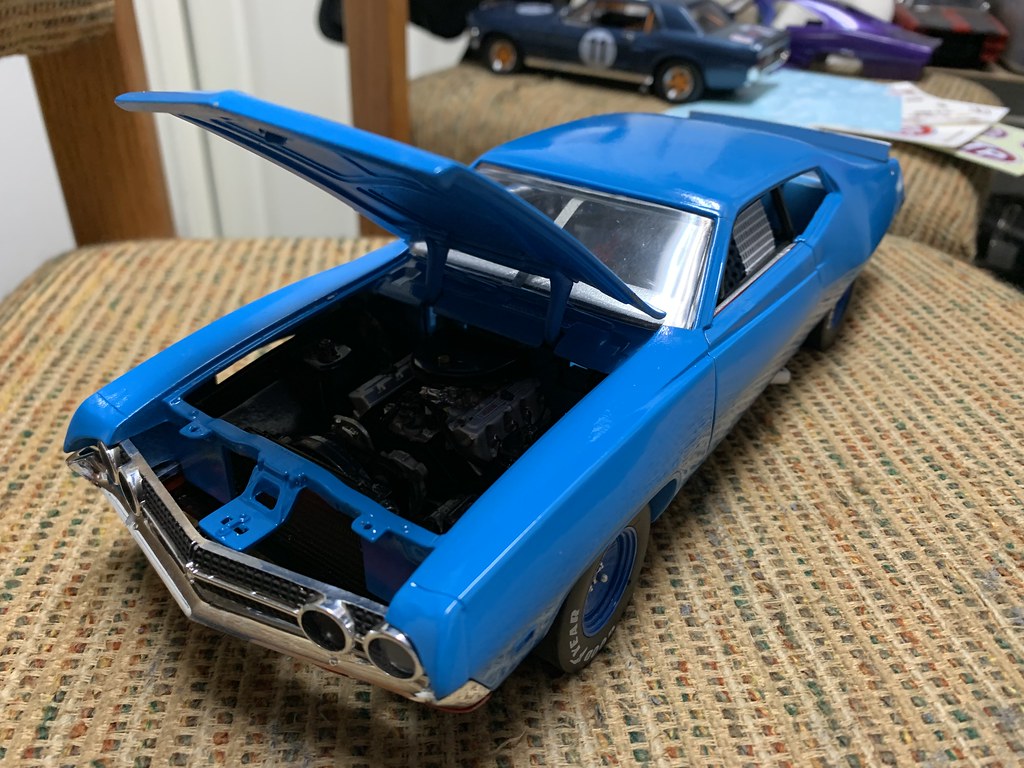 Just need to figure out how to connect the engine to the exhaust dumps. Already have a driveshaft roughed together, just need to cut it to length.  The package tray for the Roadrunner interior didn't extend back to the rear window of the Torino, so I placed a thin sheet of aluminum in the void.  |
|
|
|
Post by Oldtimer on Jan 19, 2022 15:03:37 GMT -8
Still trying to figure out headers. Been going through my parts and found three of four sets, but their just sitting on the workbench for now. Thought I'd at least try to make some progress, so started on the decals. The decal sheet I'm using is one of those two layer-type, with a white set and then a color set, plus I am adding in some STP decals as if this was on early pre-Granatelli temper tantrum version. Not done yet, but thought I'd share the progress.      |
|


