|
|
Post by pnance26 on Mar 14, 2022 5:59:14 GMT -8
A little more progress with attaching the transmission to the engine (dry fitted only) and then temporary fixing of top chassis frame after cementing back and mid uprights in correct position...  I realize there is a large gap at the rear (left in the photos) at the top of the upright. That is because it is not permanently in place. Otherwise, I couldn't get the engine out for detailing etc. So let's talk about that for a moment. Take the time to ask questions of others with experience with these kits and learn from them. 2whl (Paul Cadwell) and Chris Smith both warned me that following the instructions step by step will only get you in trouble and in line for head aches. Rather, build it like you would a real race car which means chassis first with dry fitting the engine block, transmission, front chassis piece (with seat). Another thing that MFH builders know but us rookies don't is this THERE IS A SHIT TON OF DRILLING TO DO ON THESE KITS. MFH doesn't make it easy nor are there any "Drill here" instructions. You need to just assume if there is a dimple that means it needs drilled out. And test fit the crap out of the kit to make sure you have drilled deep enough for a snug fit. Like I said, I am contemplating filling some of the holes with candle wax to give the screw threads something to bite into in the holes. Anyway, more drilling (there are at least 36 holes in this single piece)...  ![]()  First of many dry fits of cockpit base to the rear chassis...  Talk about building up finger strength with all that drilling. I did as much as I could do on Sunday. I won't be back in the saddle again until next Sunday. Comments and criticisms are ALWAYS welcome! ![]() |
|
|
|
Post by 2whl on Mar 14, 2022 7:29:45 GMT -8
Okay guys… The head of one of the screws on the transmission stripped out. I tried drilling it out but succeeded only in leaving the body of the screw. Any suggestion on how to “punch it out”? Also I had an idea of filling the drilled receptacles with wax in order to give the thread something to bite into besides the soft metal. Does that sound reasonable? Any and all suggestions appreciated. Patrick, which screw are you refering to? The ones that attach it to the frame? The head of the screw or the hole it goes into? I think filling with wax won't work because it will be softer than the white metal....i.e. less bite |
|
|
|
Post by 2whl on Mar 14, 2022 7:36:01 GMT -8
..... after cementing back and mid uprights in correct position... You cemented something BEFORE you fitted the rest of the chassis? I hope it's c/a so you can debond it with acetone. You should be able to assemble at least this much if not more before you start gluing parts together 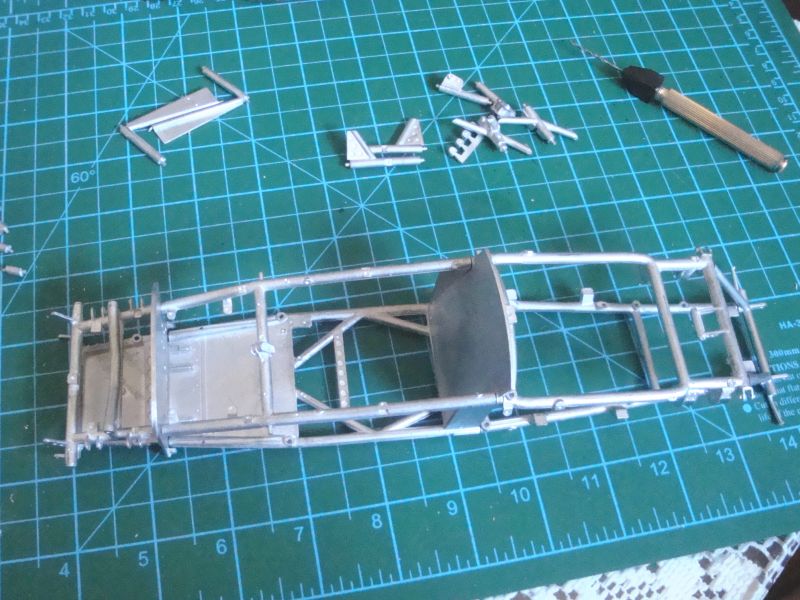 |
|
|
|
Post by pnance26 on Mar 14, 2022 7:44:25 GMT -8
Paul, I only did the rear chassis uprights, not the upper part of the chassis. I put it all together, rubber banded it into place and then glued just the bottoms... and yes, it is CA and yes, I have the "unglue it" if necessary...
As to the screw, the body is still stuck in the hole where the transmission fits to the frame. The head stripped out and I couldn't remove it. Worst case scenario is I measure the flanges that attace the transmission to the chassis frame, make new ones from sheet metal, cut off the resin, and replace. That is the ultimate Plan X (insert a letter)
|
|
|
|
Post by 2whl on Mar 14, 2022 7:51:08 GMT -8
It's going to be tough to get that screw out. It's harder than the white metal. Maybe carefully drill the head off but leave enough of the shaft to be able to grip it and remove it
|
|
|
|
Post by Joel_W on Mar 14, 2022 11:54:49 GMT -8
Patrick,
For a newbie MFH builder you're doing what I think is a pretty good job. I'm not following Paul's thoughts on when to actually start to glue up the chassis. I would think that with all those individual parts, dry fitting does become an issue unto itself.
One question for any and all MFH builders, why does everyone seem to use only a hand drill? Assuming you can get a Dremel or similar hobby drill to throttle down enough, why not use it?
joel
|
|
|
|
Post by chrissmith on Mar 14, 2022 13:09:19 GMT -8
Patrick, For a newbie MFH builder you're doing what I think is a pretty good job. I'm not following Paul's thoughts on when to actually start to glue up the chassis. I would think that with all those individual parts, dry fitting does become an issue unto itself. One question for any and all MFH builders, why does everyone seem to use only a hand drill? Assuming you can get a Dremel or similar hobby drill to throttle down enough, why not use it? joel Using a dremel of any other power drill usually breaks the drill bits and you don’t have the control you need, on some of the parts your only drilling part way. |
|
|
|
Post by chrissmith on Mar 14, 2022 13:14:07 GMT -8
I have a suggestion on those 1.5x 3mm screws. I drill a 1.05mm hole and screw in the screws to get it threaded before I actually screw the parts together. That way your not putting too much pressure on the parts.
Hopefully this
Make sense and helps
|
|
|
|
Post by pnance26 on Mar 14, 2022 14:19:37 GMT -8
I have a suggestion on those 1.5x 3mm screws. I drill a 1.05mm hole and screw in the screws to get it threaded before I actually screw the parts together. That way your not putting too much pressure on the parts. Hopefully this Make sense and helps Yeah, that makes sense… after I broke one… LOL! |
|
|
|
Post by pnance26 on Mar 14, 2022 16:03:57 GMT -8
By the way, I bought a variable speed drill this morning that was recommended by Tom Browne in the Hiro builders page… not quite as unwieldy as a Dremel.
|
|
|
|
Post by chrissmith on Mar 14, 2022 17:01:40 GMT -8
By the way, I bought a variable speed drill this morning that was recommended by Tom Browne in the Hiro builders page… not quite as unwieldy as a Dremel. I personally will still drill by hand |
|
|
|
Post by pnance26 on Mar 15, 2022 5:43:16 GMT -8
By the way, I bought a variable speed drill this morning that was recommended by Tom Browne in the Hiro builders page… not quite as unwieldy as a Dremel. I personally will still drill by hand I will give it a go. And maybe regift it to the wife if I don't like it. She will have a use for it! |
|
|
|
Post by Chris K. Hale on Mar 15, 2022 6:20:24 GMT -8
A old slot car trick is to use a thin carbon Dremel cutting disc and cut a new slot in the remainder of the screw then just back it out. Did this on a lot of Allen head screws that stripped but if the screw is far in or there is no room...... just saying . Chris
|
|
|
|
Post by arcticwolf on Mar 15, 2022 8:21:20 GMT -8
By the way, I bought a variable speed drill this morning that was recommended by Tom Browne in the Hiro builders page… not quite as unwieldy as a Dremel. I use a light duty variable speed drill anywhere it will fit, but obviously anything under about 1/16th won't be gripped by the chuck, so it's pin vise. A Dremel would have too high an rpm even on low - it would simply melt the plastic rather than drill it. It might work on metal, I rarely ever work with white metal.
Does the screw need to thread in for any real reason? I mean can you not just drill out the broken part and CA in a new one?
|
|
|
|
Post by pnance26 on Mar 15, 2022 13:27:09 GMT -8
By the way, I bought a variable speed drill this morning that was recommended by Tom Browne in the Hiro builders page… not quite as unwieldy as a Dremel. I use a light duty variable speed drill anywhere it will fit, but obviously anything under about 1/16th won't be gripped by the chuck, so it's pin vise. A Dremel would have too high an rpm even on low - it would simply melt the plastic rather than drill it. It might work on metal, I rarely ever work with white metal.
Does the screw need to thread in for any real reason? I mean can you not just drill out the broken part and CA in a new one?
Unfortunately, it is the back attachment point for the transmission to the chassis. I've tried drilling it out... let me see if I can show you the exact screw.  |
|


