|
|
Post by tatocorvette on Jan 5, 2017 15:14:58 GMT -8
Hello, The 2016 Rolex 24 hours at Daytona was a great race. It was the last Daytona race for the DP prototypes but the most popular class and my favorite by a long shot was the GTLM, where Ferraris, Porsches, BMWs, Fords and of course Corvettes duke it out for 24 hours. The 2016 saw the debut of the new Ford GT race car, after years of the brand been absent from the racing circuit. Corvette racing started serious factory backed efforts in 1999 and since then has evolve into arguably The best team out there, becoming the measuring stick for all others. After 23 and a half hours of racing, The GTLM class was contended by a Porsche and the 2 Corvettes. Oliver Gavin in Corvette #4 passed the Porsche after a slight "touch" and then Corvette #3 driven by Antonio Garcia posted fastest after fastest lap of the race trying to catch his teammate. Convention will dictate that teammates fly in formation for a 1-2 finish. But in a very unusual manner, with about 15-20 minutes to go, Corvette team told the drivers "You are OK to race! (each other). Keep it clean no risks". Those last 15 minutes were the most epic in recent history speaking volumes about the trust the whole team has in the equipment and the drivers. At the checkered flag, it was a drag race, with Gavin in Corvette #4 winning by only .034 seconds over his teammate after 24 hours, 25 pit stops, 722 laps and 2,570 miles! Sounds like I enjoyed it isn't it? This link will show the last 15 minutes of that race... www.youtube.com/watch?v=TE5cA2YTiusAnyways, Revell recently released the long awaited C7R kit. The kit is humble but has great potential. After opening it the first issue was clearly visible: The car is a 2014-2015 spec car with decals for the 2016 winner...... So we have several options here: -Build the car as the 2015 Le Mans winner: That will require a custom set of decals. This idea is in the back burner now. -Update the car to 2016 specs. That's the route I'm going here.   Started by removing the molded emblem.  The hood was modified for a 2016 specs. Note the molded hood pins were removed as well.    Rocker panels changed from 2015 to 2016. New ones were made. 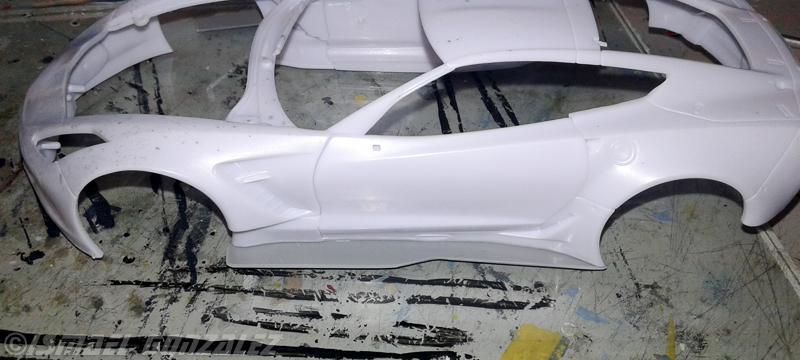  The front splitter is also very different for 2016   Changes in safety regulations for 2016 now mandate a hatch in the roof. This is not an escape hatch like NHRA funny cars. This is for the safety crew to insert a spine brace before extracting the driver in case of injury. The hatch was scribed using a template I did in aluminum tape.   Regulations changes for 2016 allowed for improved aero packages. In the back of the car, the smooth splitter has been replaced with an aero diffuser to optimize airflow and improve downforce. This was done using brass and styrene.     More updates to come. Stay tuned! Thanks, Ismael |
|
|
|
Post by checkeredflagdetails on Jan 5, 2017 16:20:41 GMT -8
Wow! Just watched the youtube link. can't wait for more of this build. Great start.
|
|
|
|
Post by robhart on Jan 5, 2017 18:13:40 GMT -8
Yeah, that is a great start! I will definitely be following this project. Really nice work on the roof hatch and diffuser.
|
|
|
|
Post by tatocorvette on Jan 5, 2017 20:37:14 GMT -8
Hello, The engines in modern race cars are barely seen. The kit's engine is very humble. Not much more than a "lump between the fenders". I know this will barely be seen but I have never claimed to be normal.  I wired and plumbed everything I could see in the references which is not that much. The headers are loose as they need to be installed after the engine is in place. the heat wraps should go all the way down but that won't be seen anyways. The mold lines in the air box are actually in the real thing. Something I have noticed: In previous cars like C5R and C6R, the engine was a jewel! Glossy carbon fiber with exquisite decals and all. Today's car has more raw carbon parts which is dull and not many decorations. Hope you like it.      If I close my eyes, I can hear it idling. Thanks, Ismael |
|
|
|
Post by Art on Jan 5, 2017 21:57:45 GMT -8
Great start, Ismael! I'm looking forward to more.
|
|
|
|
Post by tatocorvette on Jan 6, 2017 5:06:04 GMT -8
Hello, There is a fluid tank in the C7R engine. Not really sure what it is for. Trying to find out. I machined my own tank. The lid was machined in place. It came out slightly thinner than I wanted but no big deal. Added aluminum strap to eventually attach it to the bracing and added a fluid line that will disappear underneath.    Also, these cars have a drink cooler can so the driver can keep hydrated. Since different drivers like different things, they never run sports drinks. Just pure water (my favorite by the way). This cooler "sits" where the passenger would be. The kit's cooler can is... well..... ehhhh... sub-standard for my liking. So, knowing it will not be seen anyways, I machined my own cooler. Painted it and it is ready to reflresh!    The kit's safety net was replaced with a more accurate one including the round hook in the dash to attach to. These cars also have a triangular net on the driver's door. I added that one as well. Anyways both are black and will barely be seen once completed. I tinkered with the idea of a tubing roll cage but that would be a waste of time and will take forever.  Thanks, Ismael |
|
|
|
Post by Chris K. Hale on Jan 6, 2017 6:01:30 GMT -8
Ismael, Great Detail work, check my Cadillac XLR GT2 Build, its based on the C-5 & C-6 Revell kits with a lot of added detail. A good friend of mine drive the Konica Minolta #10 Corvette Daytona Prototype and also just happened to win Lemans in the Corvette, Jordan Taylor! Great Guy, really quite a driver and we talk quite a bit. This years prototype car, Cadillac is un-real!! .. Keep up the work on the C-7 its coming along real nice... Chris
|
|
|
|
Post by tatocorvette on Jan 6, 2017 7:31:28 GMT -8
One of the most prominent and important features of this car is the rear camera and radar system. It is not just a rear camera, but a complete collision avoidance system developed by Pratt & Miller and Bosch that alerts the driver of cars passing, blind spots, closing in, distance, time etc. This system is a tablet size screen on top of the dash, and of course missing in the kit. I cut some bits of styrene and assembled it from 5 bits of styrene and 4 strips of tape. Of course it will barely be seen once painted black but I had to do it.    Scratchbulit paddle shifters and the anodized star-like piece behind the steering wheel. The spiral cable carries the signals from all the buttons and switches in the steering wheel and goes underneath the dash. Yes it is very long. I'll cut to size once in place.    Thanks, Ismael |
|
|
|
Post by tatocorvette on Jan 6, 2017 7:33:58 GMT -8
Ismael, Great Detail work, check my Cadillac XLR GT2 Build, its based on the C-5 & C-6 Revell kits with a lot of added detail. A good friend of mine drive the Konica Minolta #10 Corvette Daytona Prototype and also just happened to win Lemans in the Corvette, Jordan Taylor! Great Guy, really quite a driver and we talk quite a bit. This years prototype car, Cadillac is un-real!! .. Keep up the work on the C-7 its coming along real nice... Chris, That is very cool! Jordan is a great driver! The Konica Minolta is one of my favorites! I have actually thought about scratchbuilding a DP Corvette body. Someday I may start on that. The Cadillacs are looking GREAT! Thanks, Ismael |
|
|
|
Post by Chris K. Hale on Jan 6, 2017 9:20:24 GMT -8
I worked on a school project for my daughter a while back and we built a 1/24 Ford Expedition, the project was to show new technology that the student would like to see in the future...so we built an in dash computer, and I used a Film Color Negative on some white styrene and then made a surround kinda like yours. It came out great and you could see the pic on the screen real well. just a tip!! Chris
|
|
|
|
Post by tatocorvette on Jan 6, 2017 9:49:30 GMT -8
Hello again, Need a hug? Feeling lonely? Nothing will hug you like a tight harness! Disclaimer: I took an artistic license here. Race cars are always changing. So you need to pick a point in time to replicate. I'm building the car as it raced in Daytona in 2016. However, the car raced with BLACK belt harness. Now, if I would have made them black, they would be lost in the darkness of the black cockpit. So I did them in red, which this car has used in other venues. Even in red, they will be hard to see once finished. YES, I know it is not 100% accurate and take full responsibility for it 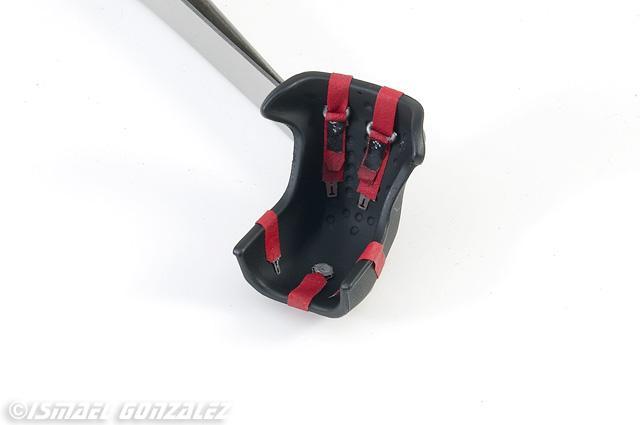 I started this project a few months ago. These updates are a caught up summary of that time. This is where we are now. Thanks, Ismael |
|
|
|
Post by tatocorvette on Jan 6, 2017 14:58:55 GMT -8
Hello, I just did aluminum oval exhaust tips. 
Of course the molded exhaust port in the body (below the door) which are incorrect anyways, will be opened up for these to go thru.Thanks, Ismael |
|
|
|
Post by tatocorvette on Jan 7, 2017 13:05:57 GMT -8
Hello, I finished most of what will not be seen. I added the 2 square braces that go from the top of the dash to the upper cage. However, I hit a major roadblock. Tried dry fitting the body and nothing fits! Thanks Revell! The details added to the engine make not even the hood to fit properly. Sadly, I will have to dismantle and remove the engine top. The engine can not be taken out because it is locked under braces, the cage, axles etc. and would require disassembling pretty much everything. I'm not going that route. Most likely the hood will be glued shut this will become a curbside.... not sure yet....  Oh well....... Thanks, Ismael |
|
|
|
Post by tatocorvette on Jan 11, 2017 9:40:57 GMT -8
Hello, I may have a workaround, but I admit this issue hit my enthusiasm hard. But I'm back on it. The top of the engine was carefully removed. If displaying the model with the hood in place the engine will not have the top. If the hood is off, the top of the engine will carefully be set in place with nothing but gravity holding it. Oh well.... Anyways, here is what will most likely not be seen. Even without the body it is hard to see the added details but I know they are there...    Stay tuned for more...... Thanks, Ismael |
|
|
|
Post by tatocorvette on Jan 11, 2017 12:44:14 GMT -8
Hello again, Turning the attention to the body: Opened the exhaust outlets on both sides and tested the tips.  Blended the hood scoop to the hood. 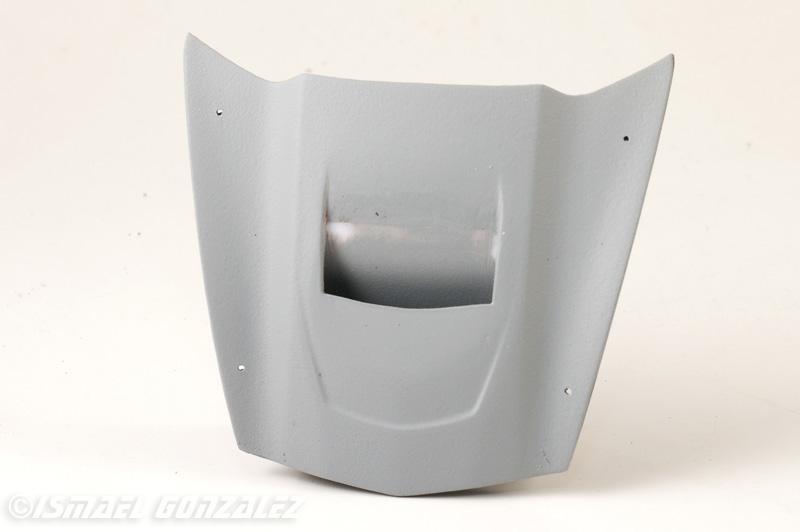 The mounting holes for the rear spoiler brackets were way too big. Made them smaller.  And the kit makes no provision for the driving lights, which are very prominent on these cars. So the dremel and the Xacto had a party together.....  Thanks, Ismael |
|


 Pro Tech | MAD | Scale Motorsport
