|
|
Post by Joel_W on Jan 26, 2019 6:44:39 GMT -8
Ismael,
have a safe trip. Looking forward to your next update when you get back.
Joel
|
|
|
|
Post by Chris K. Hale on Jan 26, 2019 7:03:59 GMT -8
Ismael, did you find 2016 Decals? Just wondering who makes them? Chris
|
|
|
|
Post by tatocorvette on Jan 27, 2019 16:01:56 GMT -8
Hi Chris,
Yes. I got them. It is some sort of a mystery. A fellow forum member from the MCM forum pointed me to an ebay seller who was selling unboxed kits with the set of decals. My impression was that these could be Revell test shots or something. I contacted that ebay seller but he had no more. Then a few weeks later he contacted me saying he found a set of the decals. We struck a deal thru ebay's Buy it now. I don't have pics with me but the decals packaging simply says "RCD Race Car Decals" There is no company or contact info. At first glance the decals look decent but the white seems not as opaque as the kit's decal. But I haven't tried them yet. I believe these are die cut, not the type you need to cut close to the artwork. I'll get some pics when I get back home.
Thanks,
Ismael
|
|
|
|
Post by tatocorvette on Feb 1, 2019 19:24:45 GMT -8
Hello, Just got back from a long day traveling and flying. Chris; These are the decals: 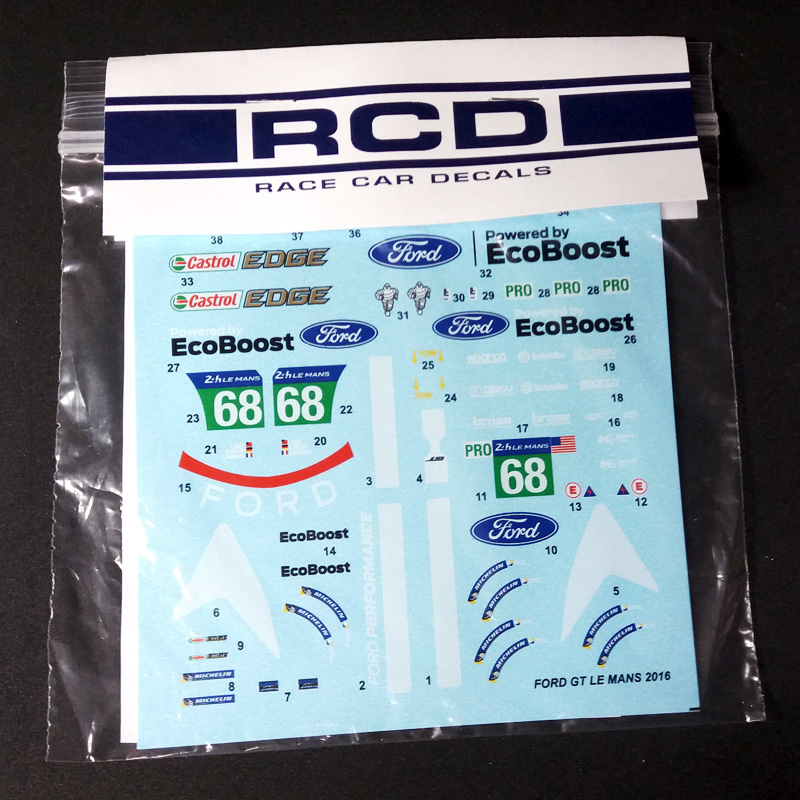 and the illustration on a separate piece of paper on the back 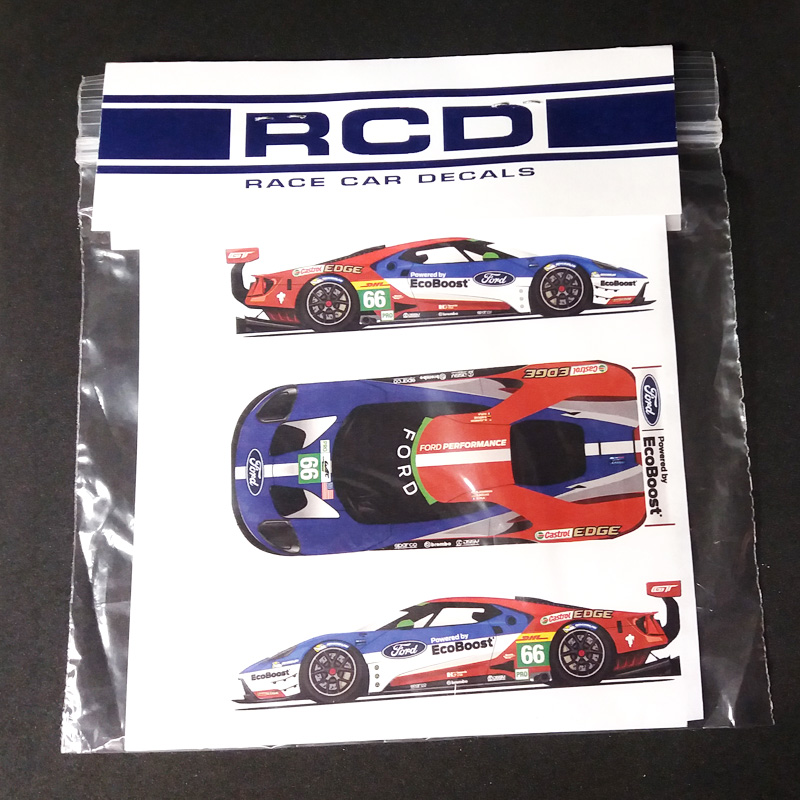 Looking closely I don't think they are die cut. Thanks, Ismael |
|
|
|
Post by tatocorvette on Feb 2, 2019 2:47:09 GMT -8
Hello again, I landed hoping to have my Gravity paints for this car waiting for me but unfortunately they haven't arrive yet. In the meantime, I think you can guess where this is going....   Thanks, Ismael |
|
darylh
Full Time Ride

Posts: 126
|
Post by darylh on Feb 2, 2019 5:30:26 GMT -8
Duuuude this is good stuff! I love what you're doing this kit. I've learned more about this car from your build than rom any other source on the 'net. This could be a blueprint for a build of this year's cars using the excellent Indycals sheets. |
|
|
|
Post by tatocorvette on Feb 3, 2019 16:37:26 GMT -8
Hello, Tires are done. Wheels painted gunmetal. Center cap metallic acrylic. Sanded tire contact surface. Applied Future to the sidewalls so decals had a glossy finish to stick. Applied decals. Once dry, I brushed dullcoat over it. Added valve stems (wire). The decals were incorrect, so I went with the least noticeable of the errors. All wheels had small red stickers showing car # and location: LF, LR, RF, RR. But the kit had the left side one color and the right side another. So I used the red ones from car #69. So if you ever get very close to this car with a magnifying glass and look at the wheels and read the stickers, you'll see it says 68 in one side and 69 on the other side...  Yes, they are too clean. Weathering will take care of that eventually.  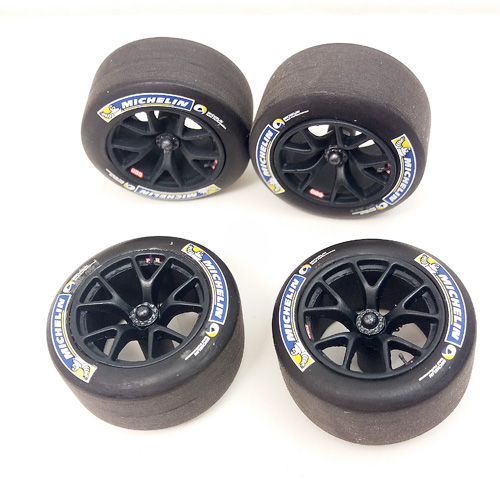 Thanks, Ismael |
|
|
|
Post by Chris K. Hale on Feb 3, 2019 16:42:55 GMT -8
Hi Chris, Yes. I got them. It is some sort of a mystery. A fellow forum member from the MCM forum pointed me to an ebay seller who was selling unboxed kits with the set of decals. My impression was that these could be Revell test shots or something. I contacted that ebay seller but he had no more. Then a few weeks later he contacted me saying he found a set of the decals. We struck a deal thru ebay's Buy it now. I don't have pics with me but the decals packaging simply says "RCD Race Car Decals" There is no company or contact info. At first glance the decals look decent but the white seems not as opaque as the kit's decal. But I haven't tried them yet. I believe these are die cut, not the type you need to cut close to the artwork. I'll get some pics when I get back home. Thanks, Ismael There is a seller avp48 who is Ed Sexton, the main designer for Revell, bought some interesting kits from him , also sells a lot of 1/43 kits which I find very interesting considering Revell was mainly 1/25 scale kits.... Good find on the decals though, it is possible RCD is to notate they were thinking of a passenger version also? Just Saying ..Chris |
|
|
|
Post by Joel_W on Feb 4, 2019 6:03:15 GMT -8
Ismael,
Outstanding job on the tires and wheels.
Joel
|
|
|
|
Post by tatocorvette on Feb 5, 2019 19:28:53 GMT -8
Hello, We have a rolling chassis! Uhh, mmm is it too weird to be in love with an exhaust system?  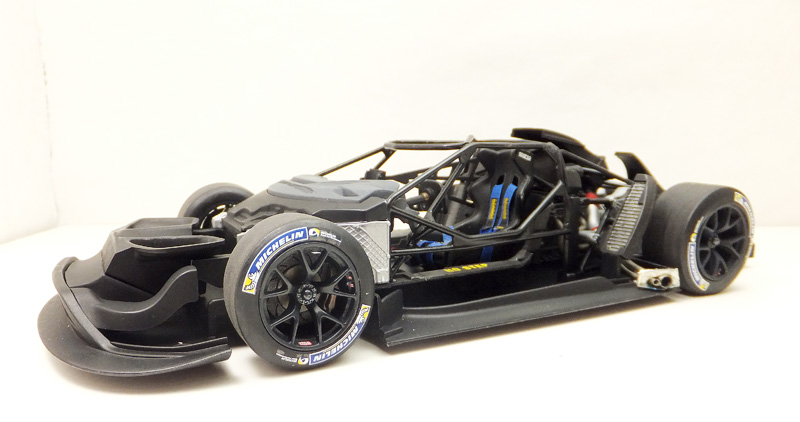 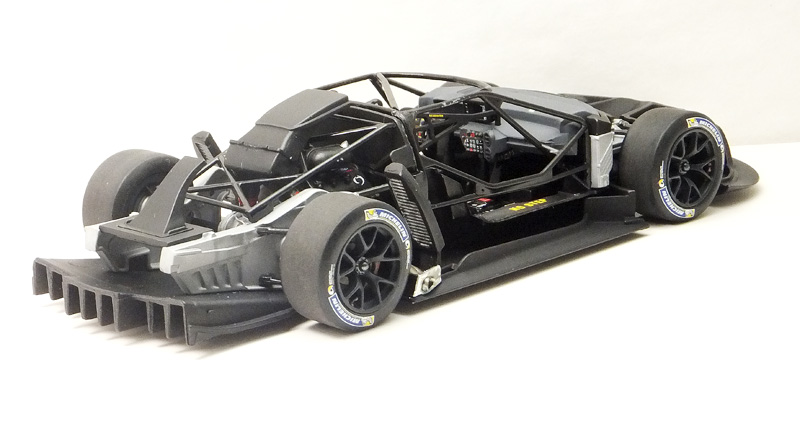 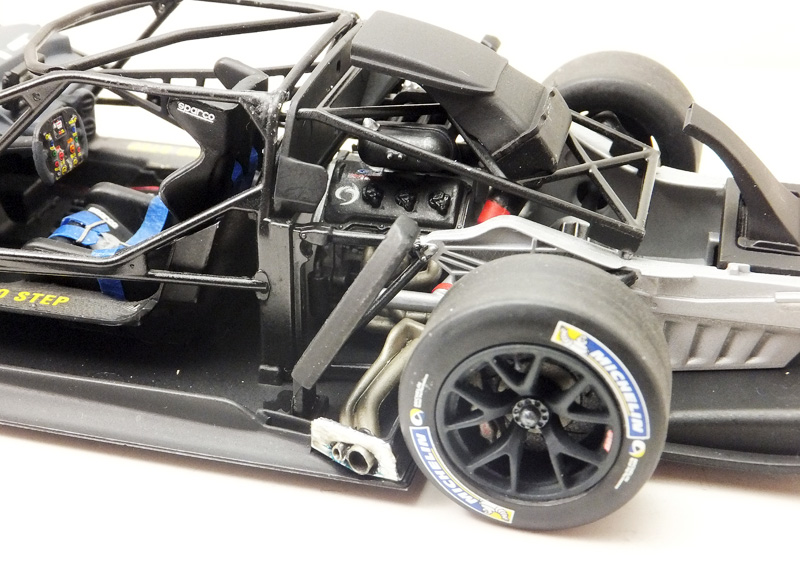  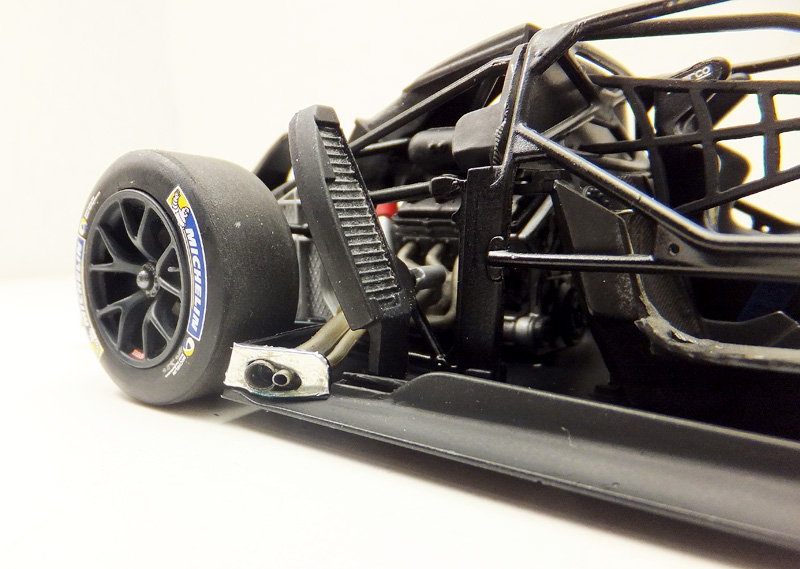 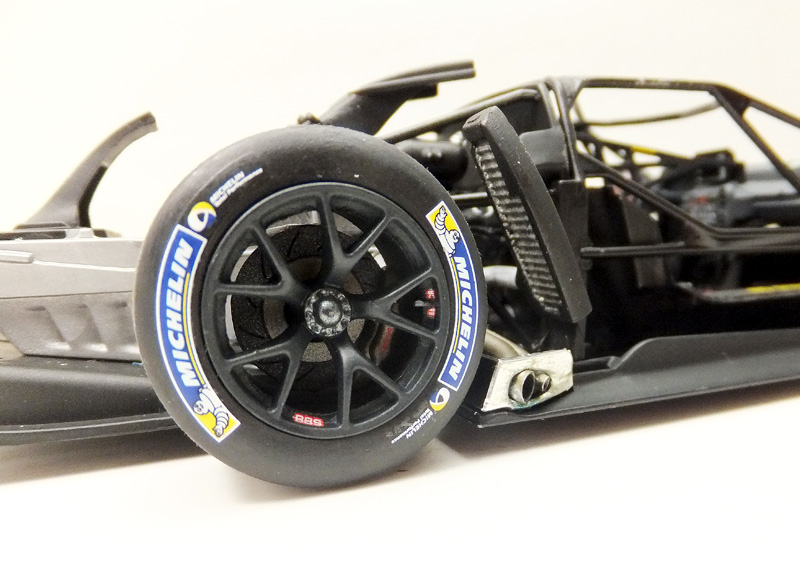 Looking at the pictures I noticed the tires need to be properly seated in the wheels. Thanks, Ismael |
|
|
|
Post by afx on Feb 6, 2019 3:25:58 GMT -8
In love with an exhaust system? I'm kinda fond of this one which I scratch built. 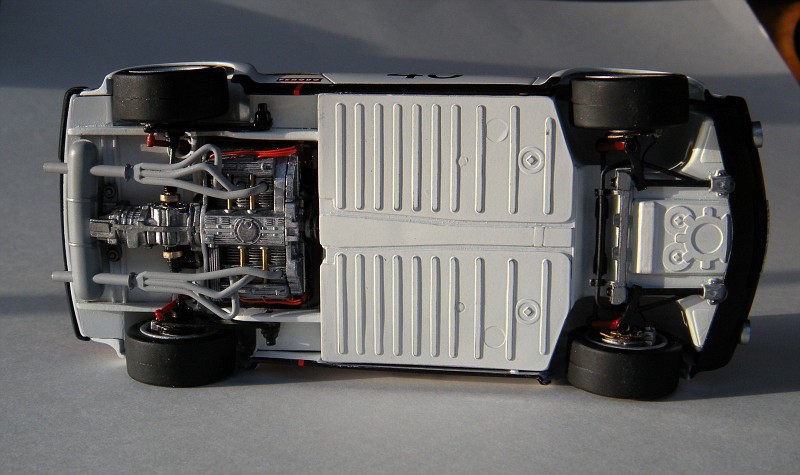 |
|
|
|
Post by Ben_B on Feb 6, 2019 6:07:50 GMT -8
Ismael, that's looking great!
Ben
|
|
|
|
Post by Joel_W on Feb 6, 2019 6:11:50 GMT -8
Ismael,
Different, most certainly, but you certainly made it look the part.
JC, those are really some excellent exhaust headers you scratched out. I would have thought that by their looks, they were injection molded.
Joel
|
|
|
|
Post by garydavis on Feb 6, 2019 12:40:37 GMT -8
Ismael...this is really coming together GREAT. The profile shots of the chassis sure make the car look real. Great work...
|
|
|
|
Post by tatocorvette on Feb 7, 2019 3:38:37 GMT -8
Hello, I knew I was missing something... the body! Panel lines were deepen. Mold lines sanded and first coat of primer. 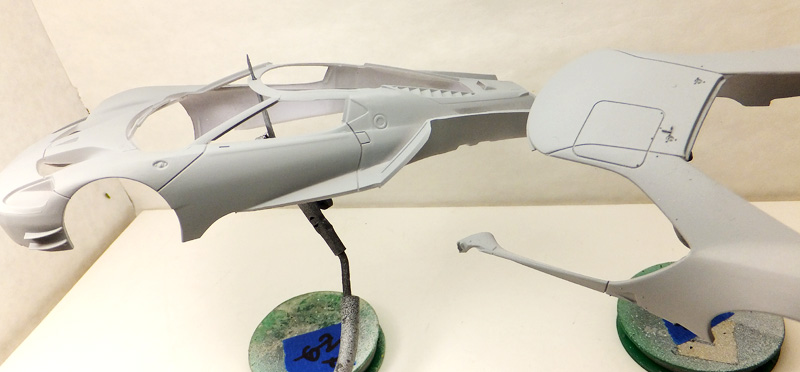 The primer revealed quite a lot of issues! The body has plenty of stubborn mold lines and the surface is quite wavy, especially on the nose. I have spent quite some time addressing these. Far more work than what the pictures suggest. By the way, for this particular race (2016 Le Mans), the port in the left front fender was covered. At the end of the race, the car had a rip hole between the fender and the door. I've been looking at footage of the race but can't figure out when or how it happened. Haven't given much thought yet on how to replicate it but it has to be there. 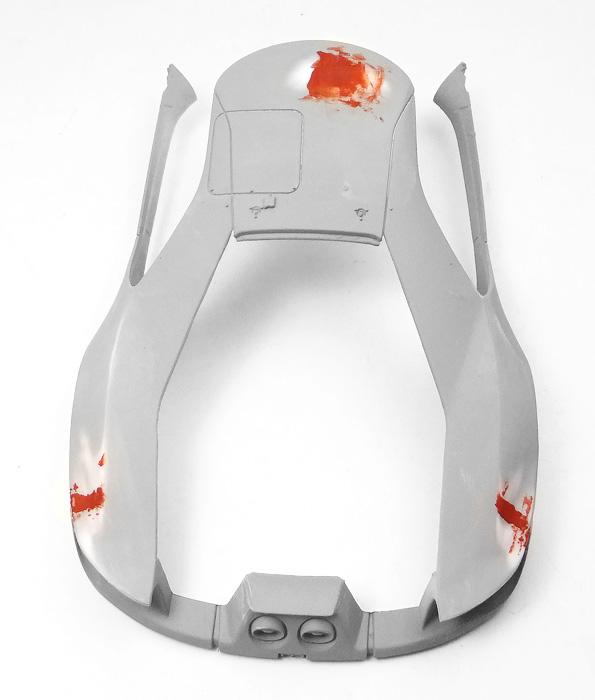 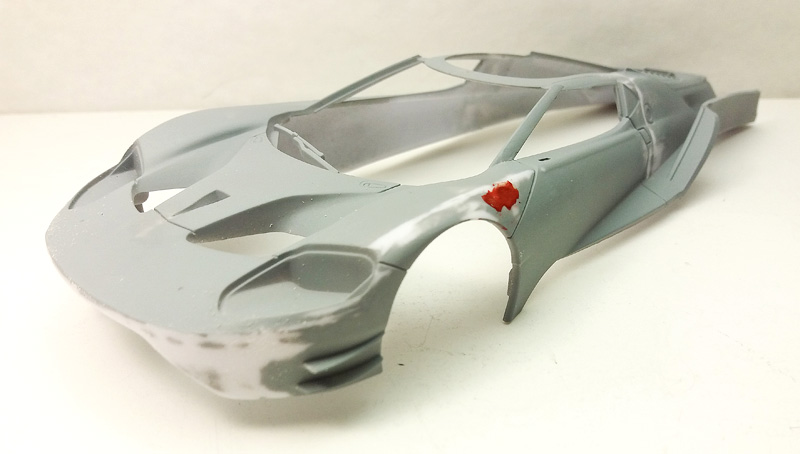 Not sure how much progress I can make in the next day or so, as I've been summoned to go back to Houston next week.  Thanks, Ismael |
|


