|
|
Post by Joel_W on Mar 18, 2022 10:48:52 GMT -8
Great paint and masking work Joel. See that's where you have it over me. You do great paintwork. So I take it both of these colors still need a gloss coat? Your painting looks just as good as mine. As for the colors, yes both colors will need to be clear glossed, then polished and waxed,. Auto lacquer paints, which is what Gravity, Scale Finishes, MCW, and Zero to name a few make their paints from don't contain any glossing agents, so they dry Matt, or with a slight sheen. These days they clear coat with Urethane, but I'm still concerned about residue fumes that get loose in the house. joel |
|
|
|
Post by Joel_W on Mar 18, 2022 10:49:52 GMT -8
Chris and Ben,
Thanks so much guys for your thumbs up as it always means quite a lot to me.
joel
|
|
|
|
Post by Joel_W on Mar 18, 2022 10:57:05 GMT -8
Paul, To answer you paint questions, 90% of the time I prefer to lay down the overall color, even if it's darkish and I'm going to apply a lighter color over it. I just lay down a few lite white primer coats, very lightly sand when dry, then lay down the next color coat. if I was to paint the Orange stripe 1st, the only difference would have been way less time masking the stripe compared to the body, and thus using up expensive Tamiya tape. But it's just my preference. I even used that procedure on my Ford 427 Cobra which was Guardsmen Blue with a double White Stripe.  joel |
|
|
|
Post by Joel_W on Mar 24, 2022 9:09:38 GMT -8
It’s been nearly 2 weeks since my last update, but progress has been made. Decaling was up next, so both the upper and lower body shells got a lite wet rubbing with a well worn piece of Tamiya 3,000 sponge. When dry, the decaling phase started. I used Indy Cal’s excellent decal sheet for most of the decals especially for the Black stripes that bordered the Orange center stripe, needing to trim and alter it to fit the cockpit top window opening. The Fujimi Kit decals were used for the solid White number circles, and the #2s. To my surprise these decals were as thin as the Indy Cal decals, but required a whole different decaling approach. My usual method is once the decal loosens up I slide it off the backing paper, then slide it into position after the surface was wetted with warm water with a drop of Dawn dish detergent, and gently pressed into place. Then the Micro Set followed by the Micro Sol, and finally Walthers Solvaset. I let the solutions do 90% of the work, and don’t touch the decals until they’re almost dry, then gently work them with a dampened Qtip. But with the Fujimi decals I quickly learned that even less touching was needed, or you just moved or damaged the decal. So after positioning each decal, and very, very lightly nudging it into it’s final position, I didn’t touch the decal after applying Micro Set, and then ever so lightly with the Micro Sol, and no Solvaset. As they dried, the wrinkles vanished. Layered decals like the numbers on the number circles were done a day latter. I gave the decals a full 48 hours to dry and cure, then I applied Tamiya’s new Lacquer based LP 9 Clear Gloss thinned 50/50 with Mr. Color’s Leveling 400 thinner because I can’t find Tamiya’s new leveling thinner in my usual online retailers. Honestly, I was just blown away at the smoothness and gloss after applying 6 coats with the last 3 being almost a full wet coat but not quite. Here’s what the upper shell looks like after a day drying in one of my drying boxes. There’s been no polishing at all at this stage. The shells will dry and cure for 4 days or so till the polishing and waxing phase. 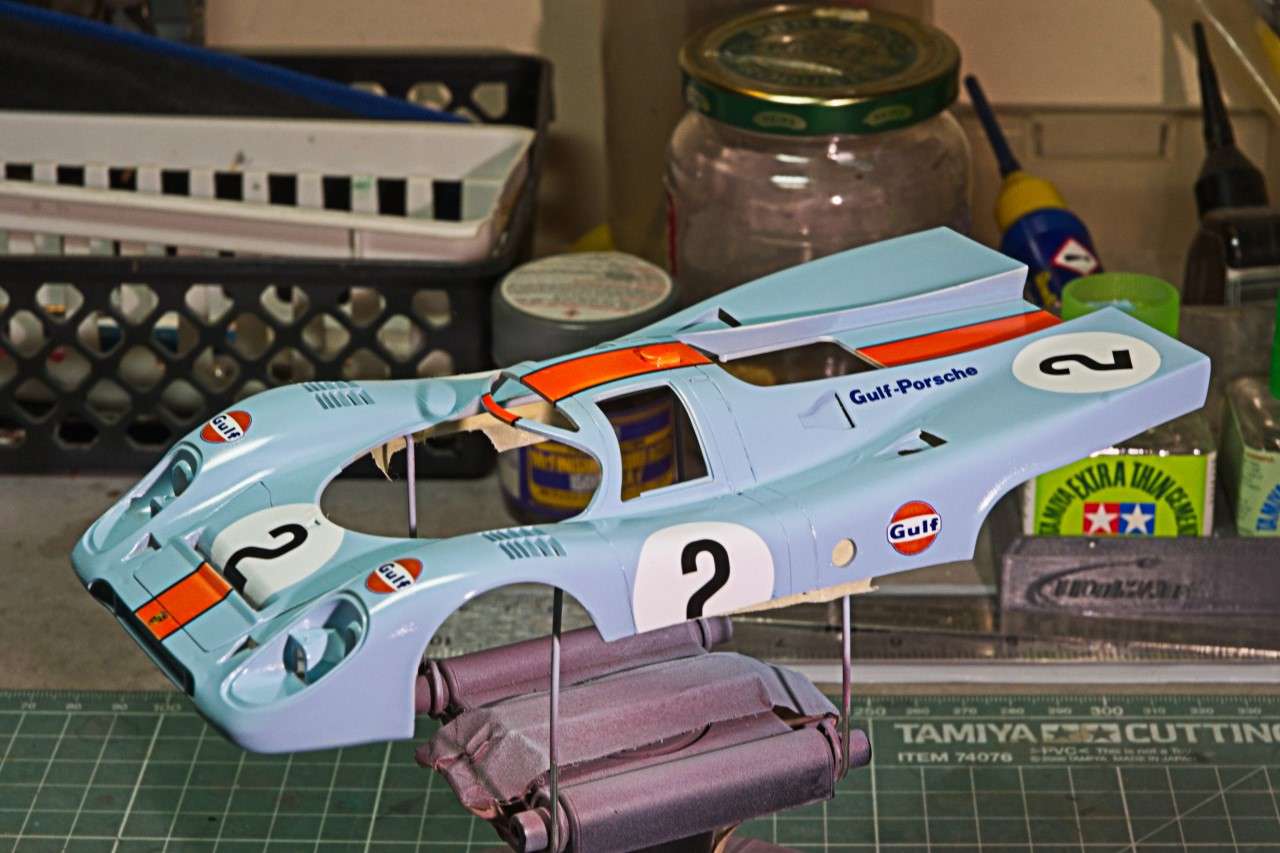  joel |
|
|
|
Post by Joel_W on Apr 2, 2022 6:17:20 GMT -8
Just a quick update. I finished polishing and waxing the 917K at the beginning of the week, but just totally forgot to post it. In person she’s got a mile deep shine, and the paint finish is about as smooth as I’ve ever achieved. Unfortunately, try as I might, my photographs just don’t come close to showing the finish as it looks up close and personal. Maybe I should hire my brother whose an outstanding photographer to take another set for me. joel 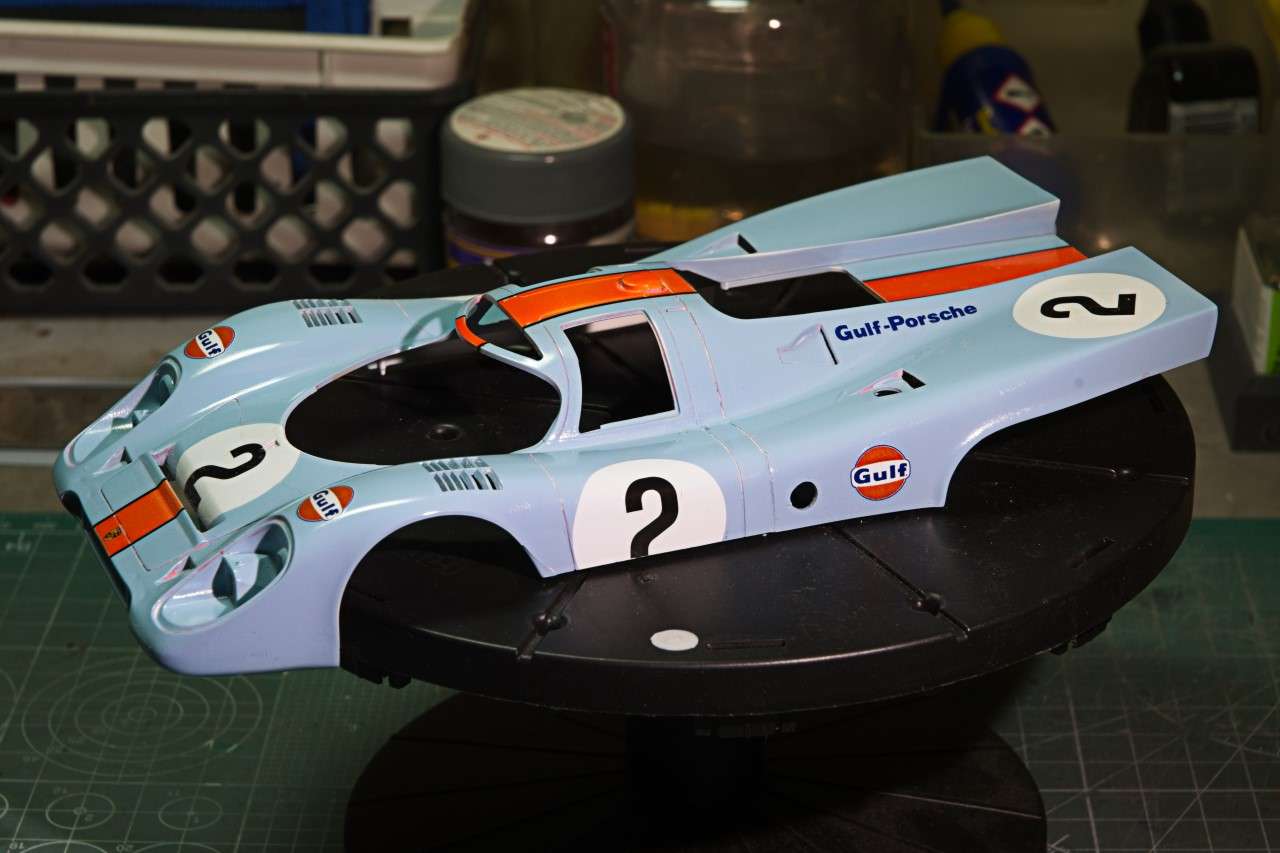 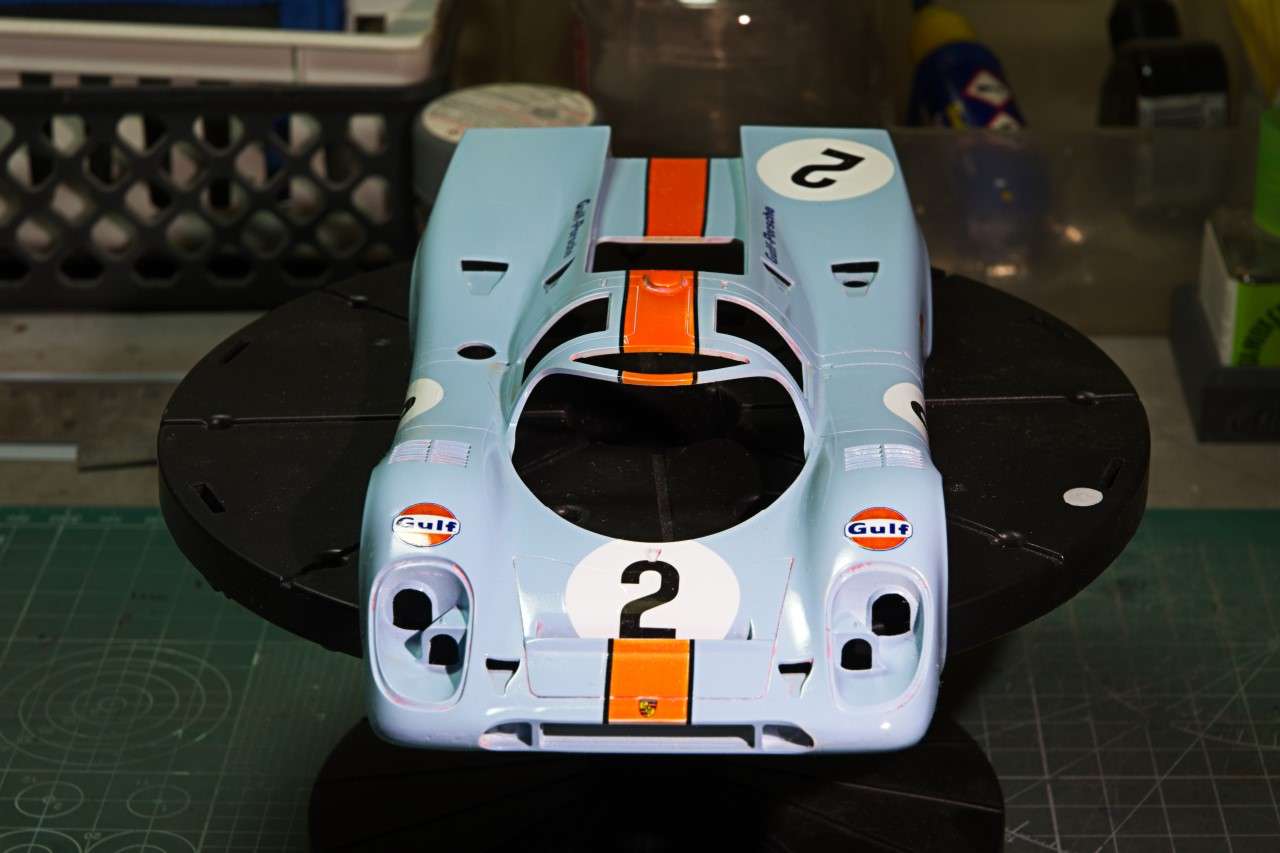 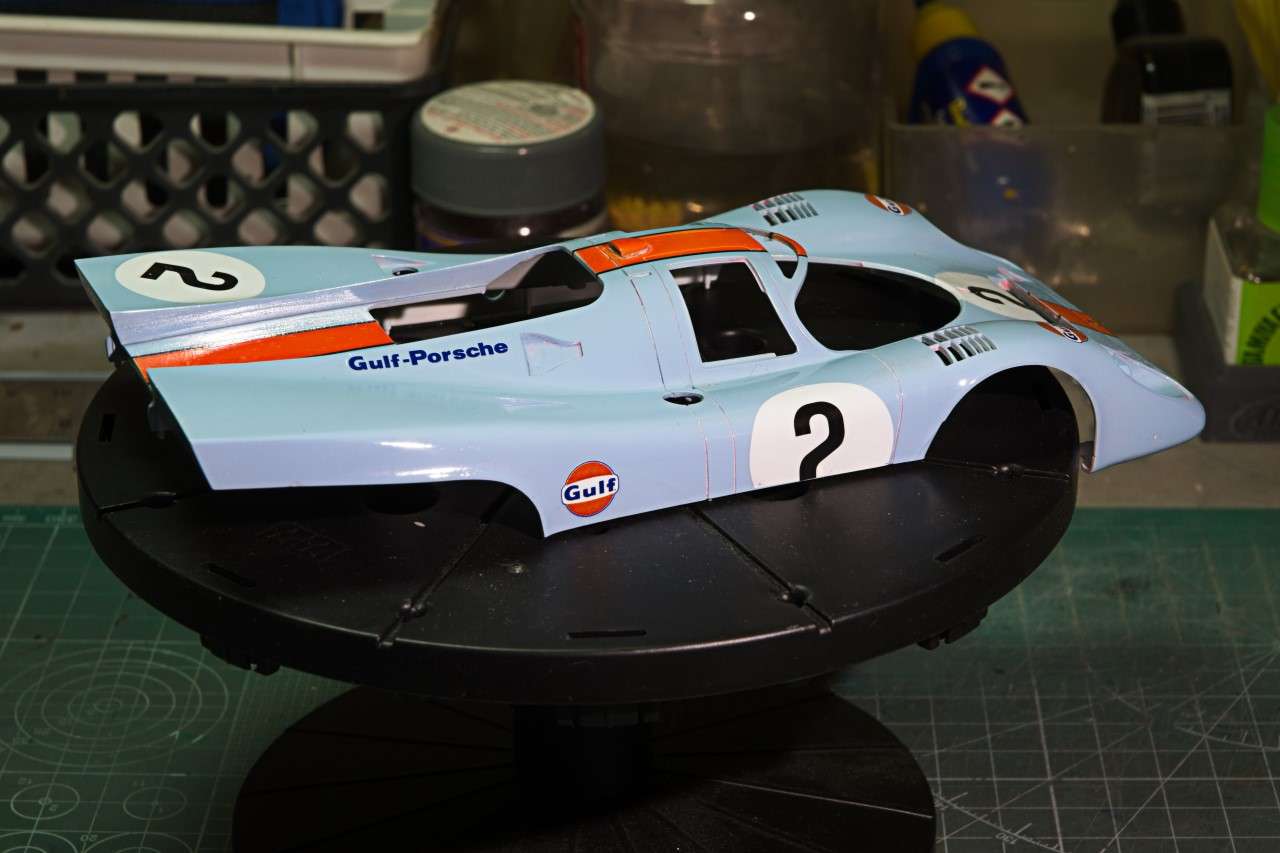 |
|
|
|
Post by 2whl on Apr 2, 2022 11:09:49 GMT -8
In person she’s got a mile deep shine, and the paint finish is about as smooth as I’ve ever achieved. Unfortunately, try as I might, my photographs just don’t come close to showing the finish as it looks up close and personal. Your body work is looking first rate as usual, Joel. I know what you mean about trying to get that look on a picture that you see in person. But I've also had the opposite happen.....the picture looks better than the actual model. |
|
|
|
Post by arcticwolf on Apr 2, 2022 12:28:20 GMT -8
In person she’s got a mile deep shine, and the paint finish is about as smooth as I’ve ever achieved. Unfortunately, try as I might, my photographs just don’t come close to showing the finish as it looks up close and personal. Your body work is looking first rate as usual, Joel. I know what you mean about trying to get that look on a picture that you see in person. But I've also had the opposite happen.....the picture looks better than the actual model. Mine are too, but I just don't tell anyone that. 
I do think I'm going to ship my kits to Joel for prep and paint from now on. He can ship them back for final assembly. You know, NAFTA and all that stuff?
|
|
|
|
Post by Joel_W on Apr 3, 2022 4:54:55 GMT -8
You guys just really crack me. Thanks so much for your super positive thumbs up on my prep and painting. But I've seen all your builds for years here, and you guys paint just as good as I do.
joel
|
|
|
|
Post by chrissmith on Apr 3, 2022 17:56:53 GMT -8
You guys just really crack me. Thanks so much for your super positive thumbs up on my prep and painting. But I've seen all your builds for years here, and you guys paint just as good as I do. joel Don’t be so modest Joel, your years of experience shows and you should be proud of it. We have to have people to look up to 👍😉 |
|
|
|
Post by Ben_B on Apr 4, 2022 11:37:04 GMT -8
That gloss finish turned out great , Joel! I’m pretty impressed with the Tamiya LP paints. I’ve been thinning it with Mr Leveling Thinner without any problems. It brush paints a little better than Mr Color does.
Ben
|
|
|
|
Post by chrissmith on Apr 14, 2022 18:50:08 GMT -8
How’s this little gem 💎 coming along?!
|
|
|
|
Post by tatocorvette on Apr 23, 2022 6:22:50 GMT -8
Joel! One of the most beautiful cars ever made, in one the most beautiful paint schemes ever, coming along masterfully by one of my favorite modelers! Pure joy! Looking really good my friend. See? Painting stripes is more fun than decals  Looking forward to see more. Thanks, Ismael |
|
|
|
Post by Joel_W on Jun 14, 2022 16:16:00 GMT -8
Well, it's been quite a while since my last update on the Porsche 917K. I kind of ran into an issue that caused the build to just stall out. At the start of the build I had to deal with a warped and twisted lower body/chassis that i thought I got the better of. My goal was to get it to the point that tape/pressure wouldn't be needed for gluing as I had concerns about the long haul in it's display. Well, when i test fitted the two body shells after painting/decaling/finishing, the twisted lower chassis was back. I just couldn't figure it out, and it did get the better of me. So I boxed it up for a while, and decided to move on. Well the move on really didn't work out as my mind was on the 917K. So I started to look for another kit, but there just wasn't any to be found. Eventually, I settled on the Martini version which is the same exact kit, but different decals and another PE sheet. I ordered a new decal sheet from Indy Cals but it's for the Spa winning car, which didn't really click in my thick skull that the printed number in the number circle was 24 not 2. That little deal would become another issue down the road. My plan was just to build up the chassis, paint, re-decal, but I started to have 2nd thoughts that the paint wouldn't match even though I was using the same primer and Gravity paint. So Plan B came into being. Start completely over, and that's what I've been up to. I've got both top and bottom shells to align nearly perfectly without tape, and that's through painting and most of the decaling. Unfortunately, that little decal issue reared it's ugly head. I needed 4 white number circles, which had pulled out of my spare decals, but i didn't have the correct or even close to the right #2. So i ordered the only sheet from Indy Cal that had the almost correct numbers, for an earlier Porsche 9i7K build:  In the mean time Here's where the Porsche is in the build. 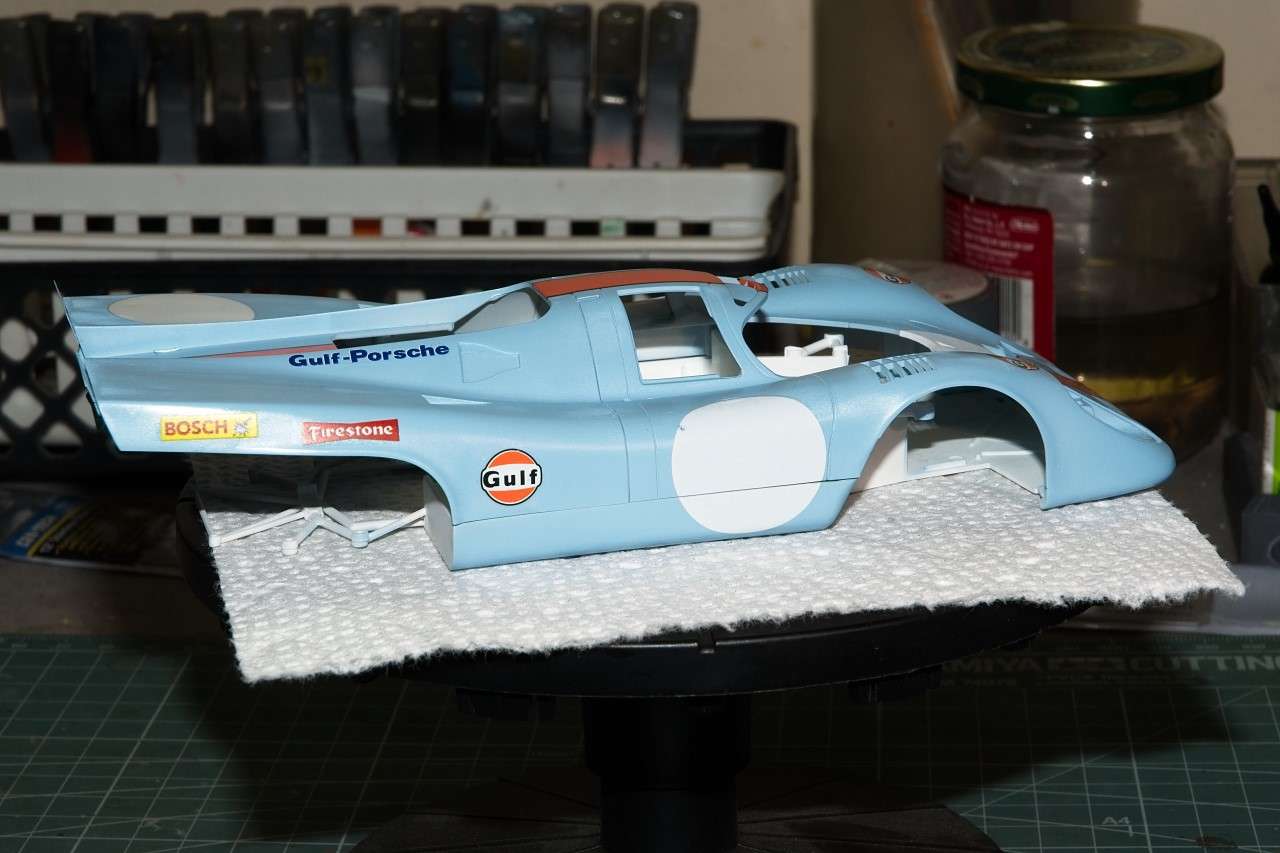 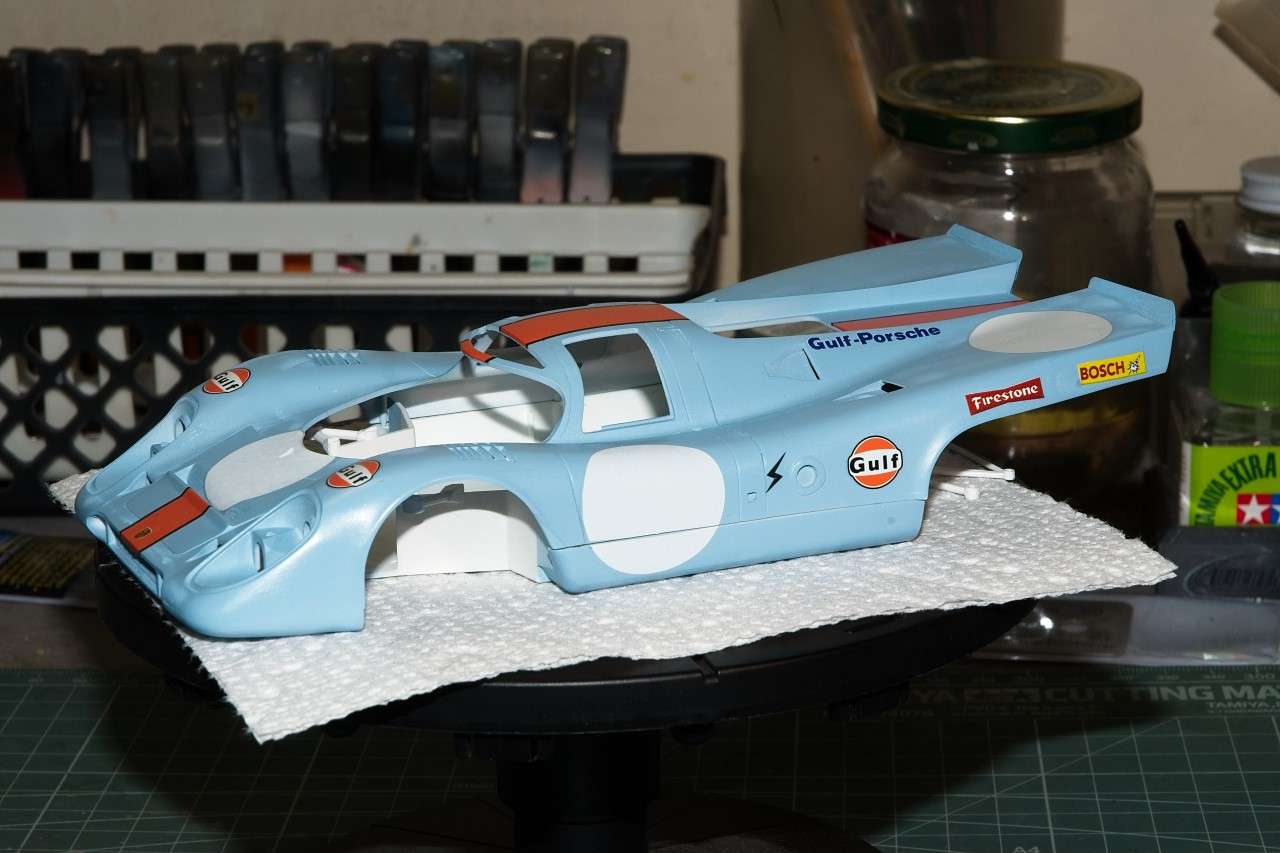 For this build I ended up having to piece together a few decals sheets from Fujimi Gulf Wyer cars as I wasn't paying any attention to where I put the open bottle of Gravity Orange paint, and knocked it over !! Fortunately, the decaling came out looking almost as good as the original painted version. 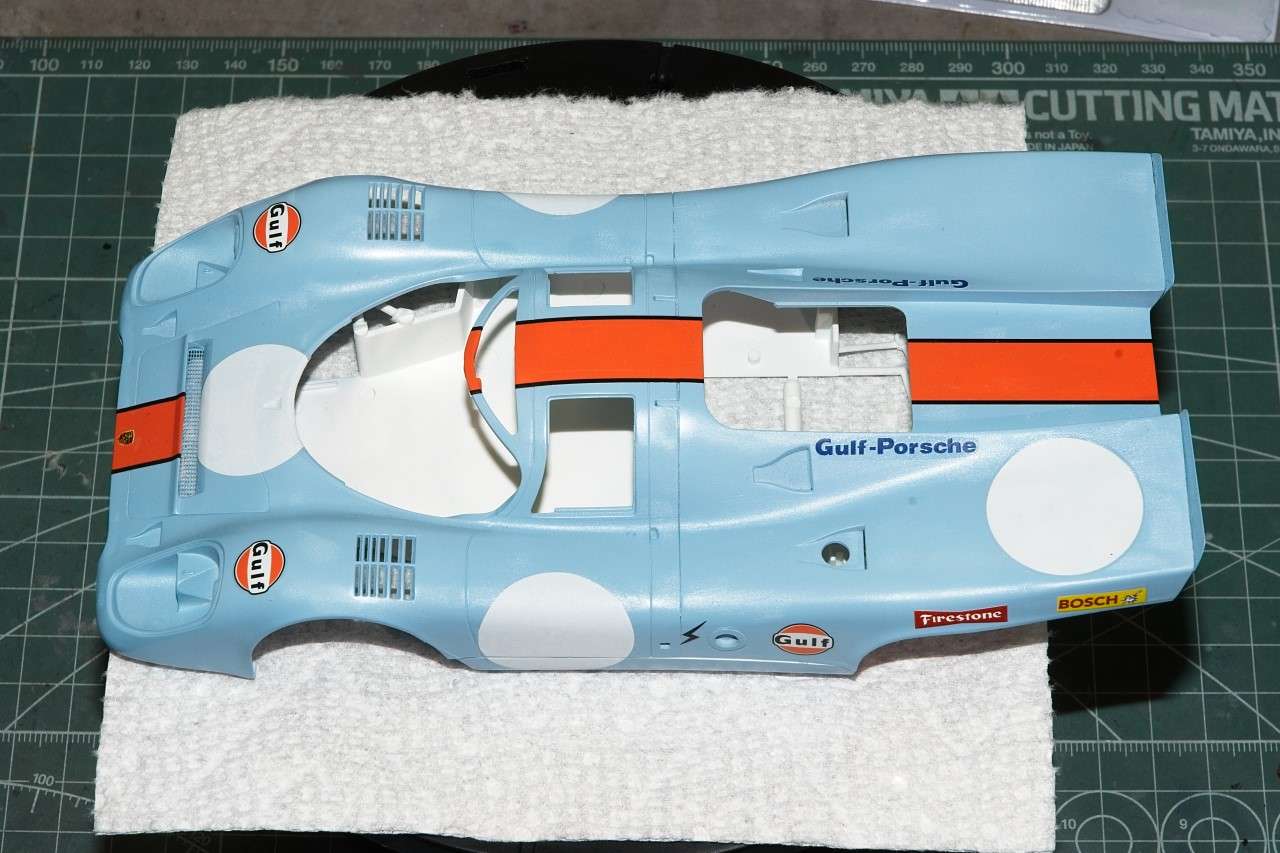 Since these pictures were taken, I've finished the decaling, and am in the process of polishing and waxing. joel |
|
|
|
Post by Joel_W on Jun 18, 2022 4:10:09 GMT -8
Well, I finished up the decaling of the numbers, gloss coated the two body shell sections with my now new favorite: Tamiya Lacquer LP-9 Clear Gloss. I’m still looking for a supplier of Gunze Super Gloss III in a bottle and Finisher’s, neither of which I’ve ever been able to get a hold of. But the Tamiya LP-9 is the best I’ve tried to date. Gave the lacquer a full week to dry and cure, then just a very lite wet polishing with Micro Mesh 12,000, followed by the Gravity 3 part polishing paste system, and finally their excellent liquid wax. One more coat of wax will be applied once the build is at its final stage. As you can see from the pictures, the two shells still align and fit nearly perfectly. No major twist/warp issues this time. 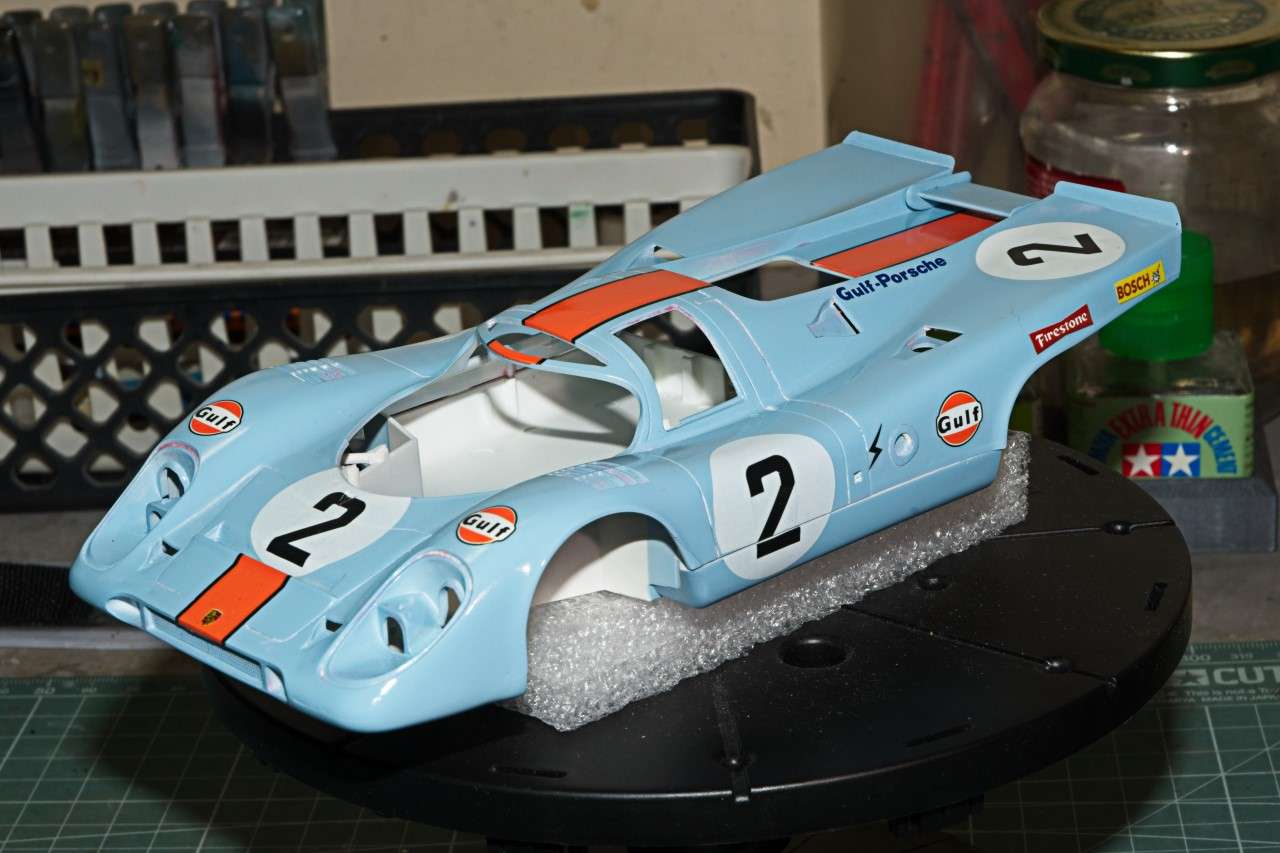 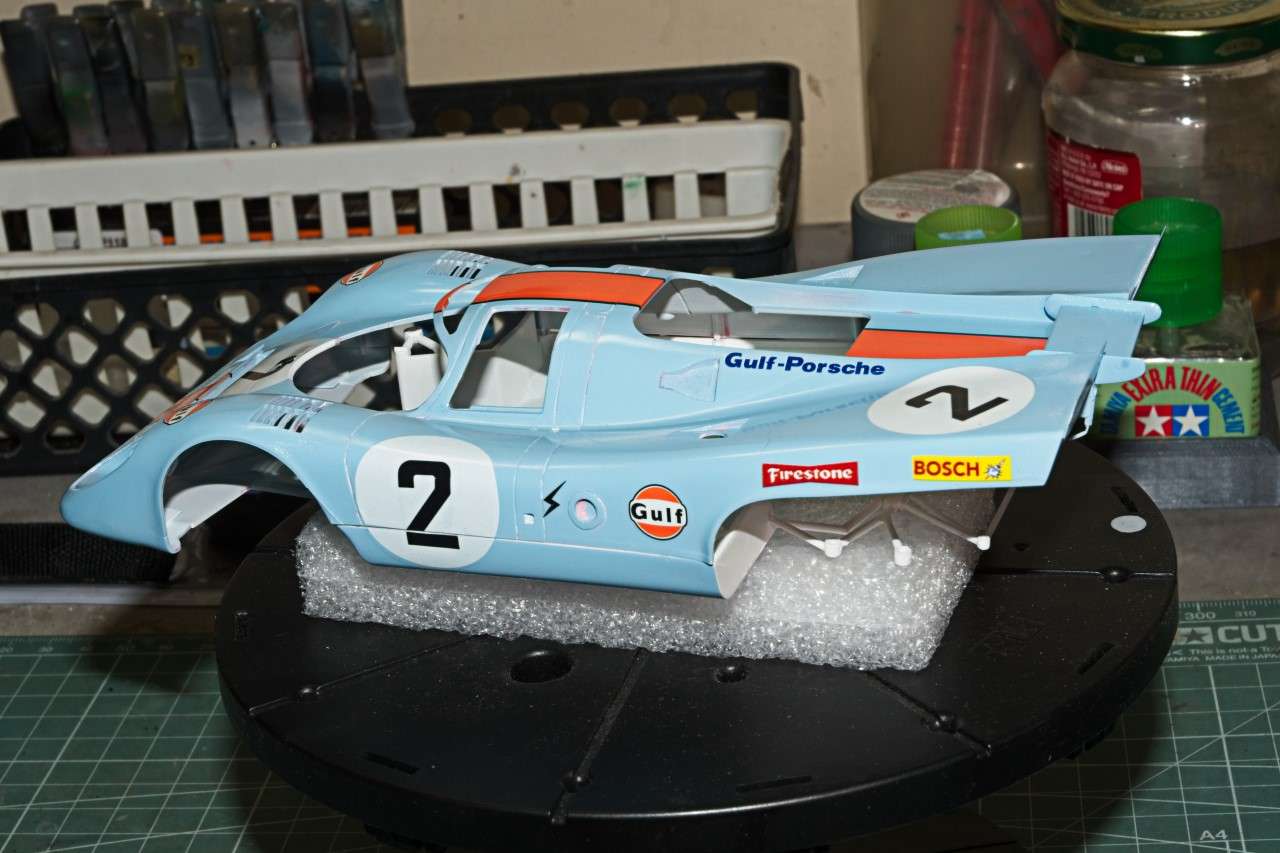  Next up is the cockpit. Thanks to all for stopping by and checking out the 917K’s progress to date. As always it’s greatly appreciated. joel |
|
|
|
Post by 2whl on Jun 18, 2022 8:39:51 GMT -8
Well, I finished up the decaling of the numbers, gloss coated the two body shell sections with my now new favorite: Tamiya Lacquer LP-9 Clear Gloss. Looking very nice, Joel. If I might ask, how much did you have to thin the LP paint? I've bought some but haven't sprayed it yet. |
|


