


1/12 Tamiya Ferrari 312T4 Rebuild/Restore/Rescue....
Mar 21, 2024 9:55:45 GMT -8
arcticwolf and kyledehart5 like this
Post by mike_t on Mar 21, 2024 9:55:45 GMT -8
...or whatever the correct term is!
Received this from a fellow board member, who had already built one so parted ways with the second one. Not sure of the entire story but a yard sale or estate sale, maybe? Anyway. it made it's way to me about 2 or 3 years ago and I finally got around to fixing it up, or trying to, at least.

After receiving the package, I started sorting and checking, to see what I was up against. Turns out it wasn't too bad, really. Some parts were already painted, some sub-assemblies were put together but not painted and a couple of pieces were missing but nothing too drastic.

Starting with the motor, the block was unpainted but most of the attached parts were so it would have to come apart to be painted. Our friend, Bob Smith, gave us a great solution for dealing with glued on parts but be aware when using this stuff. One, it's very thin and runs like water. Two, it will leave a mark. Not a damaging mark, as such, more of an oxidation type of mark. Nothing a little sanding and priming won't take care of. Oh, and the third thing? If you don't like the smell of dead fish, then...I dunno, wear a mask or something!

After letting the debonder sit for a couple of minutes and with some sharp tools and the ability to hold your breath for an extended period, you get this:

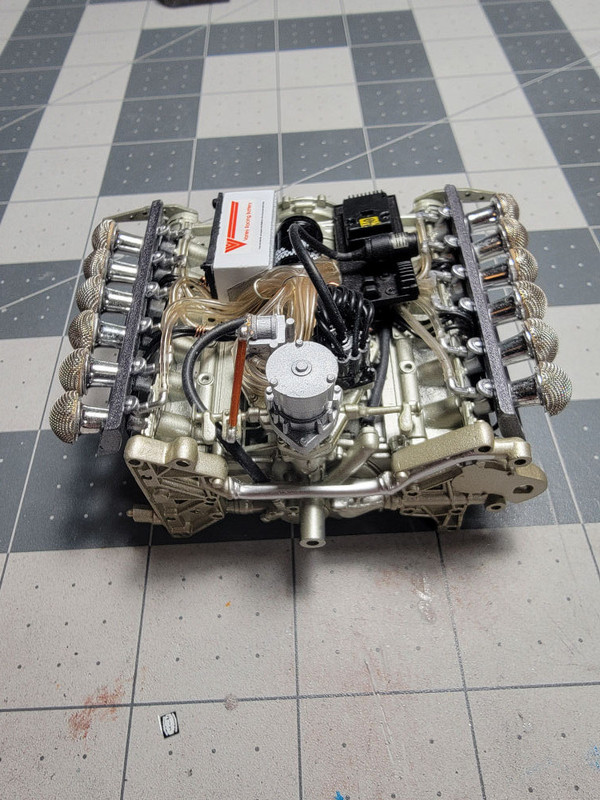
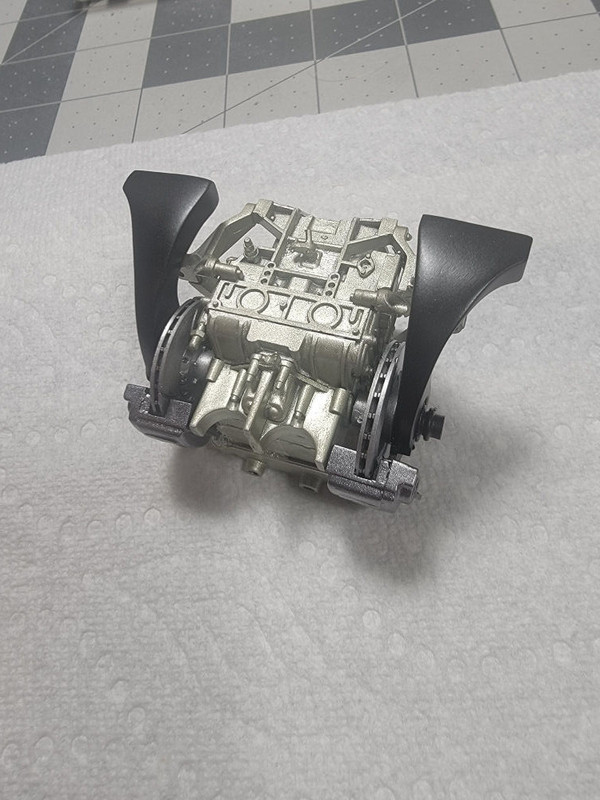
This is where the fun really began. Note the damaged/missing fuel injectors, the air intake mesh and what's left of the fuel pump (2nd piece down from the yellow brackets/hoses on the left). I did, however, remove all 12 air intake funnels without breaking or losing a single one! A rarity for me when it comes to small parts.

While researching this project, I noticed the little frame holding the mesh on the air funnels and thought it might be a neat detail to add. So, among the many other things I printed for this, I made up some little frames. Along with some new mesh, they turned out ok...sort of.

The 3D printer actually got quite a few miles put on it during this project. Among the items: wheel bearings, roll bar, fire extinguisher valves, fuel pump, fuel injectors, rear axle, front brake ducts and rims and tires. Below is the bearings, pump, injectors and roll bar. The rest will be seen later...except the axle which is hidden in the rear end.

New injectors mounted. Note the directions, 3 facing one way, the other 3 facing opposite. If you look closely at the original build picture, you will see that all 6 on each side are facing one way, plus, even though it's a twelve cylinder motor, there are only 8 fuel lines on the original build. All of this to say, the lines, pump and injectors had to be removed. The injectors and pump were mincemeat after that so new ones had to be made.

Finally, after all painted parts were stripped and repainted, it could be reassembled. Earlier, when I was talking about the mesh frames, I ended the line with "they turned out ok...sort of." What I meant was when I measured the funnel to get the size for the frame, I measured on the outside, as one would. However, for whatever reason, they printed just a smidge bigger, like, we're talking a quarter of a millimeter. However, if you add a quarter millimeter to both sides, times 6 funnels, you're going to get a difference of around 1.5mm, which scales out to about 2.5 inches in "real life". Needless to say, I never realized until I was putting it back together so, if you look at it the right way, the funnels just don't fit correctly. They are bunched up against each other instead of having some room between. And besides all that, you can't even really see the frames unless you get right in there! Oh well. It's done now.
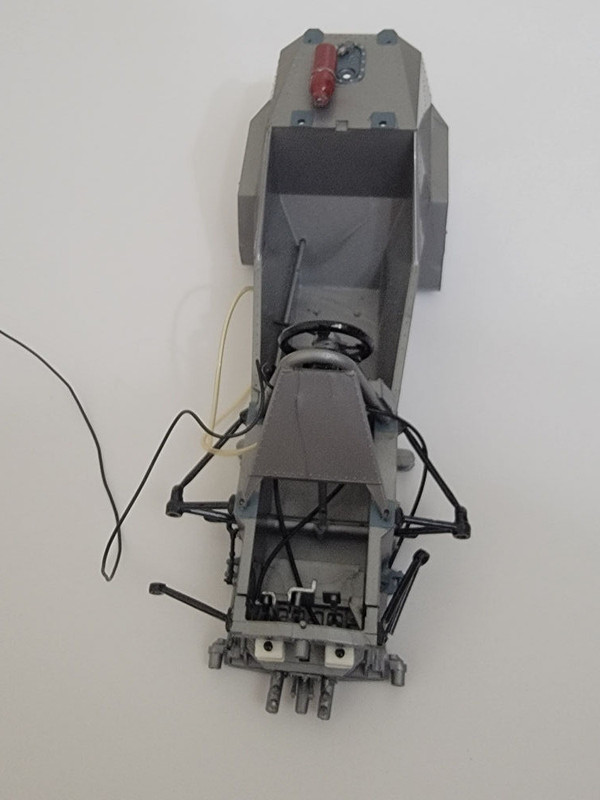
Next, on to the chassis. Besides broken suspension pieces and unfinished bits, it didn't look too bad.
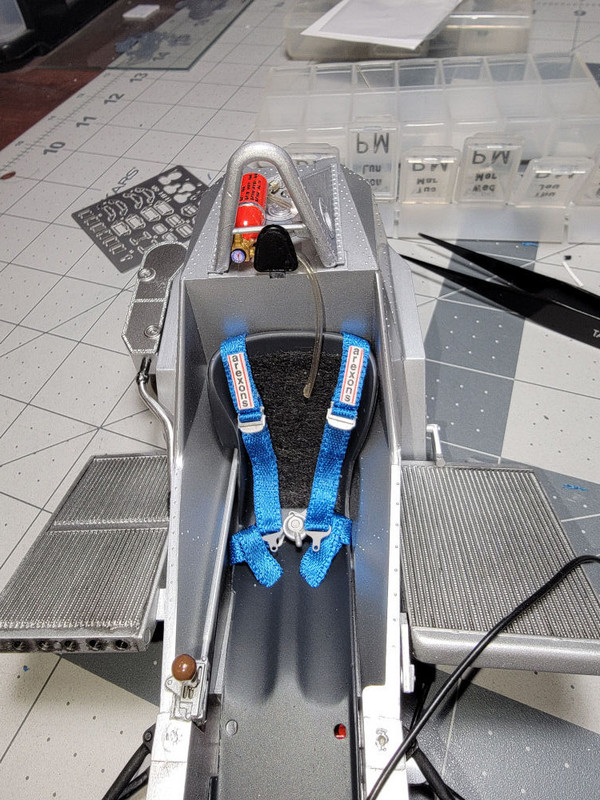
After a little body work and some minor repairs, it was looking pretty good. The seat was stripped and repainted, the old belts were replaced with new ones.
On to the rear end. The brake ducts need some work and of course, the exhaust brackets broke when I disassembled the rear end. More mileage on the 3D printer!
All dressed up and nowhere to go...yet.
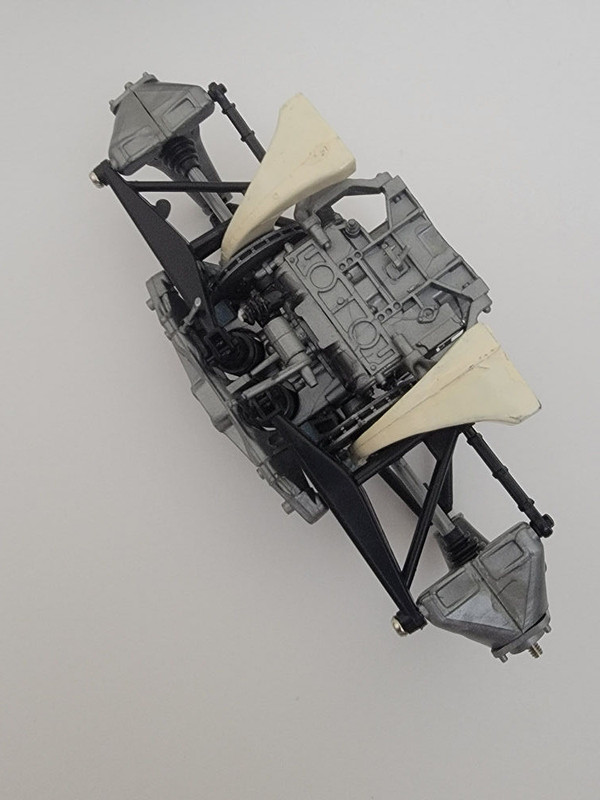
Rear end complete, testing the fit. So far everything looks ok.

Stripped and repainted the front roll hoop. Added a couple of toggle switches. Once you get to a certain age, don't try to install these by yourself. Get some help. Seriously.

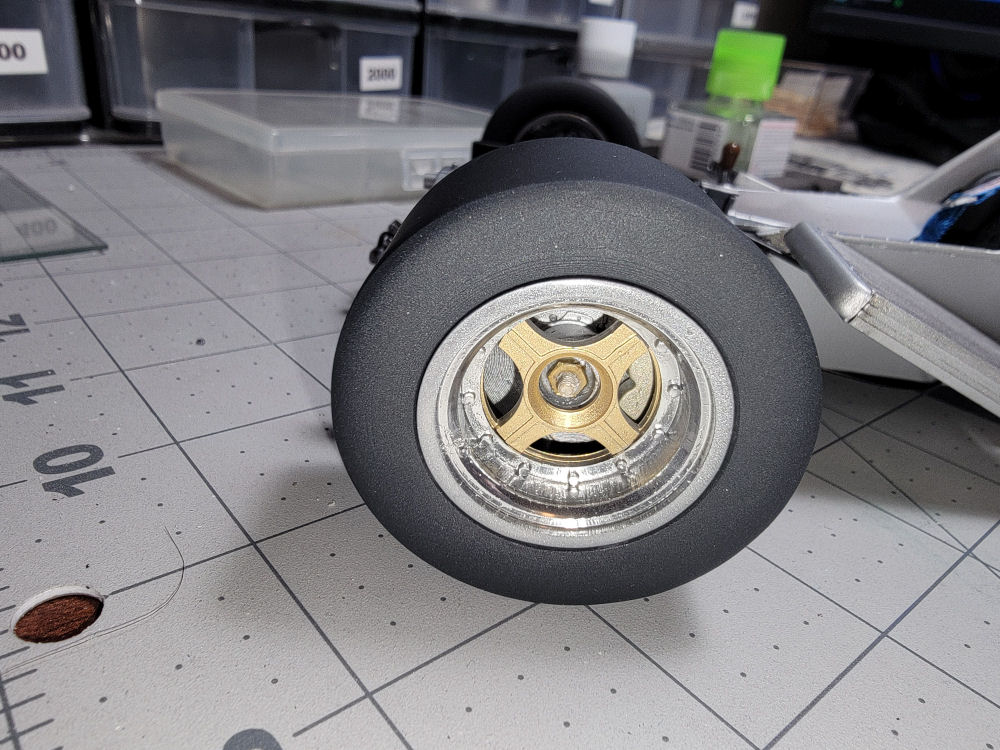
I didn't like the paint job on the wheels, so I decided to take them apart and redo them. Not a good idea. The tires were glued to the rims and one ripped while I was trying to remove it. Off we go to the 3D printer again. After a few unsuccessful attempts, I settled on a final print. The final fit of rim and tire was a bit of work but once done, I was happy with them. The only thing is I couldn't get the Michelin name or the sizing information, etc. because my 3D design skills are not even close enough. Basic circles and squares, etc., I'm ok but details and lettering and such? Out of my league. Overall, they're not too bad but not something I would put in a show.


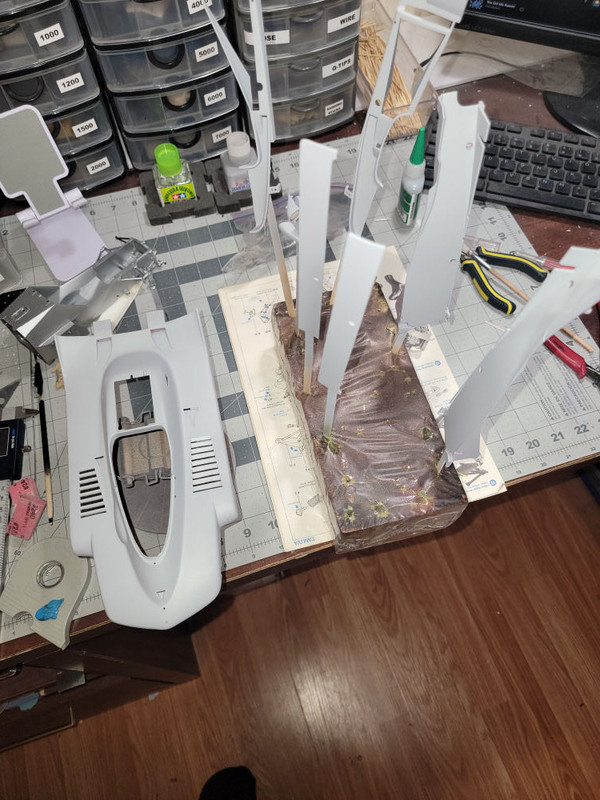
Now on to the main event. The body. First, it needs a bath...in oven cleaner.
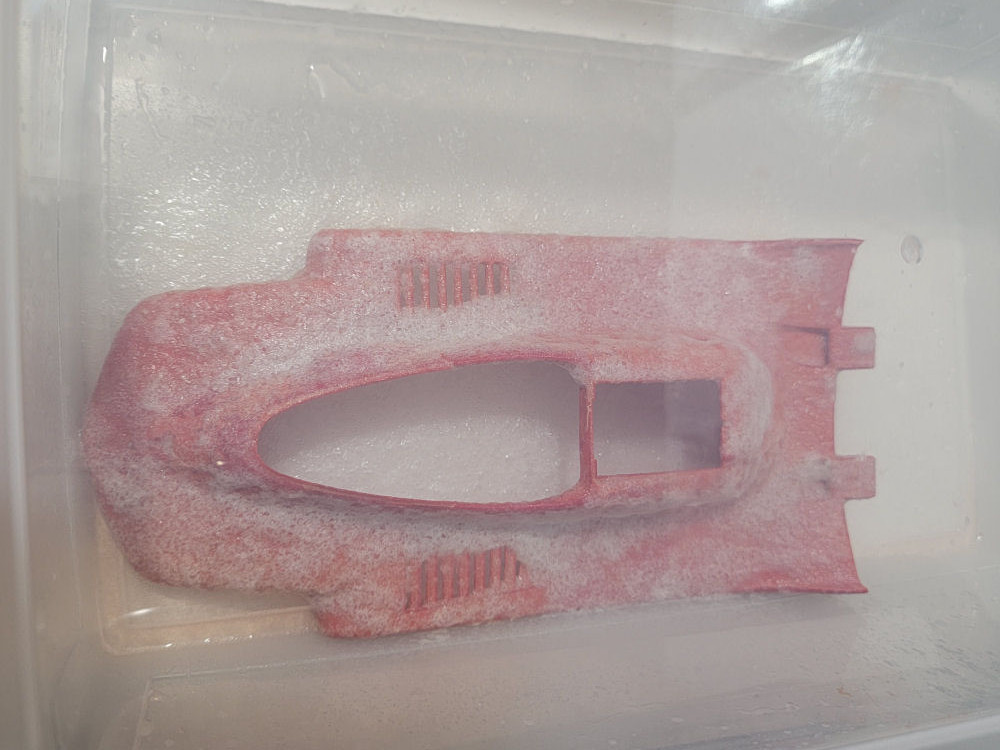
In fact, it needed two baths and a bit of scrubbing. Eventually though, it and it's mates, all turned out ok.
Then we add some primer to the mix...
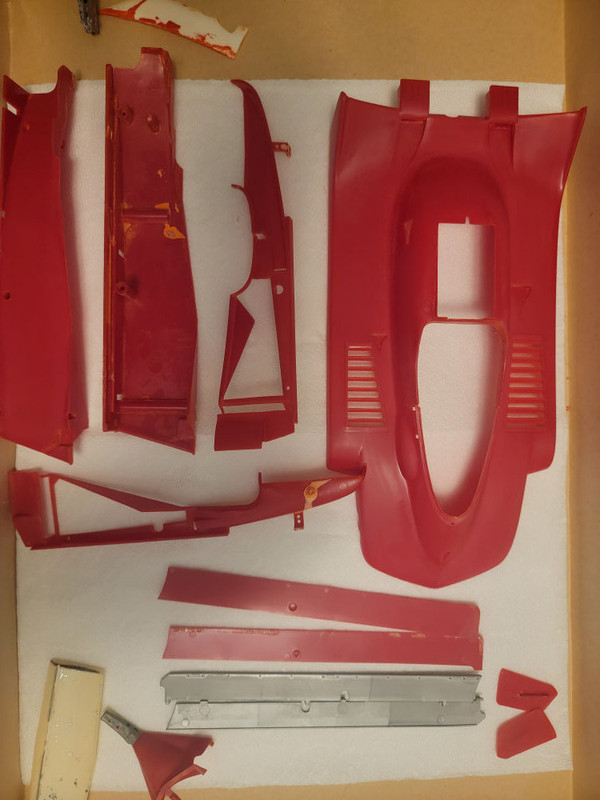
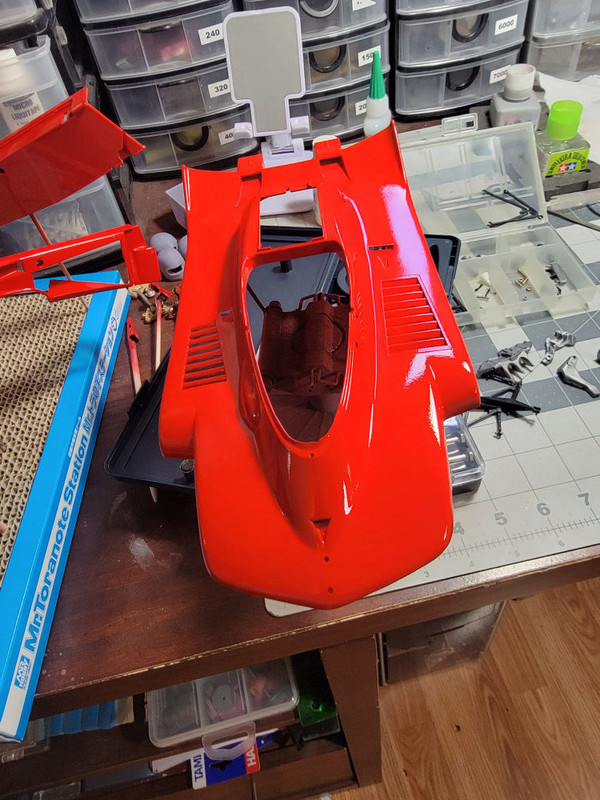
And finally, some beautiful red topcoat!
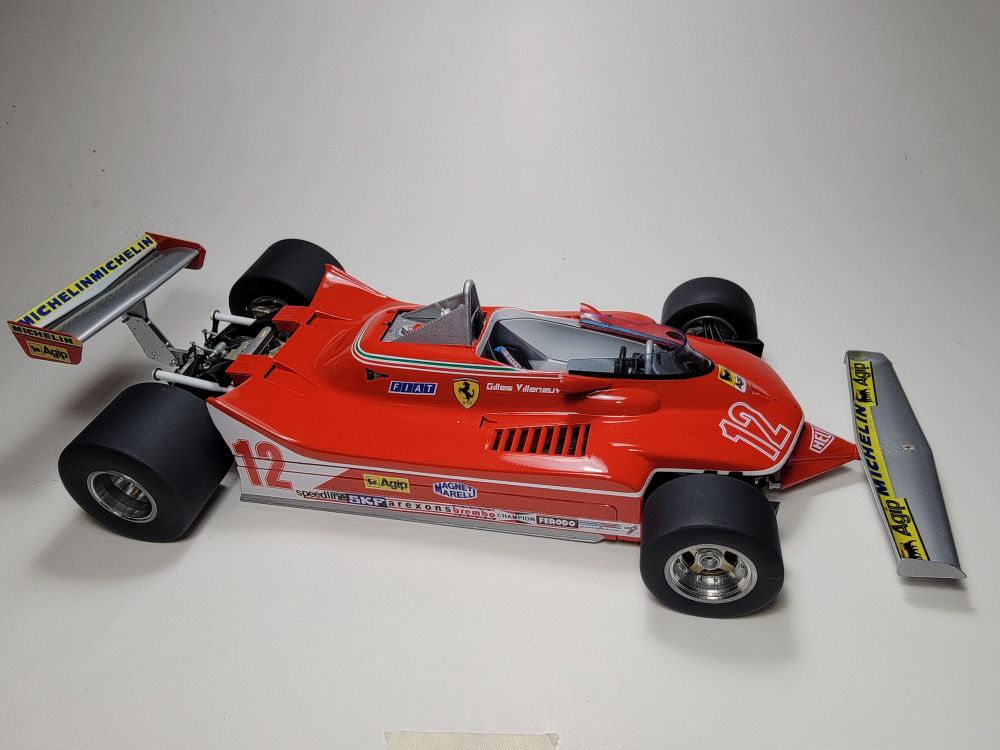
A little polish. A few decals and some other final odds and ends and here she is! The helmet was 3D printed, of course. The kit and aftermarket decals include helmet versions but there was no helmet supplied in the kit.

Overall, quite an enjoyable build. Frustrating at times but not too bad. Not perfect but it'll fill space on my shelf. Not sure if I'll ever do it again but who knows!
Received this from a fellow board member, who had already built one so parted ways with the second one. Not sure of the entire story but a yard sale or estate sale, maybe? Anyway. it made it's way to me about 2 or 3 years ago and I finally got around to fixing it up, or trying to, at least.
After receiving the package, I started sorting and checking, to see what I was up against. Turns out it wasn't too bad, really. Some parts were already painted, some sub-assemblies were put together but not painted and a couple of pieces were missing but nothing too drastic.
Starting with the motor, the block was unpainted but most of the attached parts were so it would have to come apart to be painted. Our friend, Bob Smith, gave us a great solution for dealing with glued on parts but be aware when using this stuff. One, it's very thin and runs like water. Two, it will leave a mark. Not a damaging mark, as such, more of an oxidation type of mark. Nothing a little sanding and priming won't take care of. Oh, and the third thing? If you don't like the smell of dead fish, then...I dunno, wear a mask or something!
After letting the debonder sit for a couple of minutes and with some sharp tools and the ability to hold your breath for an extended period, you get this:
This is where the fun really began. Note the damaged/missing fuel injectors, the air intake mesh and what's left of the fuel pump (2nd piece down from the yellow brackets/hoses on the left). I did, however, remove all 12 air intake funnels without breaking or losing a single one! A rarity for me when it comes to small parts.
While researching this project, I noticed the little frame holding the mesh on the air funnels and thought it might be a neat detail to add. So, among the many other things I printed for this, I made up some little frames. Along with some new mesh, they turned out ok...sort of.
The 3D printer actually got quite a few miles put on it during this project. Among the items: wheel bearings, roll bar, fire extinguisher valves, fuel pump, fuel injectors, rear axle, front brake ducts and rims and tires. Below is the bearings, pump, injectors and roll bar. The rest will be seen later...except the axle which is hidden in the rear end.
New injectors mounted. Note the directions, 3 facing one way, the other 3 facing opposite. If you look closely at the original build picture, you will see that all 6 on each side are facing one way, plus, even though it's a twelve cylinder motor, there are only 8 fuel lines on the original build. All of this to say, the lines, pump and injectors had to be removed. The injectors and pump were mincemeat after that so new ones had to be made.
Finally, after all painted parts were stripped and repainted, it could be reassembled. Earlier, when I was talking about the mesh frames, I ended the line with "they turned out ok...sort of." What I meant was when I measured the funnel to get the size for the frame, I measured on the outside, as one would. However, for whatever reason, they printed just a smidge bigger, like, we're talking a quarter of a millimeter. However, if you add a quarter millimeter to both sides, times 6 funnels, you're going to get a difference of around 1.5mm, which scales out to about 2.5 inches in "real life". Needless to say, I never realized until I was putting it back together so, if you look at it the right way, the funnels just don't fit correctly. They are bunched up against each other instead of having some room between. And besides all that, you can't even really see the frames unless you get right in there! Oh well. It's done now.
Next, on to the chassis. Besides broken suspension pieces and unfinished bits, it didn't look too bad.
After a little body work and some minor repairs, it was looking pretty good. The seat was stripped and repainted, the old belts were replaced with new ones.
On to the rear end. The brake ducts need some work and of course, the exhaust brackets broke when I disassembled the rear end. More mileage on the 3D printer!
All dressed up and nowhere to go...yet.
Rear end complete, testing the fit. So far everything looks ok.
Stripped and repainted the front roll hoop. Added a couple of toggle switches. Once you get to a certain age, don't try to install these by yourself. Get some help. Seriously.

I didn't like the paint job on the wheels, so I decided to take them apart and redo them. Not a good idea. The tires were glued to the rims and one ripped while I was trying to remove it. Off we go to the 3D printer again. After a few unsuccessful attempts, I settled on a final print. The final fit of rim and tire was a bit of work but once done, I was happy with them. The only thing is I couldn't get the Michelin name or the sizing information, etc. because my 3D design skills are not even close enough. Basic circles and squares, etc., I'm ok but details and lettering and such? Out of my league. Overall, they're not too bad but not something I would put in a show.
Now on to the main event. The body. First, it needs a bath...in oven cleaner.
In fact, it needed two baths and a bit of scrubbing. Eventually though, it and it's mates, all turned out ok.
Then we add some primer to the mix...
And finally, some beautiful red topcoat!
A little polish. A few decals and some other final odds and ends and here she is! The helmet was 3D printed, of course. The kit and aftermarket decals include helmet versions but there was no helmet supplied in the kit.
Overall, quite an enjoyable build. Frustrating at times but not too bad. Not perfect but it'll fill space on my shelf. Not sure if I'll ever do it again but who knows!


 ). You could probably pick up a used one for $100 or less. Resolution is one of the selling points. Mine is a 2K while 8K is probably the most common now. Like a higher resolution TV gives you a better picture, a higher resolution printer yields better prints and of course, a bigger price tag.

