|
|
Post by Joel_W on Oct 19, 2018 12:38:09 GMT -8
Gary,
What's even worse is that my wife watches my spending like a Hawk. of course it doesn't stop me, but it sure makes it interesting and creative to keep the kits and parts coming.
Joel
|
|
|
|
Post by Joel_W on Oct 20, 2018 13:00:33 GMT -8
Well, another week of work on the 330 P4, and I've got just enough done for an update. I decided that a little break was needed, so getting the 5 tires and wheels ready for installation would be a productive break from the Chassis/pit/suspension. The tires are solid rubber with no side wall detail lettering, but the tread pattern looks pretty good. Since I'm modeling a pre-race version, the tires should be new, hence the molding seam down the middle. Fujimi gives you 4 Gold plated, & 1 non-plated 5 spoke Ferrari type wheels, with knock offs for 4 of them, but the wheel for the spare tire isn't plated, nor does it have a knock off. I air brushed it Testors enamel Gold which nicely matches the plated wheels. Some how I lost my picture of the 5 wheels, so I kind of borrowed one off the 'net. 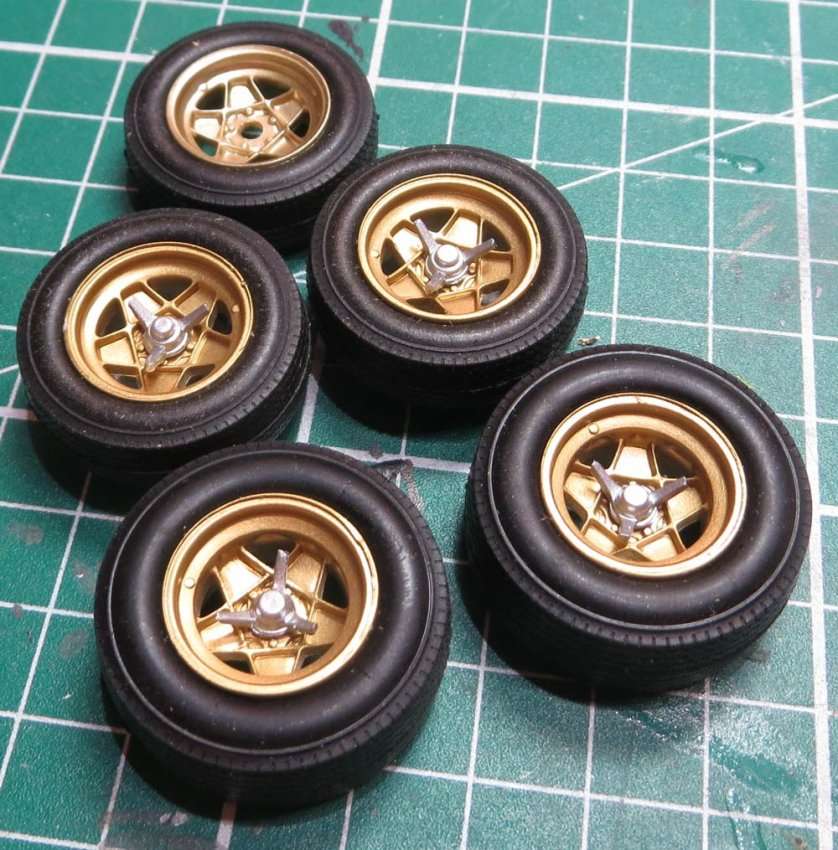 then I hand glossed the sidewalls with Tamiya X-22 as I wanted a thick coat to decal on. 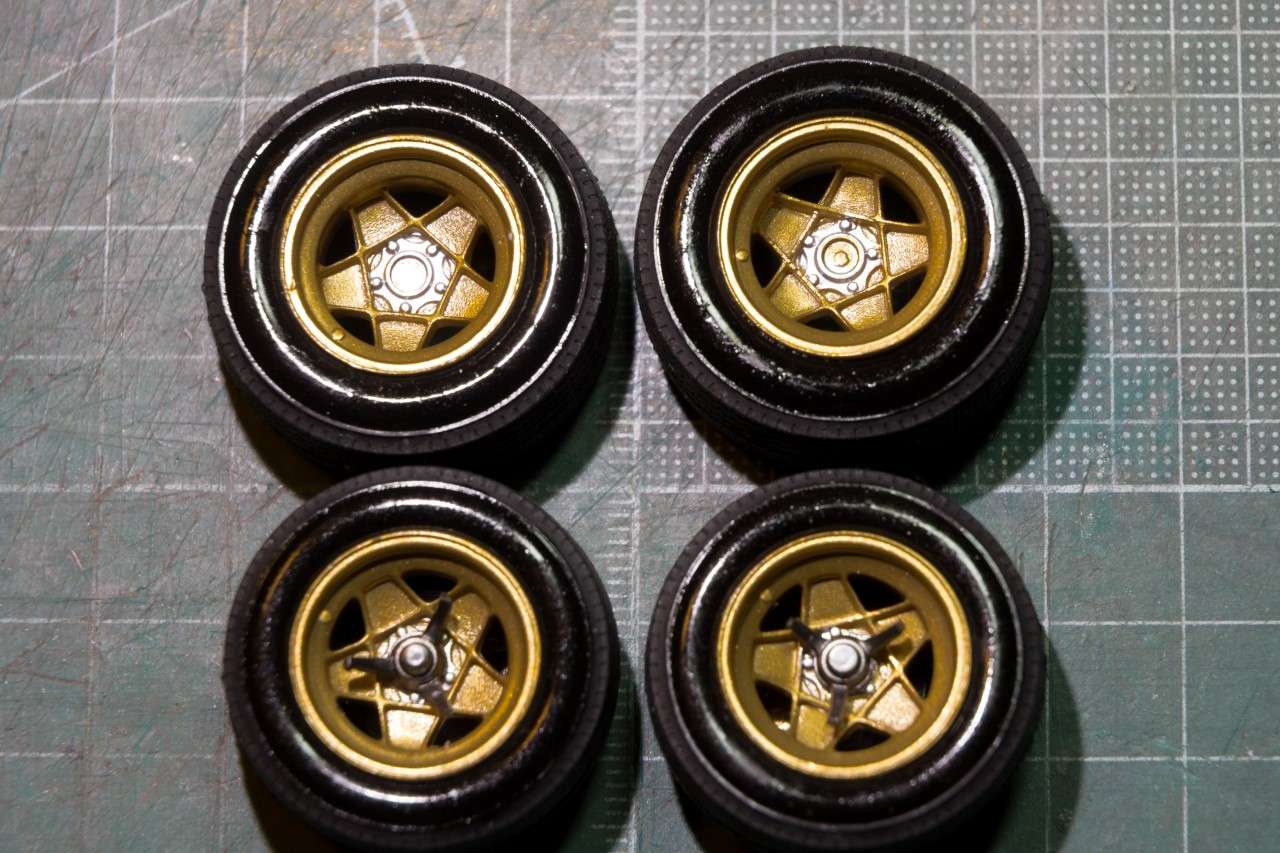 24 hrs later I decaled them with IndyCal decals. 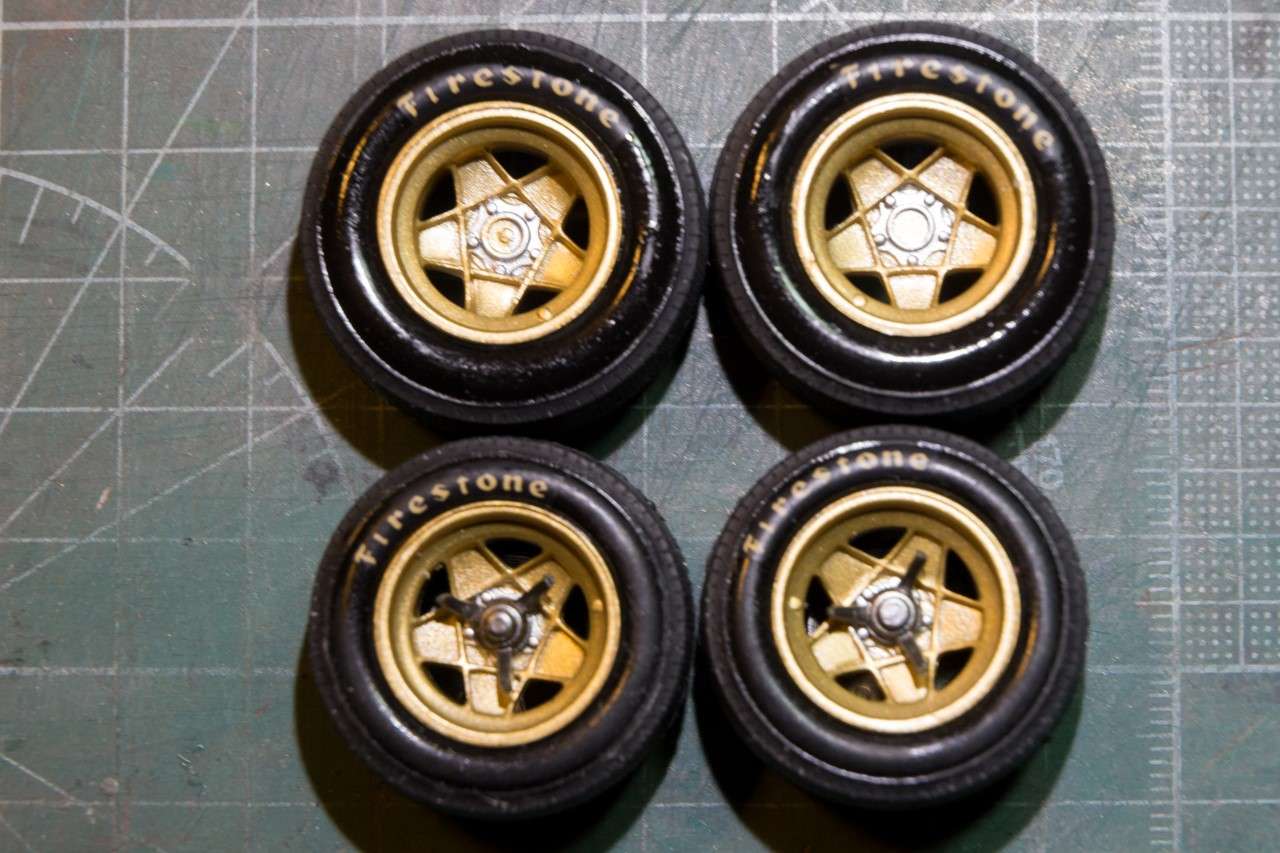 then after another 24 hrs I air brushed on a leveling coat of Testors Glosscoat to start blend the decals in. 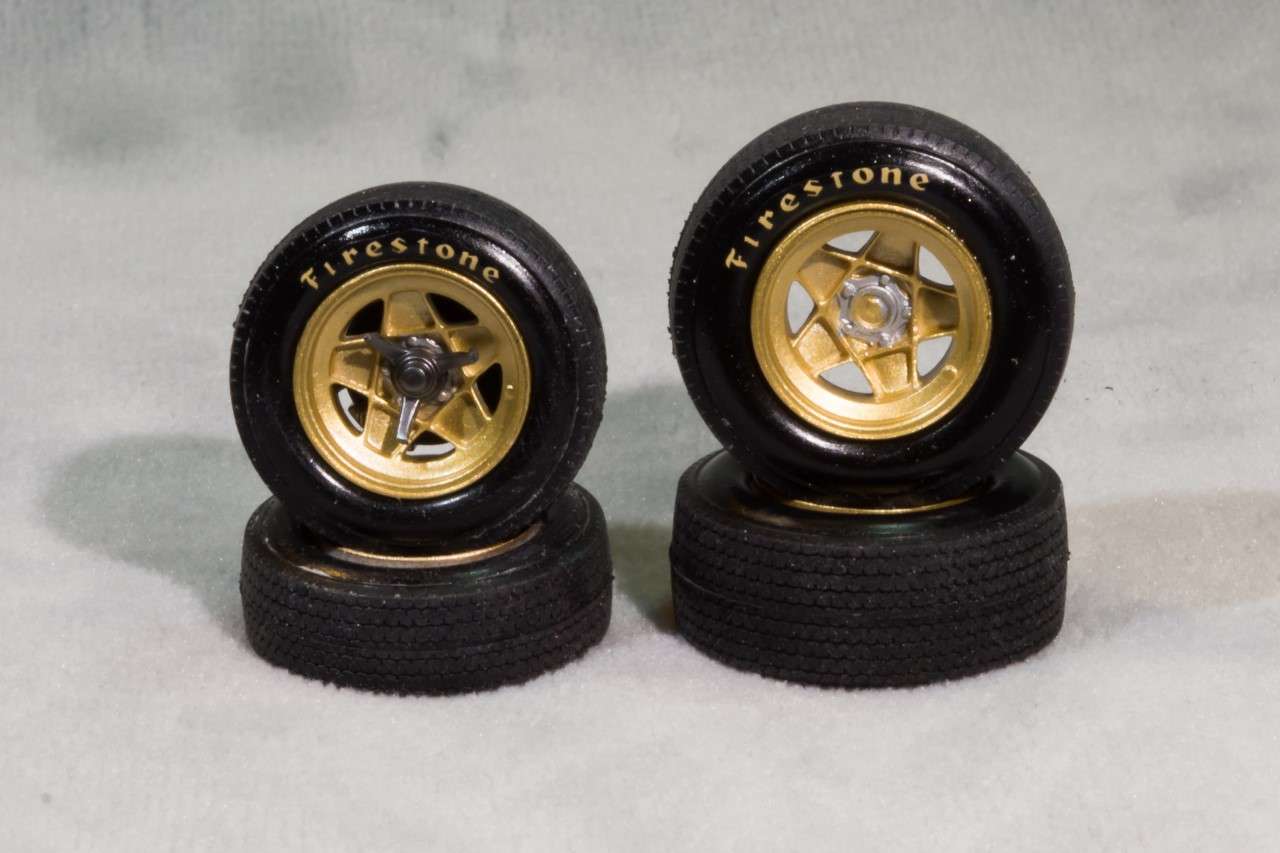 Once the gloss has cured for 24 hrs, I give each sidewall a easy rub with 3,000 grit so that the decals blend in, and then a coat of Dullcoat. Then they'll be ready for installation, which will let me complete the front suspension. I finished up the rear suspension/transmission, which is kind of weird without an engine as it's just a big empty hole. 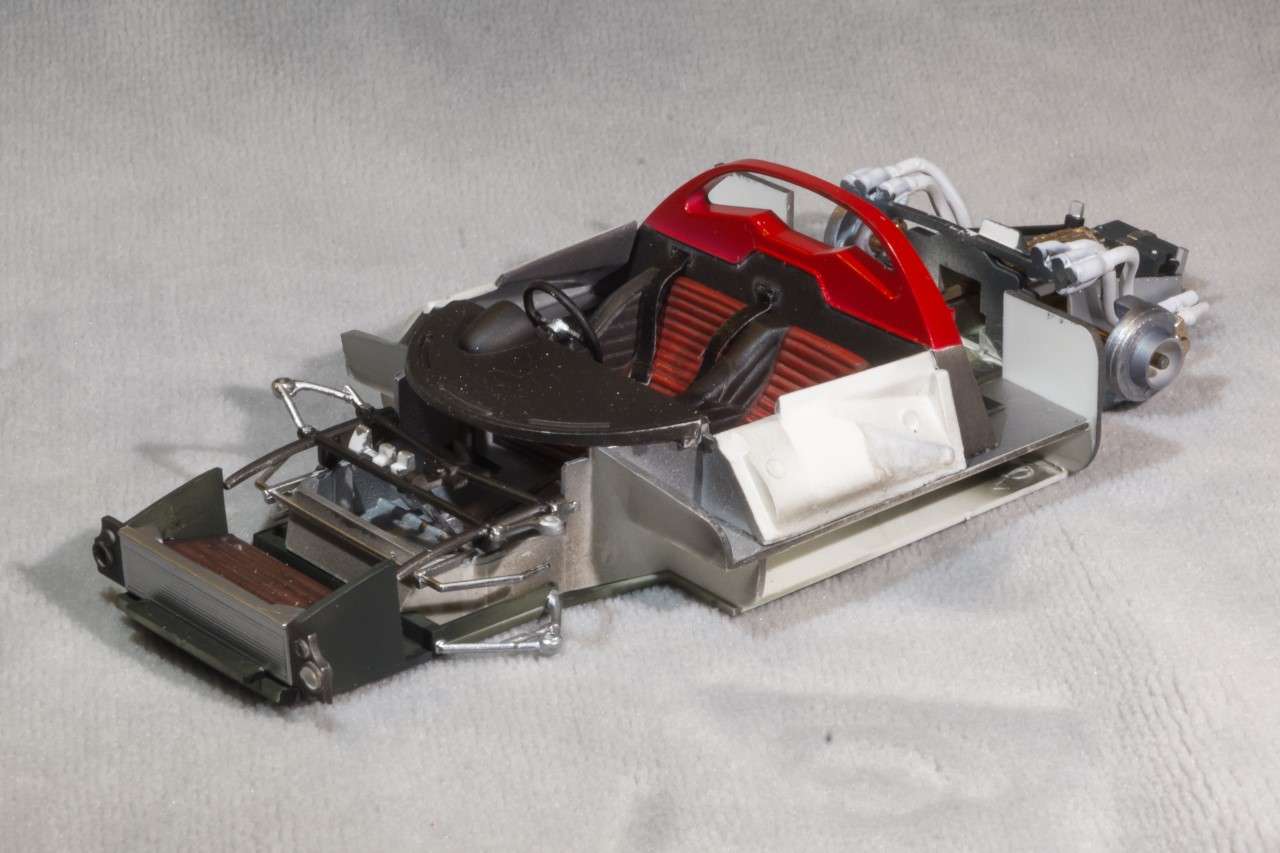 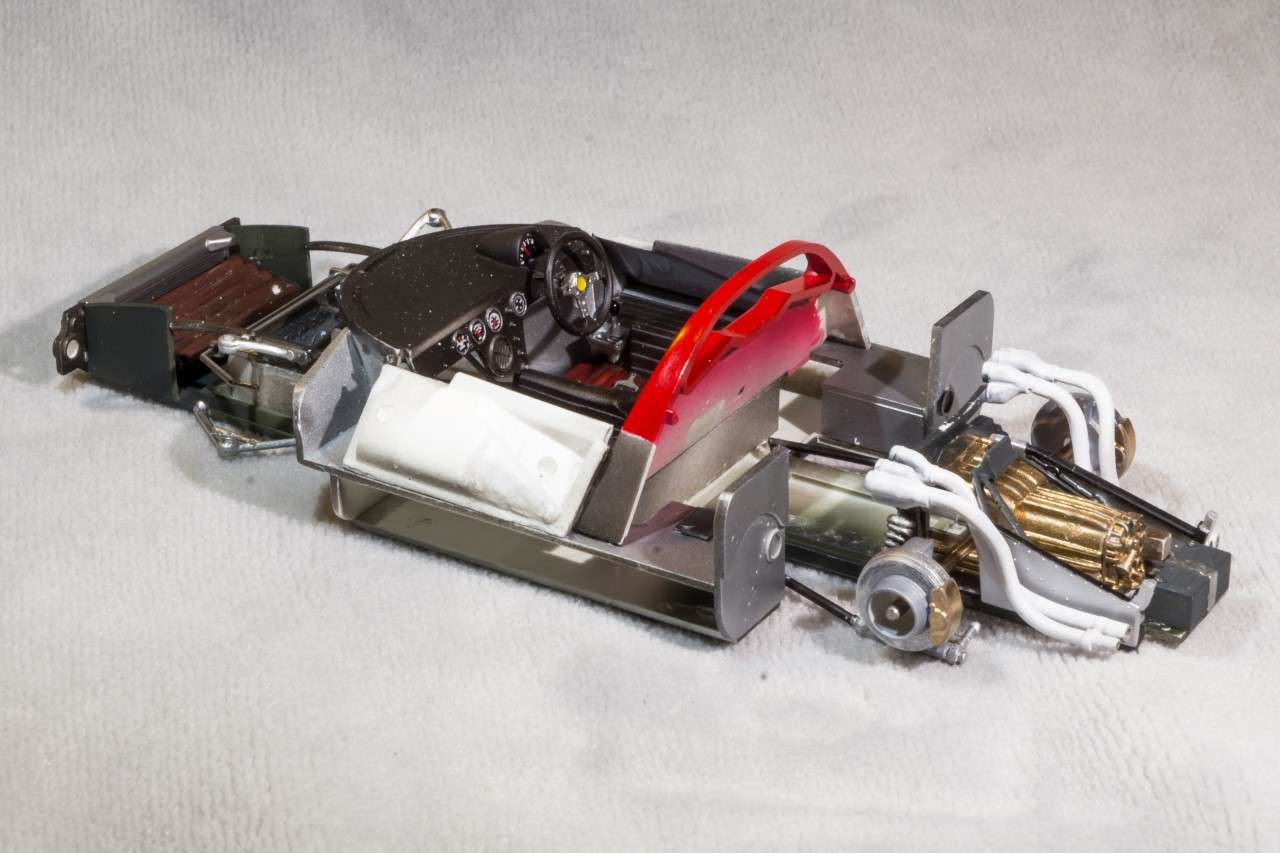 I test fit the spare tire into its holder over the transmission. 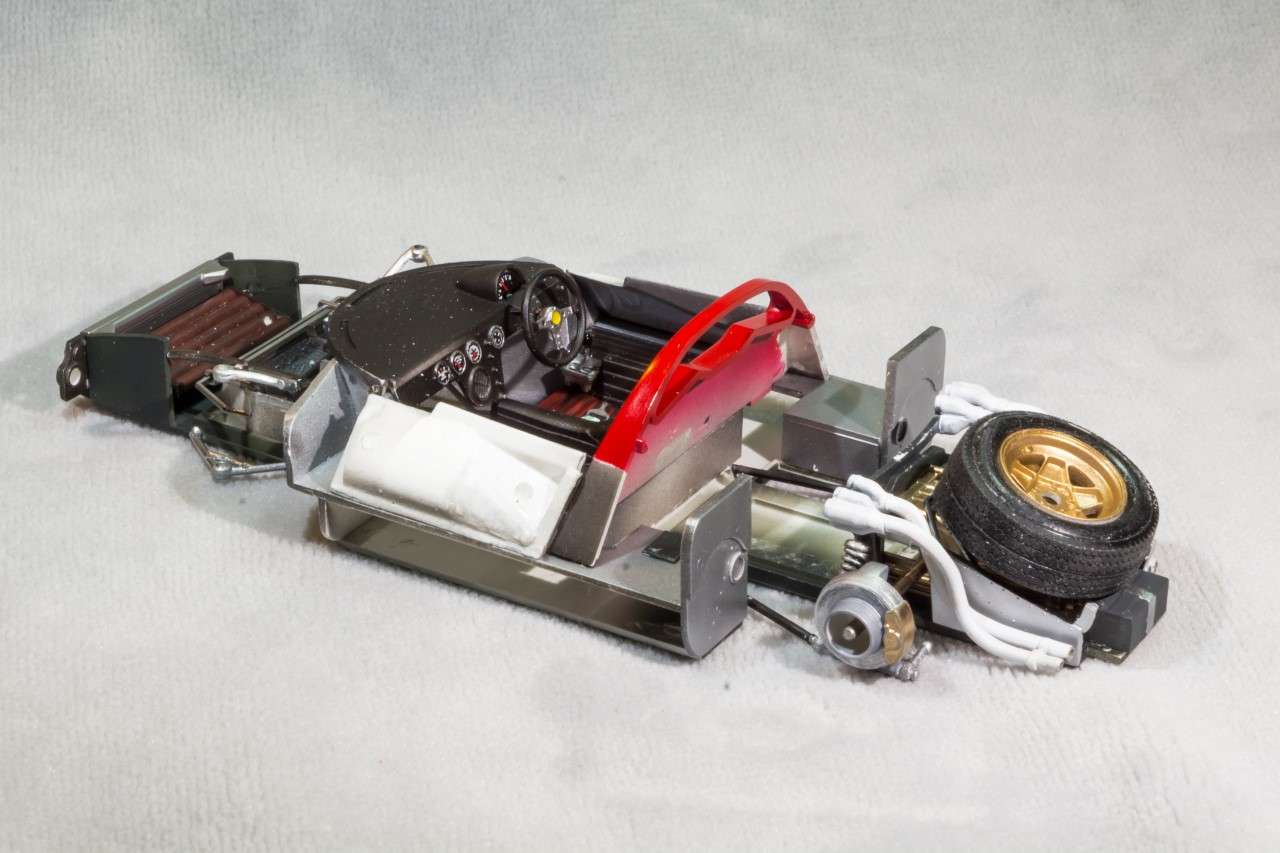 And it fit just fine, but now that huge empty engine space would be completely visible through the top rear window. So Fujimi came up with a 100%, totally factious cover plate that will be painted Gloss red. 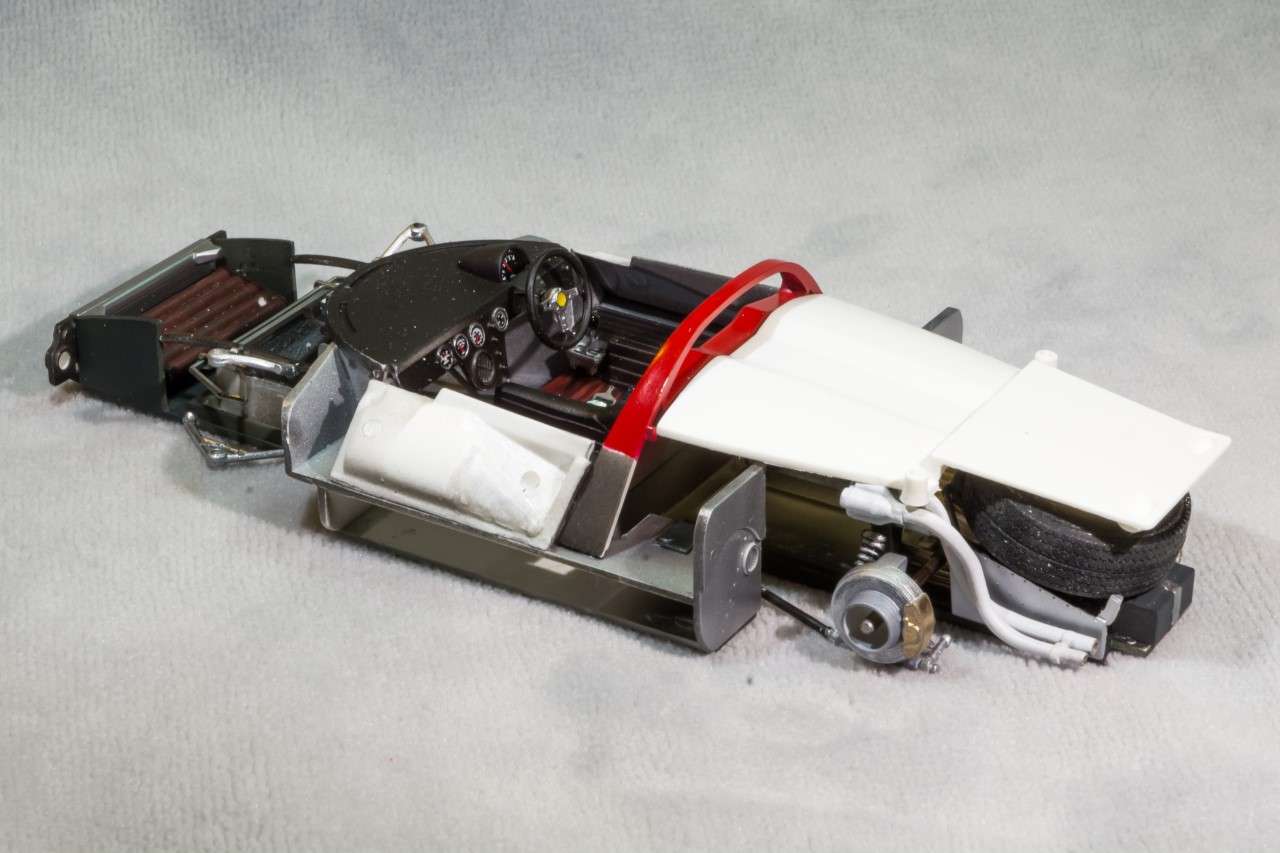 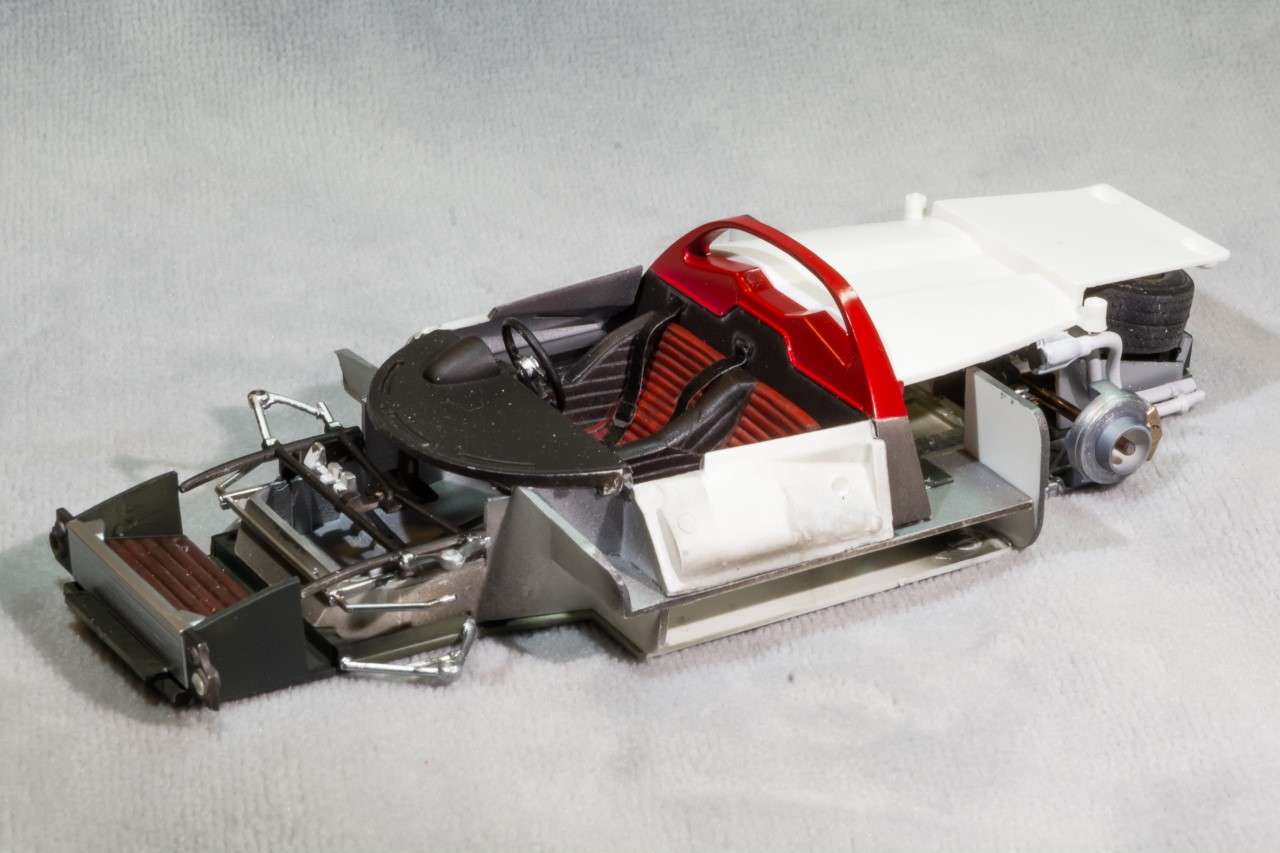 That will have to do for this build. I did find out that Historic Racing Miniatures makes a Resin/white metal engine but it was sold out, and I was really passed the point of installation. I'll keep that in mind for my Fujimi Ford Gt40s that also suffer from the missing engine syndrome. From the bottom I will have to admit that it looks ok, not great, but the engine pan does block out a lot of the view. 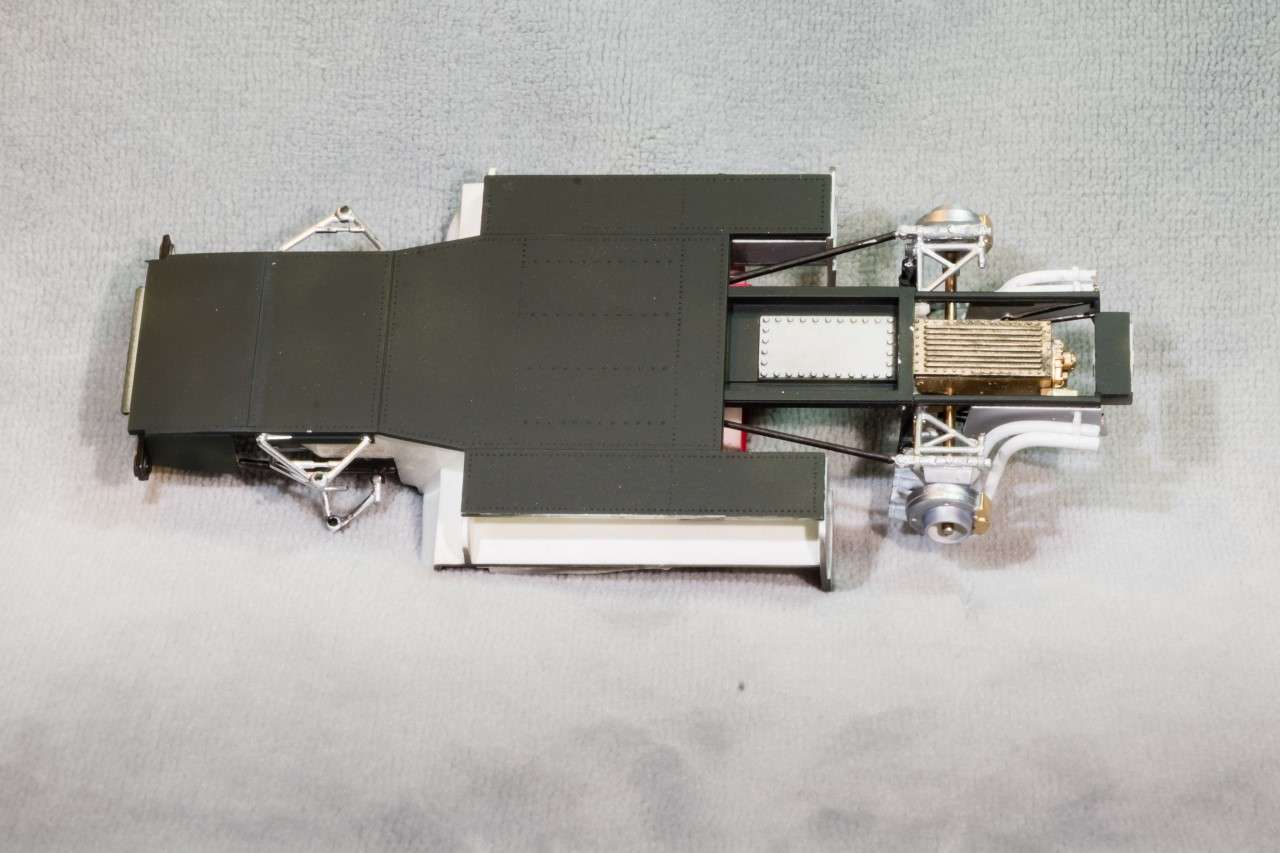 I thought I'd test fit the shell that I've been working on, and see how my 330 P4 is starting to come together. 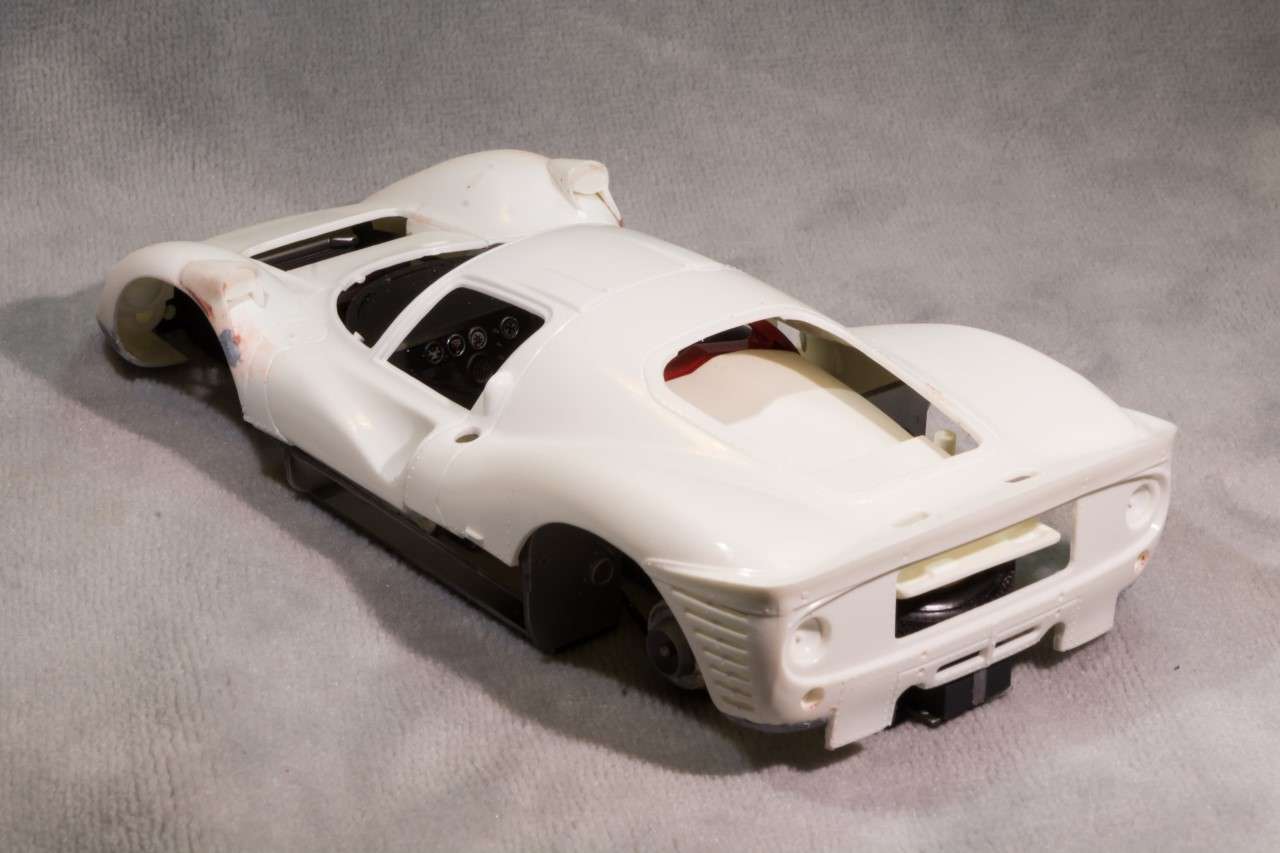 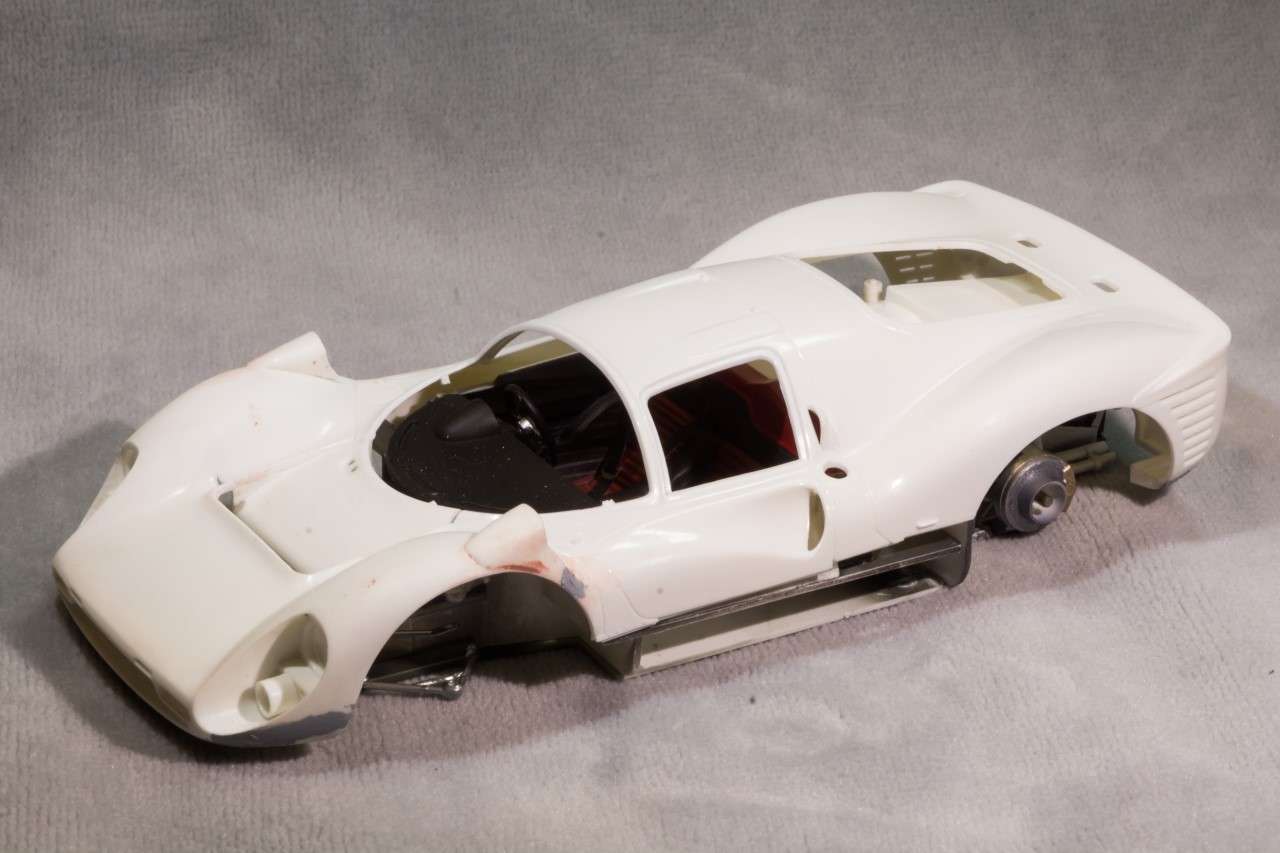 Thanks for stopping by, and checking out my progress, it's always much appreciated. Joel |
|
|
|
Post by Chris K. Hale on Oct 20, 2018 14:06:18 GMT -8
Keep in mind, The Gt40 Engine set is for the MK-I not the more common MK-II Fujimi kits. The MK-II used the 427 Engine in 99% of the cars . I just got the KA MOdels set, not cheap either and then realized it was for the MK-I also so I am on the Hunt for a MK-I Fujimi kit. not many out there though.. Also I noticed Red Frog says 1 to 3 weeks for shipping meaning they probably order them from Harold when they get an order. Go direct if you can, its the only way to insure you will actually get it!! Chris
|
|
|
|
Post by garydavis on Oct 20, 2018 14:09:20 GMT -8
Man Joel...this is looking really good. Good clean work. You are making this build look more like a full detail kit than a curbside.
|
|
Deleted
Deleted Member
Posts: 0
|
Post by Deleted on Oct 20, 2018 19:17:48 GMT -8
Man Joel...this is looking really good. Good clean work. You are making this build look more like a full detail kit than a curbside. Truer words were never spoken...^^^^ Joel everytime I look at your progress I have to wonder, "how good would this guy be if he KNEW what he was doing building automobile models as a second choice!" Truly fine and a lot of good tips from you, pretty nice deal happening here! |
|
|
|
Post by Joel_W on Oct 21, 2018 5:03:16 GMT -8
Keep in mind, The Gt40 Engine set is for the MK-I not the more common MK-II Fujimi kits. The MK-II used the 427 Engine in 99% of the cars . I just got the KA MOdels set, not cheap either and then realized it was for the MK-I also so I am on the Hunt for a MK-I Fujimi kit. not many out there though.. Also I noticed Red Frog says 1 to 3 weeks for shipping meaning they probably order them from Harold when they get an order. Go direct if you can, its the only way to insure you will actually get it!! Chris Chris, Thanks for the heads up. Like I said, I bought both Fujimi kits, and I want to try my 1st AM upgrade kit on just the Mk1 which won the 1968 LeMans with a 5 liter engine. The Mk II I'm not planning on adding an engine to it. Gotta watch my modeling budget as I have a few rather expensive (for me) builds planned for the up coming year. Joel |
|
|
|
Post by Joel_W on Oct 21, 2018 5:12:42 GMT -8
Man Joel...this is looking really good. Good clean work. You are making this build look more like a full detail kit than a curbside. Truer words were never spoken...^^^^ Joel everytime I look at your progress I have to wonder, "how good would this guy be if he KNEW what he was doing building automobile models as a second choice!" Truly fine and a lot of good tips from you, pretty nice deal happening here! Ben, Why thank you Sir for those most really kind words. Just for the record, race car/sports car modeling in now by far my #1 building effort. Military aircraft, which I'll always have a fondness for as I modeled that for almost 10 years, has been regulated to maybe one per year at best. My focus now is on learning anything and everything I can about auto modeling since "I came out of the modeling closet", with the intent of each model being just that much better then the previous efforts. One other thing that I truly appreciate is the history and stories behind the car, driver, and team. Joel |
|
|
|
Post by Joel_W on Oct 21, 2018 5:14:55 GMT -8
Man Joel...this is looking really good. Good clean work. You are making this build look more like a full detail kit than a curbside. Gary, Thanks so much for those most kind words. All I've really done to the kit is careful detail painting up to this point, and try to get the parts to fit as good as I possibly can prior to glue work. Joel |
|
|
|
Post by Joel_W on Oct 29, 2018 12:42:03 GMT -8
Being retired does have its pluses, and I've been able to consistently get more time at the bench, and still get my Honey to List chores done on a daily & timely basis. Work concentrated solely on the shell as there was a still plenty to do before priming could take place. There is an abundance of mold seams over the entire shell that had to be removed, as well as finishing up the blending in of the fender mirrors. The final body work was adding the PE front clip winglets that help to provide additional downforce at high speeds. They're actually well thought out as I'm not the greatest with PE bending especially when a curved surface needs to be created. But that surface adds quite a lot of gluing area which is a very good thing. Here's one of the winglets pre-bend: 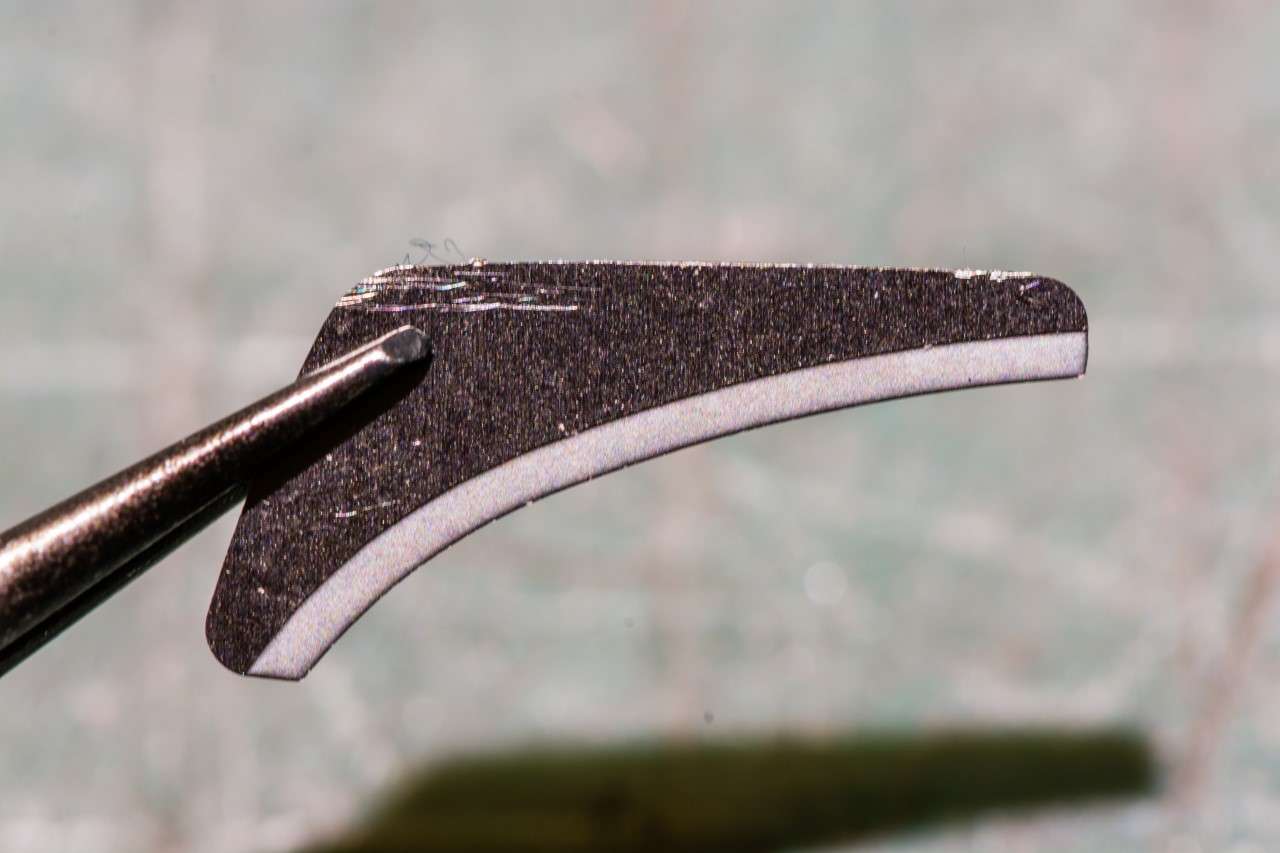 and here's one after I carefully worked the bend with a hand drill handle, followed by a the grip of a modeling hand file. 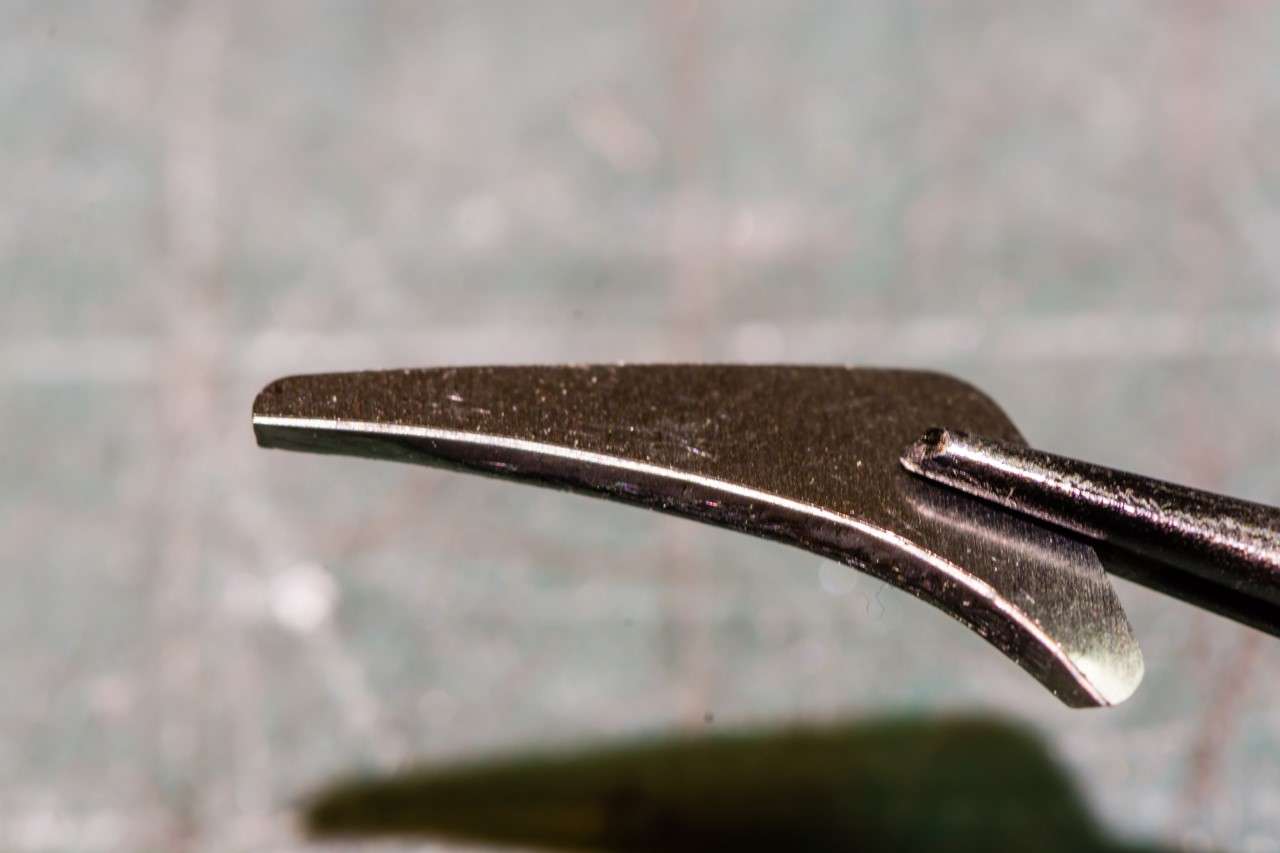 They're both glued up with Gorilla CCA glue, and once dry are there to stay. 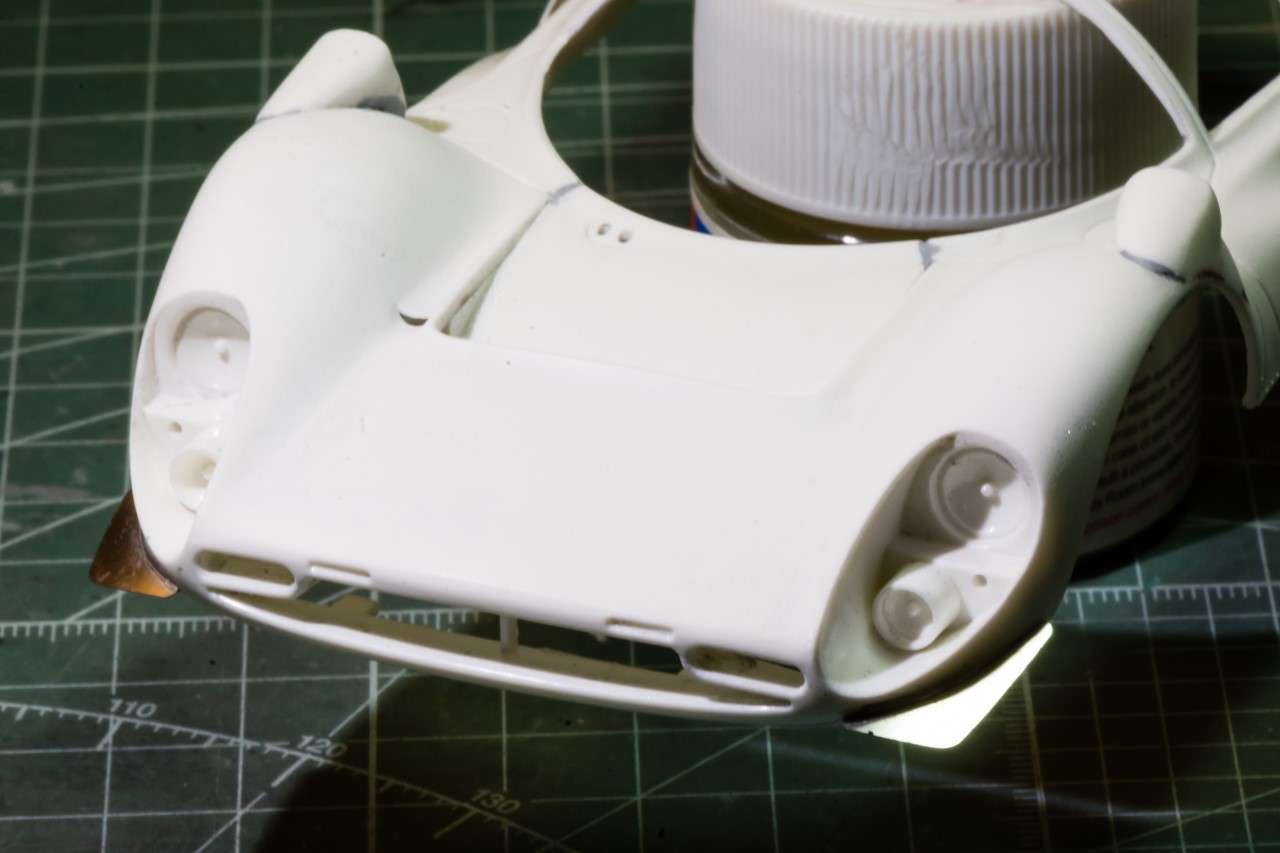 After washing down the shell with ISO Alcohol, followed by a quick wipe with a tack cloth, It's primer time. The paint of choice for the 330 is Gravity's Ferrari Rosso Corsa GC-107, which really needs a white primer, but the shell is molded in White. Having poor eyesight that's just not going to work for me, so I decided to do a little custom blending of Tamiya's Gray and White Lacquer primers. I just wanted it to be more like Off White then Gray. Took a while but I got there. Of course I totally forgot to write down the mixture, so I better not have to mix more or reply it later. Here's the shell after priming: 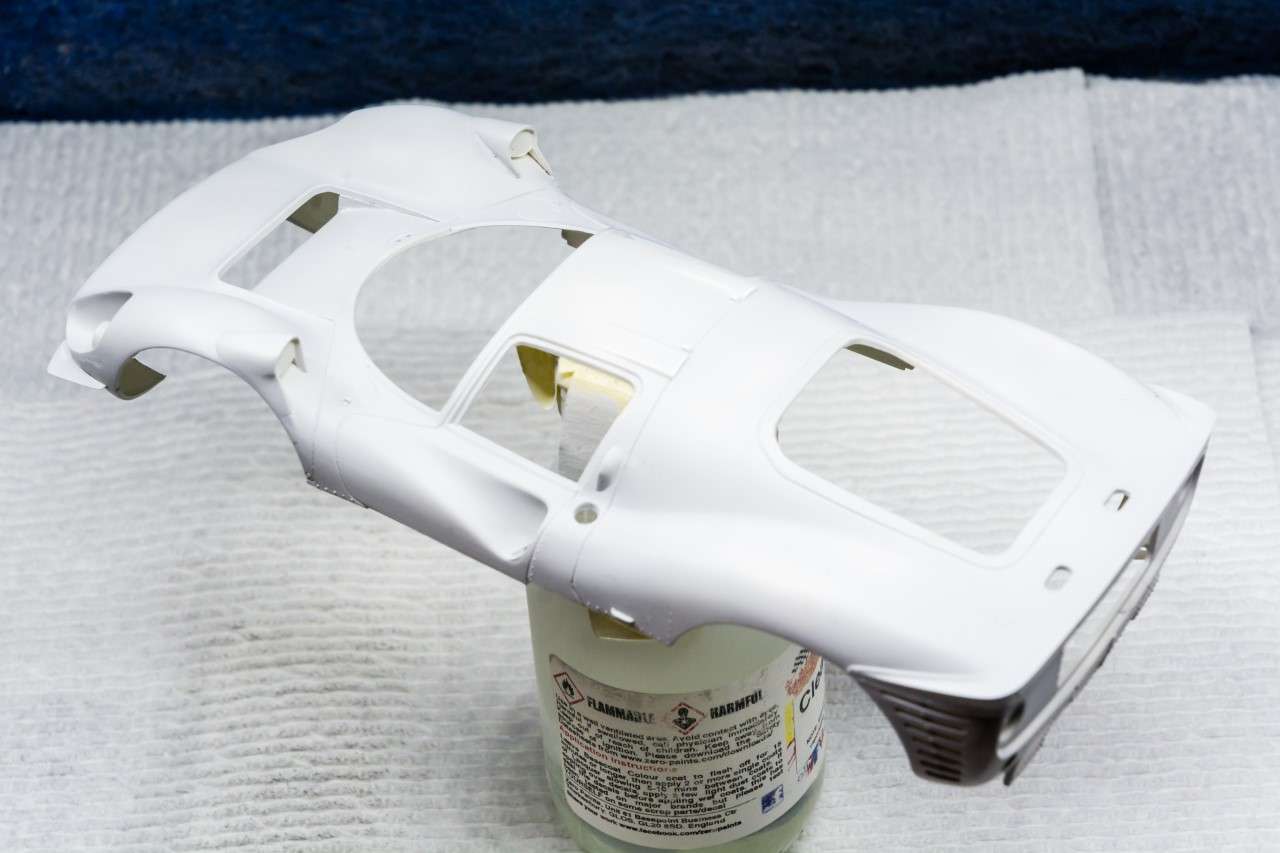  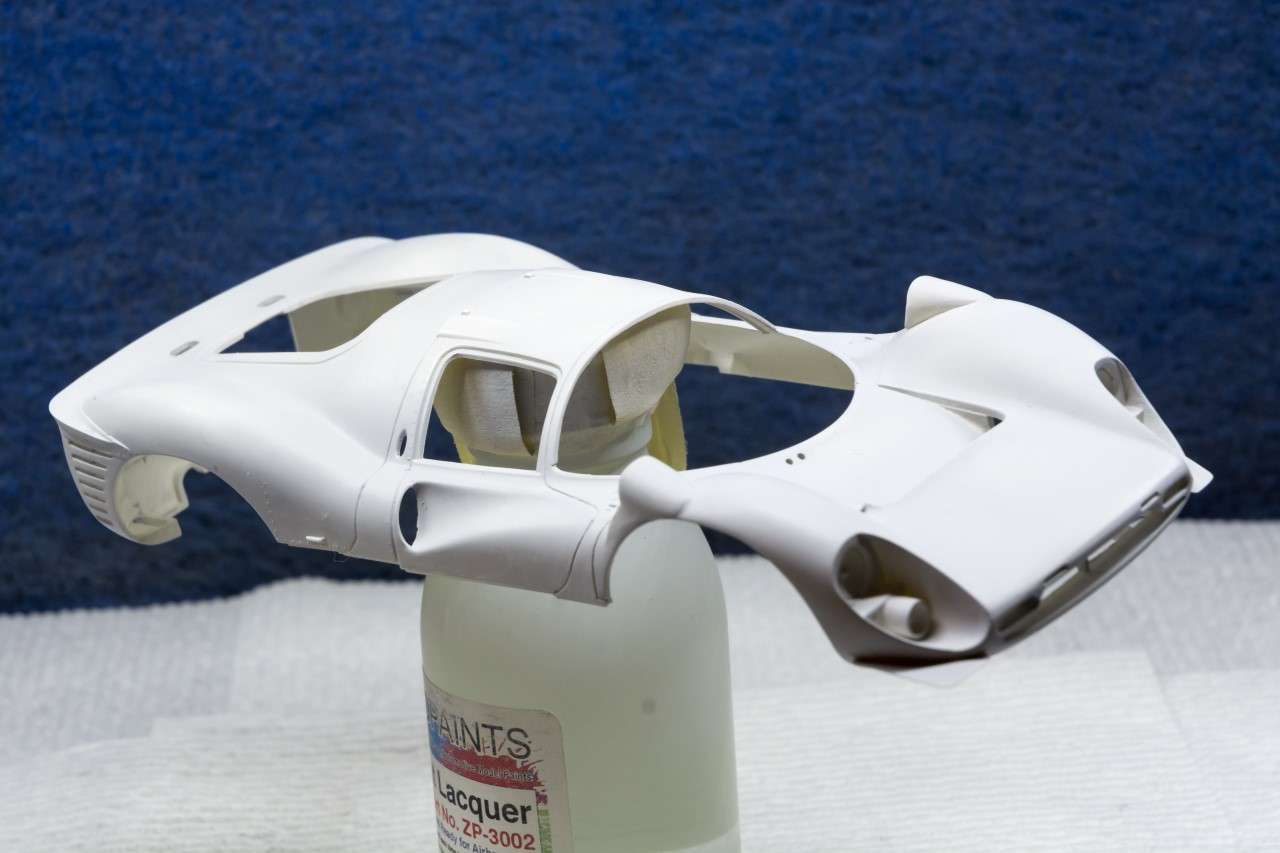 I gave the primer coat several hours to dry, then a lite sanding with Tamiya 3,000 grit sponge and warm water. Now the primer is really nice and smooth to the touch. Next work session was applying the color coats. Nothing fancy here, as I just followed the procedures that seem to work well for me: Tack coat #1, 2-3 min tack coat #2, 2-3 min color coat #1, 5 min Color coat #2, 10 min final color coat as well as looking for drier spots. Now into the drying bin. 6 hrs later it's back to the rub with a wet piece of Tamiya 3,000 sponge. 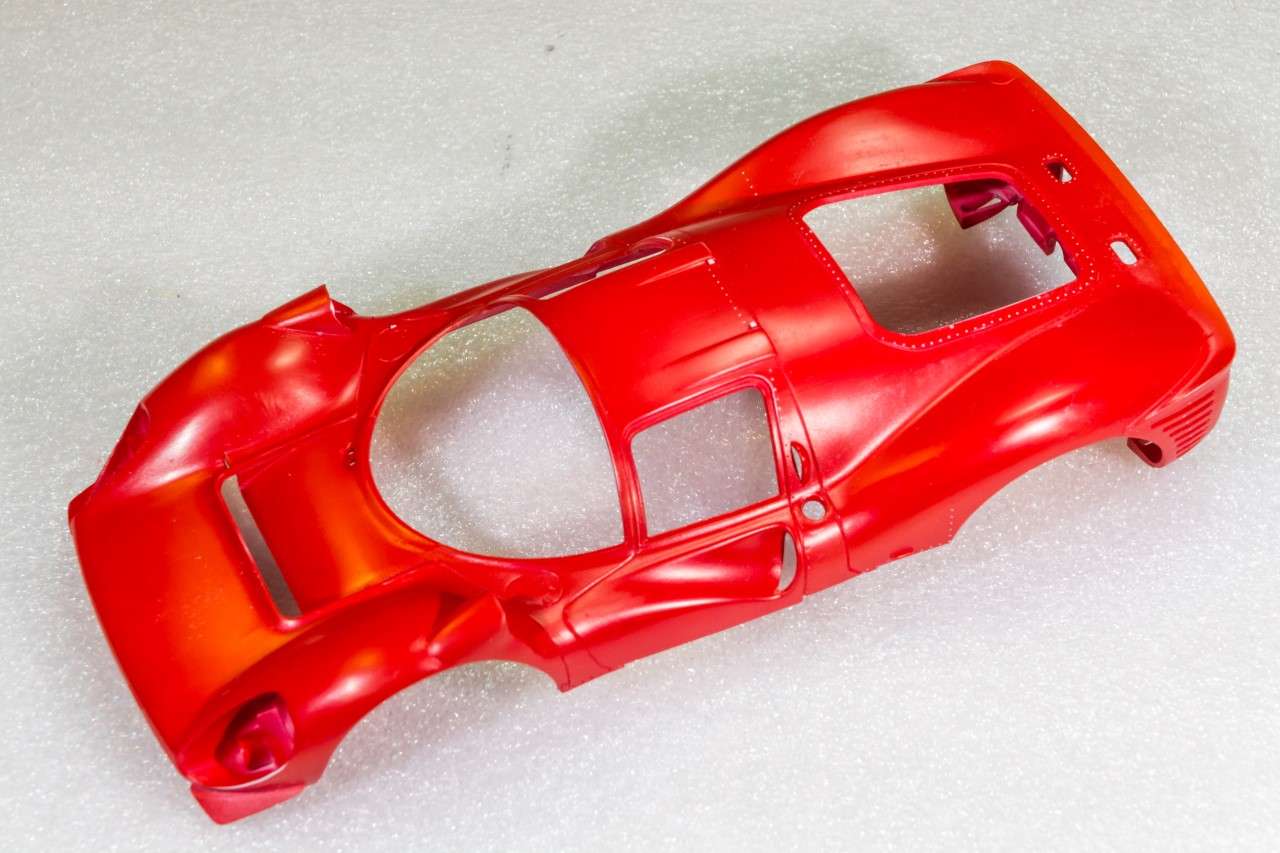 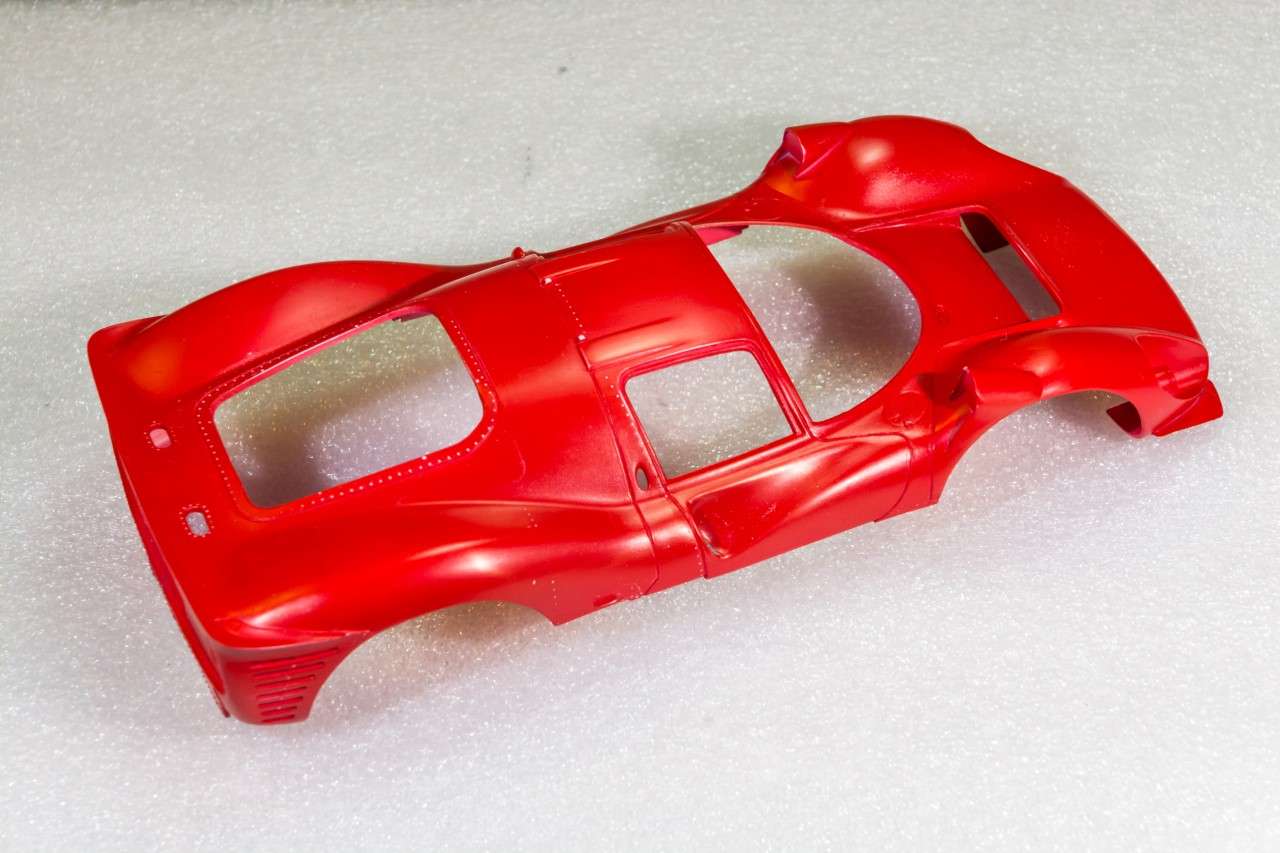 Next work session I applied the IndyCal decals, which preformed perfectly using Micro Set, Sol, and finally Solvaset. The only issue I have with them is that they're printed on a single sheet and you have to cut out each decal. Takes time and a steady hand, but certainly worth the effort. I gave the decals two days to dry, then following the same exact air brush procedure as I used for the primer, & color coats, I applied Mr. Hobby/Mr.Color lacquer clear gloss. The results came out perfect. Here's the shell after the clearcoat with no polishing as yet. 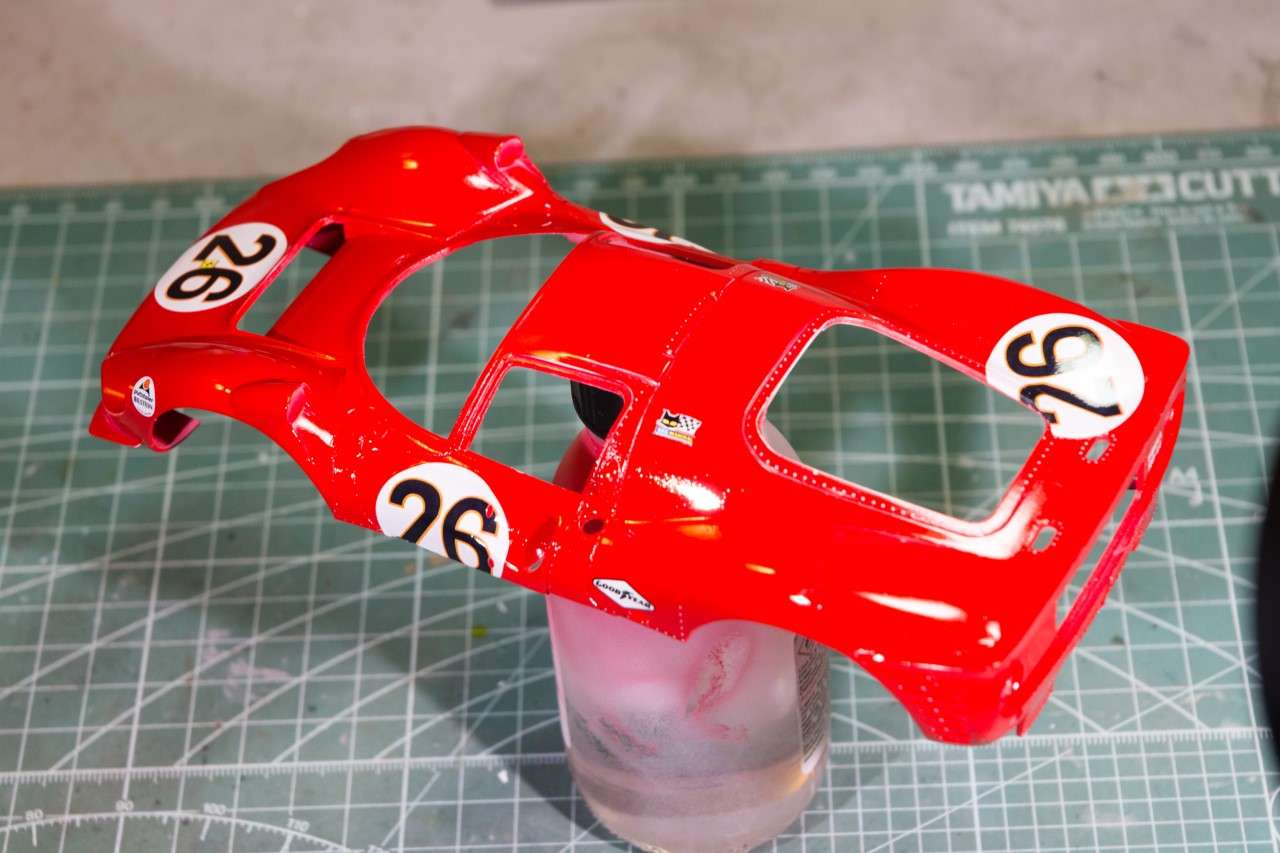 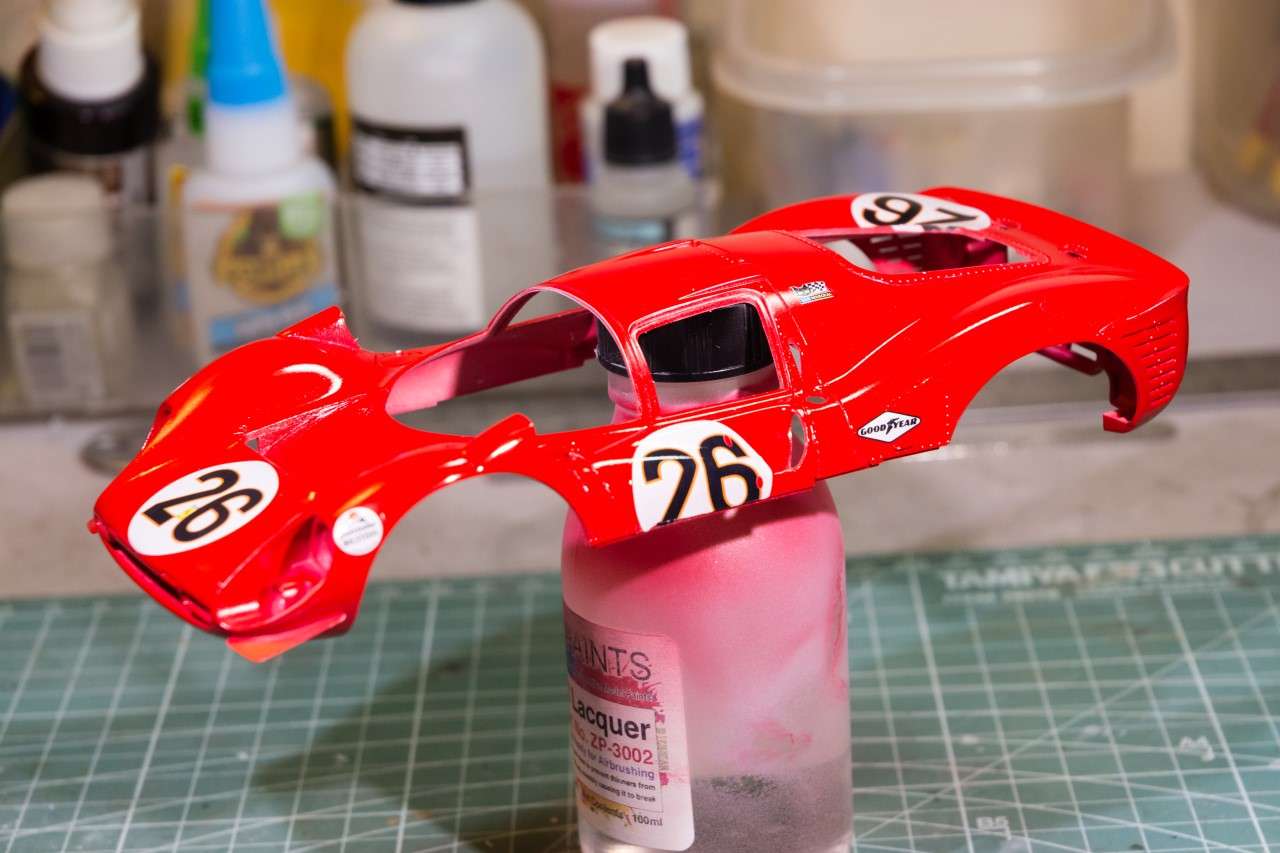 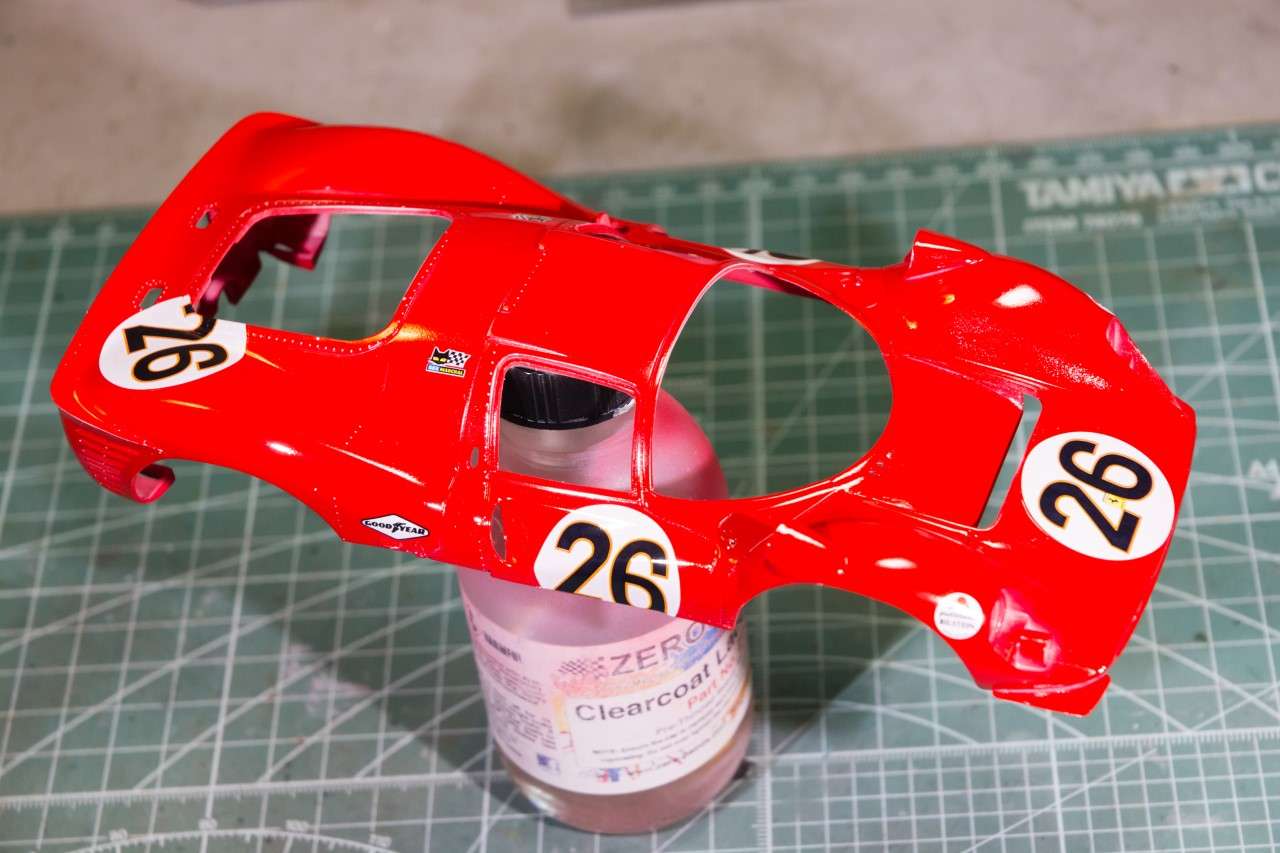 Thanks for stopping by and checking out my build to date, as it's always much appreciated. Joel |
|
|
|
Post by Ben_B on Oct 29, 2018 14:39:19 GMT -8
Wow! Beautiful!! Still taking notes for whenever I get around to building the one in my stash.
Ben
|
|
|
|
Post by garydavis on Oct 29, 2018 15:15:19 GMT -8
That paint looks good Joel...Nice and RED...
|
|
|
|
Post by Chris K. Hale on Oct 29, 2018 16:43:39 GMT -8
Super Job on both the paint and decals, really looks GOOD! Chris
|
|
|
|
Post by Joel_W on Oct 30, 2018 12:03:43 GMT -8
Wow! Beautiful!! Still taking notes for whenever I get around to building the one in my stash. Ben Ben, thanks so much for stopping by and checking out my build to date. it's greatly appreciated. Joel |
|
|
|
Post by Joel_W on Oct 30, 2018 12:04:59 GMT -8
That paint looks good Joel...Nice and RED... Gary, you're not kidding it Bright Ferrari Red. I was amazed when I was on the Gravity site at just how many Ferrari Reds that there actually are. Joel |
|
|
|
Post by Joel_W on Oct 30, 2018 12:06:41 GMT -8
Super Job on both the paint and decals, really looks GOOD! Chris Chris, thanks for that most positive comment. When a builder of your level gives me the thumbs up, it really means quite a lot to me, especially being one of the new guys "in town". Joel |
|


