|
|
Post by mickgee on Feb 14, 2020 13:27:49 GMT -8
Hello guys, here a new rail-job on the bench. This time a 145" wheelbase, around 1967. Motor will be a 426 Hemi with Hilborn injection. Nickel wheels out back, fronts will have laced wire wheels.
This is not a replica, just a car that has some features that I like.
Let's have a look at the chassis, modeled after a Kent Fuller plan, with a few changes that I chose....
This will be an ongoing WIP that I'd like to update should there be any interest here.
Thanks for looking...Mike
|
|
|
|
Post by afx on Feb 14, 2020 15:34:53 GMT -8
I love FEDs bring it on.
|
|
|
|
Post by Bernard Kron on Feb 14, 2020 15:56:15 GMT -8
145" w.b. is on the short side of perfect proportions. Judging where the motor will be placed this should look mighty fine. Lovin' the pure logic of this era of tubular frame building. Glad to see you at work once more.
|
|
|
|
Post by arcticwolf on Feb 14, 2020 19:50:38 GMT -8
Lovely work. What do you use for soldering?
|
|
|
|
Post by mickgee on Feb 15, 2020 3:02:05 GMT -8
Thanks guys. Moving forward, yesterday the ride height was figured out. Since the wheels and slicks are decided, next step was to prepare the block with a rod running through at crankshaft level back through to the rearend housing. After mounting the wheels and tires into the rearend, I could mark where the cradle will attach to the chassis to support the housing.
So, a firewall is attached, the motor has the proper dump, firewall is a scale 23" form rear axle....we're set to go forward now. All things are dependent upon these guidelines. Plus, the chassis is a scale 4" above ground. As with the wheelbase, nothing too radical here.
Also, the joints needed, and some still need to be shaped up a little better. The joints were too messy and large.
Next up is fabricating the clutch can and driveshaft housing.
afx, oh yes, I'm nuts about FEDs too. They're just fun to build and look nasty (hopefully).
@bernard, Thanks for the support. I had to fight with myself about the 145", but felt it to be about right for the motor and era. Stretching it would not be difficult, time will tell.
arcticwolf, I use two solders, both lead based. Main one is 0.5mm from a 50yd. roll, the other is a "radio solder", typical cheap stuff that has a bigger diameter and flux combined, great for joining larger parts. The joints will turn dark gray though with time and manipulation, if this were to be an unfinished brass model, I'd use a higher quality solder of the "Stay Brite" sort. All of these are soldered electrically with a low temp, not flame soldering...too messy.
Thanks guys for your interest.
|
|
|
|
Post by afx on Feb 15, 2020 5:13:41 GMT -8
Good idea Mike adding the temporary stands to allow you to line everything up.
|
|
|
|
Post by tatocorvette on Feb 15, 2020 7:53:29 GMT -8
Love this type of work! Looking GREAT!
|
|
|
|
Post by Bernard Kron on Feb 15, 2020 9:33:51 GMT -8
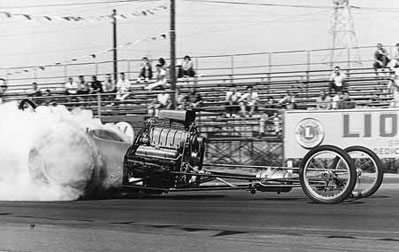
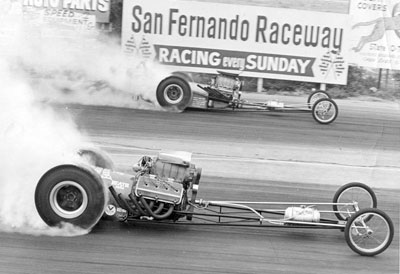
I always associate these "slightly short" '62-'64 era chassis with George Bolthoff, one of the dominant entrants during the NHRA fuel ban ("The King of the Gas Dragsters"). In it' earliest form with Jeep Hampshire driving it has what has been written of as a Kent Fuller 112" chassis, with SBC or Olds power, running A/GD. After Hamsphire was drafted into the military Bolthoff took over driving. Around '64 he switched to a hemi-powered AA/GD configuration and stretched the chassis to something like the 145" you've got going. The pictures below show that in either form it had a marvelous "hooked up" efficiency about its proportions that I find especially attractive. The longer one, natrurally, looks a bit more "airy" and graceful. I've thought about using the Revell Tony Nancy Competition "T" roadster to build something like the short wheelbase version.
112" type:
145"(?) type: |
|
|
|
Post by mickgee on Feb 16, 2020 11:04:51 GMT -8
@afx ...Thanks JC, already the "cradles" have proven to be good idea. The clutch can is done and the driveshaft tube also. Without having a "go to" point during assembly and construction, I'd be a nervous wreck....so many elements sliding around not and sitting still...it's insane the way problems can multiply.
@tatocorvette ...Glad you like it, thanks for dropping by. Today some of the solder joints were further cleaned up, meaning reducing the amount of solder. Seems like I do this during the entire build...lol Good thing I like about taking pics of every step is they allow a good look at mistakes and areas that can be done better.
@bernard...Again, an enjoyable contribution, thanks for this. The 112's were popular, but I didn't want this time to build a rail-job that was this short, but rather enter the '64-'65 season. From what I've been able to come up with, also from a real racer or two, a 145" would be kind of the golden middle of mid-late 60's injected cars. Man I love this stuff! Presently though, I'm unable to view your two photos, probably browser issues my side. Here though, a 150" beauty, with a Gen2 Hemi with injection. Should this build progress nicely, I do have in mind trying a full body in brass sheet. Again, time will tell.
Here the 150" car;
Hmmm? Maybe I'll stretch this one to 150 anyway...my opinion, what a beauty!
Mike..
|
|
|
|
Post by arcticwolf on Feb 17, 2020 17:30:17 GMT -8
Love your work. I have a pair of these, 1/25th, rubber, like new, I'll probably never have any need for them, if they're any use to you (or anybody else) just let me know.
cheers
Paul
|
|
|
|
Post by mickgee on Feb 17, 2020 22:13:34 GMT -8
Love your work. I have a pair of these, 1/25th, rubber, like new, I'll probably never have any need for them, if they're any use to you (or anybody else) just let me know.
cheers
Paul
Hi Paul, those look like my go to tire for altereds and dragsters. Bad for me I live in Europe.... Did you add the "10.50 x 15.00", mine are 11.50 x 16.00?
Mike
|
|
|
|
Post by mickgee on Feb 18, 2020 9:51:54 GMT -8
UPDATE, new photos.
Today the cockpit got needful things. Clutch and go pedal, rear brake pull lever and a pinion support bracket.
Also a skid bar was attached to the bottom of the chassis.
The motor got an aluminum clutch can, which will probably be painted later on, and a mounting brace for the firewall. Also, the heads were drilled out and prepared for rods to hold the zoomie pipes in place, and rods on top for the injector tube assembly. Some gold paint for the motor too, looks good my opinion with shiny metal and brushed aluminum.
Next up will be moving forward to tackle the front suspension.
Mike..
|
|
|
|
Post by arcticwolf on Feb 18, 2020 15:50:55 GMT -8
Love your work. I have a pair of these, 1/25th, rubber, like new, I'll probably never have any need for them, if they're any use to you (or anybody else) just let me know.
cheers
Paul
Hi Paul, those look like my go to tire for altereds and dragsters. Bad for me I live in Europe.... Did you add the "10.50 x 15.00", mine are 11.50 x 16.00?
Mike
No, they came lettered that way. I believe they are 15", I have Cragars that they fit perfectly, Revell rims are too big, so I would think 15" is accurate.
Paul
|
|
|
|
Post by mickgee on Feb 21, 2020 12:54:55 GMT -8
Thanks Paul for the precise info. I had a closer look at what I use and indeed, they're bigger, 11.75x16.
By the way, these tires are very close (the 11.75's) to scale, which makes them fit the scale cars I like to build.
Your efforts are appreciated.
Mike...
|
|
|
|
Post by mickgee on Feb 27, 2020 0:59:07 GMT -8
WIP update, front axle....
Finally a system figured out that makes fabrication a lot quicker and easier for the steerable front axle. Plus the header zoomies are set up and ready to be finished up. Everything has to be lined up before I can solder up the tube bending slits.
Here the newest photos;
Seat
Zoomies
Front axle
Today the tie rod and two radius rods and the steering rod will be tackled.
Mike..
|
|