|
|
Post by pnance26 on Aug 3, 2020 10:12:29 GMT -8
So, it's on to the ride that almost took Niki Lauda's life in 1976 at the Nurburing. Lauda had tried to lead a driver refusal to race after weather indicated there was to be rain. He lost the vote by one. This was the last race to be run on the 14.19 mile track. Because of the length of the track, only 14 laps were scheduled. The sheer size of the circuit meant several things, not the least of which the weather could be considerably different in different parts of the track. It also made television coverage impossible. But the most dangerous part of the course was the lack of emergency response units around the track. Normally, there would be first aid and safety all the way around. It would take five times as many marshals, track workers, and aid personnel as a normal track and the German organizers were unable to provide all the workers necessary for a safe race. Lauda started second, next to his rival James Hunt, on the front row. Lauda, as well as most of the field, started the race on "wets" but changed to dry tires at the end of lap one. "Just after the fast left kink before the Bergwerk right hand curve, his Ferrari 312T2 snapped to the right and spun through the fencing into an earth bank. The car bounced back onto the track, enveloped in flames. Guy Edwards managed to avoid the Ferrari, but Harald Ertl and Brett Lunger both hit it. All three drivers stopped and tried to get Lauda out of the flames and they were joined by Merzario, who stopped his Wolf Williams after seeing the wreck. Lauda had suffered serious burns and was rushed by helicopter to the Bundeswehr hospital in Koblenz; from there he was flown to the Trauma Clinic in Ludwigshafen, home to Germany's most advanced burn ward at the time, where he fought for his life for the next few days."-Wikipedia So here we go, with a 44 year old kit! I am sure some of the teeny weeny parts are brittle so I need to exercise extreme caution and patience.  |
|
|
|
Post by chrissmith on Aug 3, 2020 11:57:13 GMT -8
Should be as much fun as the T...are you going to dump some extra coin into this build 😉
|
|
|
|
Post by 2whl on Aug 3, 2020 12:15:12 GMT -8
I've never seen the insides of that kit. It will interesting watching you build it.
|
|
|
|
Post by Chris K. Hale on Aug 3, 2020 12:23:12 GMT -8
The detail is nice and other than instructions in Italian a straight forward build. Lots of good stuff can be added to make it a very well detailed model Chris
|
|
|
|
Post by pnance26 on Aug 3, 2020 13:46:15 GMT -8
Should be as much fun as the T...are you going to dump some extra coin into this build 😉 Not planning it at this point, Chris! I check into wheels and they are around $325 a set. I think I would rather be saving as much as I can so I can buy the 156 Dino Sharknose without major guilt! |
|
|
|
Post by pnance26 on Aug 3, 2020 13:48:11 GMT -8
I've never seen the insides of that kit. It will interesting watching you build it. Inside the kit is lots of little parts and bags to put them in! LOL! It is a bit fiddly but Protar can be that way. First hurdle is the get the floor painted with gloss aluminum and the red that makes the bottom of the side pods. I didn't think I would get to the floor quite so quickly. Photos to follow. |
|
|
|
Post by pnance26 on Aug 3, 2020 13:48:58 GMT -8
The detail is nice and other than instructions in Italian a straight forward build. Lots of good stuff can be added to make it a very well detailed model Chris Do you have a source and some ideas about the "good stuff". I would be willing to take a look and consider! |
|
|
|
Post by pnance26 on Aug 3, 2020 14:15:48 GMT -8
Step 1- front end... complete  Step 2- steering rack and brake canisters- complete  Step 3 in paint since bottom of side pods are part of tray  Steps 1 and 2 joined by hose lines...  |
|
|
|
Post by pnance26 on Aug 3, 2020 14:26:49 GMT -8
And our first problems rear their ugly little heads, both on the tub... First, said tub is fairly warped. I think the screws with straighten that out...  And second, it appears there is a piece broken off that is kind of crucial to holding an huge piece of front suspension. I am pretty sure I can rebuild it. I have gotten pretty good at thinking through stuff like this!  |
|
darylh
Full Time Ride

Posts: 126
|
Post by darylh on Aug 5, 2020 8:27:26 GMT -8
I'm watching with great interest. My one Protar build was the Ferrari 312B2 and it was a different sort of build with some details petite and well represented and other details that looked like they were carved with a rock.
|
|
|
|
Post by Chris K. Hale on Aug 5, 2020 8:54:08 GMT -8
The detail is nice and other than instructions in Italian a straight forward build. Lots of good stuff can be added to make it a very well detailed model Chris Do you have a source and some ideas about the "good stuff". I would be willing to take a look and consider! I would be replacing a bunch of plastic suspension parts with thin wall stainless steel tubing and RB Motion rod ends, as well as detailing with Archer decal resin rivet, weld lines and bolt heads. I would be using RB Motion nuts, bolts, AN fittings and proper stainless brake lines, fuel lines, etc. Some Model Factory Hiro lines too. I use a bunch of Hobby Design photo etch brackets, hose clamps, Gauge trim rings , really a bunch of their stuff made for other uses but can be used to replace plastic parts. Aluminum oil tank, starter, pulley's etc That's a lot of GOOD Stuff!!! I buy mostly from BNA Models (Australia) Spot Model (Spain) RB Motion Direct, Scale Hobbyist for paints and parts, and a few more. Shipping from Spot and BNA is not really too bad and sometimes less than USPS, but it might take a little longer..... Chris |
|
|
|
Post by chrissmith on Aug 5, 2020 14:03:00 GMT -8
Do you have a source and some ideas about the "good stuff". I would be willing to take a look and consider! I would be replacing a bunch of plastic suspension parts with thin wall stainless steel tubing and RB Motion rod ends, as well as detailing with Archer decal resin rivet, weld lines and bolt heads. I would be using RB Motion nuts, bolts, AN fittings and proper stainless brake lines, fuel lines, etc. Some Model Factory Hiro lines too. I use a bunch of Hobby Design photo etch brackets, hose clamps, Gauge trim rings , really a bunch of their stuff made for other uses but can be used to replace plastic parts. Aluminum oil tank, starter, pulley's etc That's a lot of GOOD Stuff!!! I buy mostly from BNA Models (Australia) Spot Model (Spain) RB Motion Direct, Scale Hobbyist for paints and parts, and a few more. Shipping from Spot and BNA is not really too bad and sometimes less than USPS, but it might take a little longer..... Chris The big man has you guided in the right direction!! |
|
|
|
Post by pnance26 on Aug 5, 2020 17:29:40 GMT -8
Like I said, this is an old kit and I am finding it to be very brittle. I am not sure it is worth the investment.
I would like to save as much money as I can to buy that one MFH kit. I am doing a little with what I have on hand. Also I am 9 steps into the construction and spending a lot of time pinning part that are breaking off... it sucks.
I am also thinking this was a kit that was under construction and got rebagged. Any way, I will keep all those resources in mind.
Thanks for the suggestions and support!
Pictures to follow tomorrow...
|
|
|
|
Post by Chris K. Hale on Aug 5, 2020 17:48:34 GMT -8
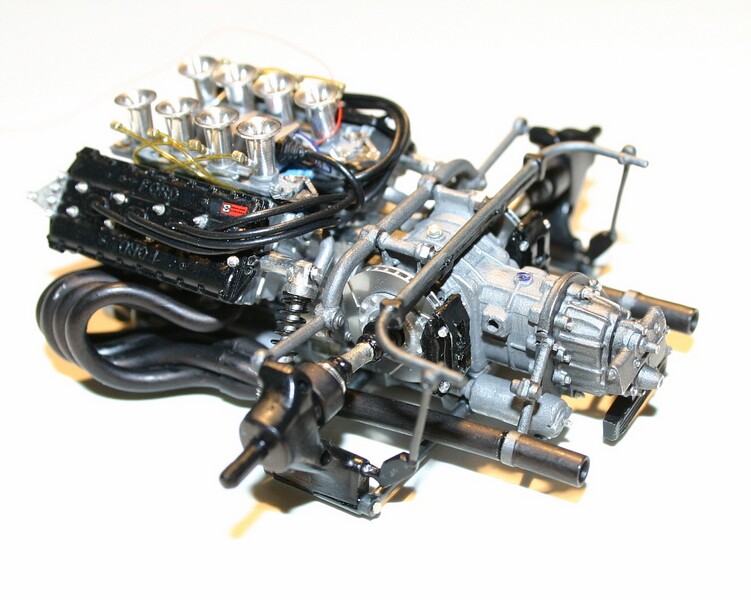 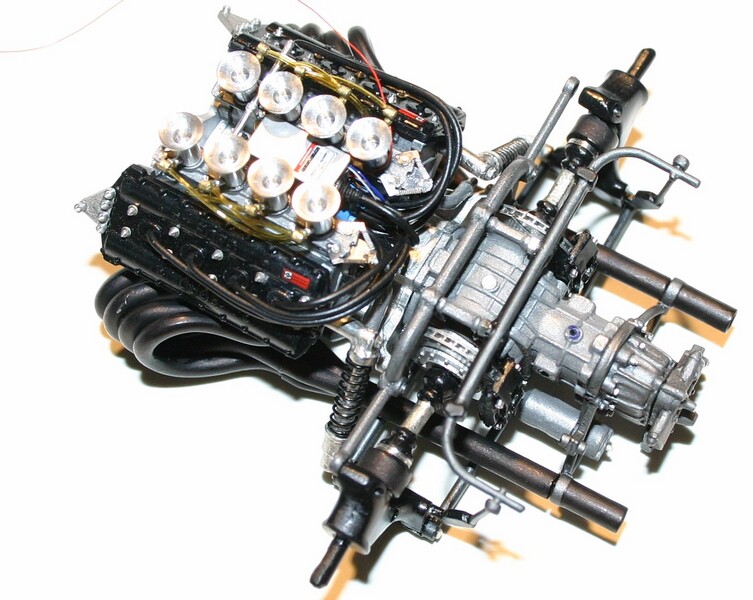 This is a Ford DFV out of the Tamiya P34 Tyrrell I did up to go in a MFH Trans kit. I added all the good stuff to it , another project in waiting.. it's 1/20th too! Chris ps. Yes, it can be expensive to add a lot of detail this way! |
|
|
|
Post by arcticwolf on Aug 5, 2020 20:31:15 GMT -8
Nice Cosworth Chris!
|
|


