|
|
Post by Joel_W on Nov 10, 2021 7:07:16 GMT -8
Chris,
Thanks for checking up on me and my progress to date. It's been almost 10 days since my last update. My modeling time has been cut back somewhat between all of my wife's and mine doctor's appointments and tests, as they've found several health issues, which is never good news at my age.
My plan is to finish decaling just the body shell, then a update. And I'm almost there. The decal scheme is very complex with a combination of large body decals, smaller multi-colored decals where placement is absolutely critical as the next decal butts right up against it. Then throw in Carbon Fiber decals just to make it a little more interesting, and of course so many multi layered decals to spice it up even more.
I'm working with the excellent SK decals for the main decals, the kit decals where they're not on the SK decal sheet, and the Nunu Detail up decals which is 3 pages of just Carbon Fiber decals. Actually, all 3 decal sources have some form of Carbon Fiber decals, so I've been mixing and matching as need be. the nose is a combination of black, white, and carbon fiber decals that took days to do.
But as I've said, the body shell is almost done. a rough est. is about 60 decals applied at this point, and with my very slow decaling method, it adds a lot of time to the job.
joel
|
|
m2
Rookie

Posts: 24
|
Post by m2 on Nov 10, 2021 8:57:25 GMT -8
Joel, hope you are feeling better. That's a lot of decals. Looking nice so far. I have the same SK sheet for mine but I think it will be awhile before I build it.
|
|
|
|
Post by chrissmith on Nov 10, 2021 13:00:45 GMT -8
Just keep plugging away, looking forward to seeing it in your next post
|
|
|
|
Post by Joel_W on Nov 10, 2021 15:24:39 GMT -8
Thanks guys for the support, it's always greatly appreciated. As long as the Doctor lets me go home, which he better be, I'll be able to finish up the basic body shell decaling and take the pictures for the update.
joel
|
|
|
|
Post by Ben_B on Nov 11, 2021 2:44:03 GMT -8
Joel,
I hope you're able to get back in action soon!
Ben
|
|
|
|
Post by Joel_W on Nov 12, 2021 6:27:12 GMT -8
Thanks Ben. I'm still finding it hard to believe that I went to my Doctor for a simple issue, and wound up with 5 major ones. Go figure that one out.
I'm still building just about every day for a few hours, and I'm almost done with the decals for the body shell. More then 60 decals so. That's insane. We've got two different doc appointments today and one tomorrow for my wife's Hip surgery next week, so time will be a little hard to come by right now. Still hoping to get a update done one way or the other this week.
joel
|
|
|
|
Post by Joel_W on Nov 13, 2021 6:15:48 GMT -8
Well, finally it’s time for another major update. Since my last update where I just started the massive decaling effort for the basic body shell, I’ve been working for the last 10 days little by little to apply more then 60 decals from 3 different sources. SK Decals for the RLL Team decals, and some of the Carbon Fiber decals. Nunu’s Detail set for the majority of the Carbon Fiber decals. Kit Decals for the few sponsors and secondary decals that SK omitted. I must say that the SK and Nunu’s Detail up decals are a pure joy to work with. Perfect color registration, absolutely no bleed through of Red nor Black that can be seen in either the White or Red decals from either source. Now that’s a 1st for me. The decals are just thin enough to conform using my 3 part decaling system that I borrowed from Paul Budzik of Microscale Set, Sol, and then a light coat of Solvaset. It does take me longer then most of you to lay down a decal, as I let the solutions do 90% of the work before I gently touch or roll them with a dampened Qtip. I’ve recently added sort of a 4th solution that’s what I use under the decal rather then just the water I dampen the decal in. It’s basically tap water, with two drops of Dawn detergent, and 12 drops of the Micro Set into a empty Micro set bottle then filled to the top. I use this solution rather then the decal wetting solution as each decal adds just a little of it’s backing glue to the water as it loosens up from the backing paper. So my mixture stays consistent, lets me move the decal into it’s final position, and then when lightly tamped down starts to soften the decal just a tad. You’ll notice that in most of the openings for the various intake radiators, and light fixtures, etc. that the decals are only rolled in with no effort to cover the entire space. That’s because all those areas will be completely covered by whatever fixture or grill is inserted into each opening. Odds are I’m going to have to lightly sand a lot of those excess decals if the parts don’t slide into proper position without the need for any additional pressure. Here’s a few pictures of the body shell with just the Gravity paint buffed with 6,000, then 8,000 Micro Mesh followed by the decals. No clear coats as yet. joel      |
|
|
|
Post by pnance26 on Nov 13, 2021 10:26:02 GMT -8
Very nice work! Glad to see you back at it!
|
|
|
|
Post by Joel_W on Nov 14, 2021 6:31:11 GMT -8
Patrick,
Thanks so much for stopping by and liking what I've accomplished to date, it's always greatly appreciated.
joel
|
|
|
|
Post by Joel_W on Nov 22, 2021 10:08:24 GMT -8
I’ve found a little time here and there in between visiting my wife in the hospital and actually being able to concentrate on the build for a little while. Work continued on the body shell with the prep of the front and rear plexi glass as well as both side Plexi windows. unlike every other build I’ve done to date where I masked the rubber seals either front or back as the case may be, this time the Nunu Detail Up set actually had decals for them. So I thought that I’d try them out as they looked darn good to me. The one “could be an issue” I saw is that the decals are applied in sections. So I decided what the heck and gave the front windshield the honor of being the official test case. the front windshield has 6 decals: the 4 sides, the sun visor, and the inspection sticker. The rubber seal decals are applied from the inside, while the sun visor is applied on the outside as is the inspection sticker. When dried and cured the next day I added the window support braces that I’m also assuming protects the driver from the windshield from coming into the cockpit in case of an accident from one of the PE frets using thin CA.  Here’s a pic of back just so you can see how perfectly the decals fit without any touch ups needed. ![]()  The back plexi glass was a little more complicated besides the 4 sections, as the top section had to conform to a molded in air intake, which it did just fine. Then the scoop and the two exhausts were decaled as well rather then masking and air brushing. What a pleasure as they fit perfectly.  The two side windows are Carbon Fiber, and the Detail Up set had them as well. Each window’s frame was constructed out of 3 decals. The fit was slightly oversized, but a little trimming took care of that issue. After the decals had cured for a day, i added the gas receptacle on one side and the cap on the other side as refueling is only allowed on the side closest to the pit but can vary from race to race.  Last up is clear glossing the body shell, and then it’s chassis time. joel |
|
|
|
Post by Ben_B on Nov 22, 2021 12:04:43 GMT -8
Looks great, Joel! I was hesitant of using the black trim decals on the inside of the clear parts on my M8 after I had problems with them on my M6. They'd lift off, allowing the window to fall out. No such problems on the M8. Good catch on the reinforcing bands on the windshield. I never noticed the car having them.
Ben
|
|
|
|
Post by Joel_W on Nov 22, 2021 19:36:11 GMT -8
Thanks Ben for stopping by and checking out my progress to date, it's always greatly appreciated. Thanks for the heads up on gluing the windows in place with the decals on the inside. I'm planning on using Revell's clear glass glue.
As for the window bands, you can't see them on the box art, but i did notice them in many of my reference pictures, and then looked for them in the Detail Up instructions which isn't the easiest thing to follow for sure.
BTW, have you started the Ford Sierra RS500 as yet?
joel
|
|
|
|
Post by pnance26 on Nov 23, 2021 5:59:47 GMT -8
Very nice work, Joel! If only all kits had decals for the window surrounds (rubber seals). It would make life so much easier!
|
|
|
|
Post by Joel_W on Dec 18, 2021 9:47:30 GMT -8
Been a while, but I’ve finally managed enough bench time to make some progress on my Bimmer. 1st up was finally finishing the rear wing. I painted it semi gloss Black then a single carbon fiber decal wraps around the entire wing including what I still call a Gurney Flap. The M8 has a BMW sponsor decal on both the top and bottom as well as red side plates. Top side  Bottom side  Next up I started the chassis and both front and back suspension which are basically just the upper and lower wishbones to hold the wheel/brake assemblies and the shocks. The bottom of the chassis was primed with my mixture of Tamiya LC primers then 3 coats of Tamiya LP Semi Gloss Black.  I still need to apply the carbon fiber decals if I want to go that route. the front twin radiators and housing got assembled next and the radiator fronts and backs had PE ones added.  I painted it Matt Black then painted the radiators Metallic Gun Metal to better replicate a new radiator.  Next up was the 4 disc brake assemblies which I used polished PE parts for the discs. For some reason Nunu in their detail up set decided that there’s no reason to include the PE discs for the backs. Makes absolutely no sense to me.  Here’s a quick picture of how the disc brake assembly will look inside one of the wheels. The wheel is straight off of the sprue tree at this point. I gotta admit that I do like the overall look.  One strange decision by the designers was to include the rear end, the back half of the drive shaft, and the two rear axles. So I primed, painted, masked and AB’d Steel on all three shafts that I found out can’t be seen from any angle once the interior tub is glued into place.   This is as far as I’ve gotten to date, and with both my wife and I seemingly going to doctors and specialists weekly, plus my 1st of two surgical procedures coming up soon, work will continue at my snail's pace. joel |
|
|
|
Post by Joel_W on Jan 1, 2022 17:43:22 GMT -8
My focus over the last few weeks has been completing the major sub assemblies for the interior. The Dash, door cards, Driver’s seat, what I’m assuming is a large air intake, the roll cage, the steering wheel were all built, as well as the interior pan, then they were primed in my basic mixture of Tamiya Gray/White lacquer primer. The roll cage and the chassis pan were painted in Tamiya X-2 Gloss White. I then hand painted the various molded electrical boxes Tamiya FX-1 Flat Black, and the two intakes for the gas tank, and cover for what I think is the fuel pump area Acrylic Flat Aluminum. The center consul top is a Carbon fiber decal. The structural raised area in the front right had a Aluminum sticker supplied with the kit, but try as I might I couldn’t get it to lay down flat, so I replaced it with Chrome Bare Metal Foil. The dash steering wheel assemblies were air brushed with Mr. Color Semi gloss Black, then the 4 computer screens had their decal faces applied.  The Door cards were also painted with Mr. Color semi Gloss Black, and then the large Carbon fiber decals were applied which was no easy task as the door cards had several recesses and raised areas that asked more of those decals then I thought they could conform to. But the Microscale system, especially the Sol really helped, and then the Solvaset worked it’s magic. The end results are more then acceptable. 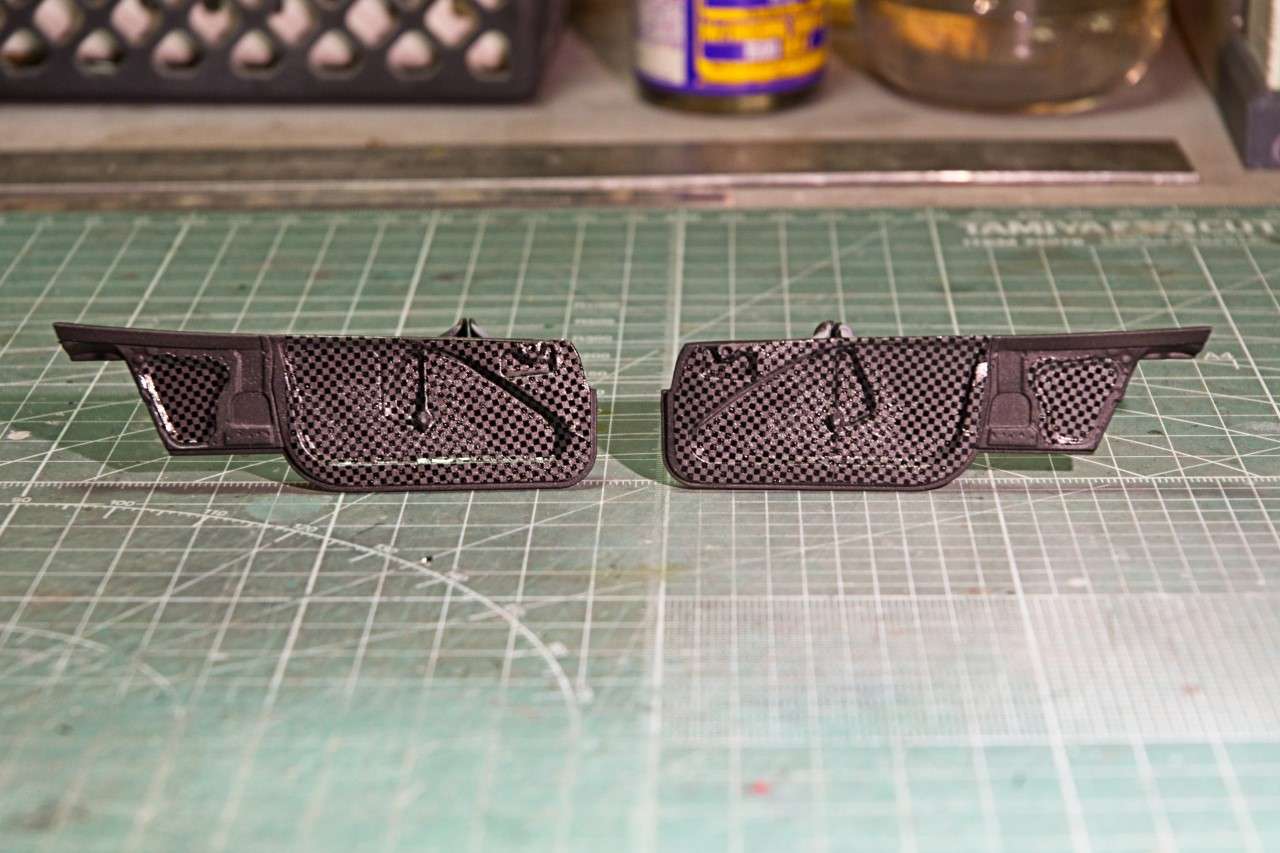 Next up was that large air intake. All four sides received plus the V were separately decaled.  The dash assembly was dry fitted in the roll cage and the fit was perfect.  Next to addressed was the seat. It also was air brushed with Mr. Color Semi Gloss Black to represent the driver’s shell. The outside of the seat is Carbon Fiber. The detail up set has one decal that has to wrap around from one side, the back, and then the other side. Well, I couldn’t for the life of me get it to remotely lay down. So put it back on it’s backing paper and let it dry for a few hours. I then cut it in half, and then cut each piece in half once again. The 4 pieces each laid down just fine, but I now have 3 seams when I shouldn’t have any. Still, it looks way better then my 1st attempt.  Finally, I dry fitted all the assemblies.  Next up is tackling the 6 way racing harness and all that PE, the tires/wheels, and then it’s back to more detail work and decaling on the body shell. joel |
|


